Tabla de contenido
Publicidad
Idiomas disponibles
Idiomas disponibles
Enlaces rápidos
Installation and Maintenance Instructions
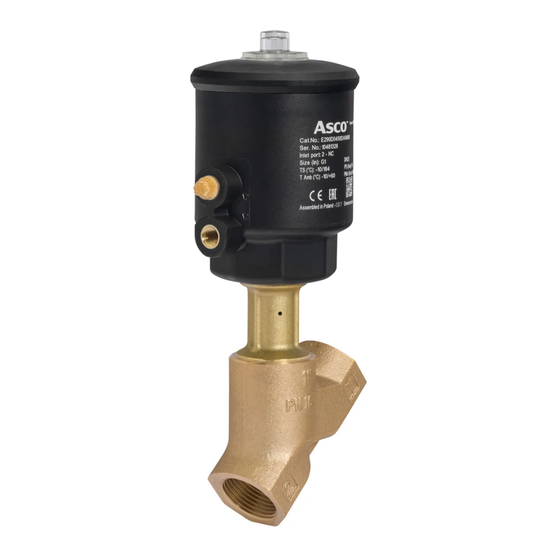
ASCO™ Series 290-390 Valves with a Signaling Box IO-Link
DESCRIPTION (
ASCO™ pressure operated normally close valves (NC) and
normally open valves (NO) can be equipped with a signaling box
IO-Link
series 890 that allows precise monitoring of the 2 valve
®
stem positions (open and close). It consists of a box containing
a linear potentiometer and a processor using IO-Link
communication protocol that allows for setpoint, feedback and
parameters data. A variant exists with an internal pilot allowing
control of the valve. It has LED status indication for visualization
of valve position and control.
Intended use
The signaling box is intended to be used with ASCO™ 290 and
390 Series pressure operated valve for the purpose of being
used in general industries.
Essential Health and Safety Requirements:
This product complies with the EMC Directive 2014/30/EU and
RoHS 2011/65/EU.
OPERATION
The internal potentiometer and software of the signaling box
detect the end of travel of the valve in open or close condition
and transfer the information thru the IO-Link
protocol.
When the internal pilot valve is present, it is operated by the
IO-Link
Signaling box depending on the setpoint. The internal
®
pilot is 3/2 normally close type. When the pilot is energized,
valve actuator is operated. When the pilot is depressurized or
de-energized, the valve moves to its rest position.
Working condition / Characteristics
• Supply pressure: Max 10 bar
• Ambient and pilot fluid temperature: 0 to +50°C
• Nominal supply voltage 24 V DC ± 10%, max. ripple 10%
• Power: 5.7 W (internal pilot version ) / 3 W ( No pilot version)
• IO-Link
®
- IO-Link
communication for setpoint and feedback and
®
parameters
- IO-Link Protocol Specification V1.1
- IO-Link Port Class A Device with COM3 (230.4 kBaud)
- Process data :
■ 1 Byte IN
■ 8 Byte OUT: Status bytes for errors/maintenance/
auto initialization/fully closed or open
Requirement for power supply
Operate the product only on a voltage source that is suitable
for PELV (Protective Extra Low Voltage) and which ensures
safe electrical isolation of the operating voltage from the
mains according to IEC/DIN EN 60204-1 (accident prevention).
Additionally: The general requirements for PELV circuits
according to IEC/DIN EN 60204-1 must be observed.
Air quality:
Air or inert gas filtered 50 µm, unlubricated, condensate-free
and water-free according to ISO 8573-1:2010 [7:4:4]
Ingress Protection level of apparatus
IP66 according to IEC 60529
IP69K (option) according to ISO 20653
Vibration
Max 1g /10-150Hz in 3 axes per EN 60068-2-6.
LED Status indication ( VI,
LED 1,
yellow
= valve open position
LED 2,
green
= valve close position
LED 3,
white
= status
LED 4,
red
= error
LED 5,
orange = check function
LED 6,
blue
= maintenance required
LED 7,
green
= Signal for IO-Link
I and II, page 35)
class A
®
communication
®
36)
page
®
Visit our website at Emerson.com/ASCO
Series 890
®
Description
Valve OPEN
Valve CLOSED
Initialization mode
Manual mode
Signaling box not initialized
Component error
Connection to IO-Link
Valid set point for IO-Link
No connection to IO-Link
Description
IO-Link
identification
®
Status signal
Maintenance required
Still valid output signal
Out of specification
Signal out of the specified range
Function check
Temporary non-valid output signal
Failure (= Component ERROR)
Non-valid output signal
LED on
LED slow fashing
LED quick flashing
Additional Specifications:
NCS (Non condensing system) option gives a permanent internal
air leakage to avoid moisture inside the enclosure. A specific
assembly kit is used to maintain pressurization of the enclosure.
The device must be kept in its original packaging as long as it
is left unused. Do not remove the protective covers from the
ports. Storage conditions: protected from exposure to weather;
storage temperature: -10°C to +70°C; relative humidity: 95%.
After storage at low temperature, the device must gradually be
brought to room temperature prior to use.
INSTALLATION AND MAINTENANCE
( pages 35 to 39)
For installation and maintenance, refer to the general
safety instructions. For work on the valve itself, refer to the
corresponding installation and maintenance instructions.
Warning
You must be careful when you switch on the power supply and
the pilot pressure of the signaling box while cover is open.
IO-Link
is a registered trademark of Profibus Nutzerorganisation e.V.
®
1
NC
NC
1
1
2
2
•
•
•
•
3
2
2
•
•
•
•
•
•
•
•
P
P
1
P
P
•
•
• •
• •
•
•
(2) (1)
(2) (1)
(2) (1)
(2) (1)
®
master
®
®
master
STORAGE
EN
3
•
•
1
Publicidad
Tabla de contenido

Manuales relacionados para Emerson ASCO 290 Serie


Resumen de contenidos para Emerson ASCO 290 Serie
- Página 1 LED 5, orange = check function LED 6, blue = maintenance required LED 7, green = Signal for IO-Link ® IO-Link is a registered trademark of Profibus Nutzerorganisation e.V. ® Visit our website at Emerson.com/ASCO...
- Página 2 In the event of failure to set the position: - Check led status indication. - If, during an operating cycle, the stem does not move or moves abnormally: Check the pressures (valve and pilot), the operation of the valve and the control system. Visit our website at Emerson.com/ASCO...
-
Página 3: Utilisation Prévue
LED 4, rouge = erreur LED 5, orange = fonction de contrôle LED 6, bleu = entretien nécessaire LED 7, vert = Signal pour IO-Link ® IO-Link est une marque déposée de Profibus Nutzerorganisation e.V. ® Visit our website at Emerson.com/ASCO... - Página 4 En cas d'échec du réglage de la position: e. Fermer le capot avec le joint approprié et le serrer à la main - Vérifiez la LED d’indication d’état. jusqu'au contact complet entre le capot et le corps (VII). Visit our website at Emerson.com/ASCO...
-
Página 5: Installation Und Wartung
Bei rauer Umgebung mit Staub- und/oder Wasserspritzern LED 6, blau = Wartung erforderlich müssen die Entlüftungsanschlüsse des Signalbox und des Ventils LED 7, grün = Signal für IO-Link ® kanalisiert werden. IO-Link ist ein eingetragenes Warenzeichen der Profibus Nutzerorganisation e.V. ® Visit our website at Emerson.com/ASCO... - Página 6 Stellen Sie sicher, dass sich keine Fremdkörper und keine kann der Systembefehl "Start Auto Initialization" über die Feuchtigkeit im Inneren der Box befinden und dass die Box IO-Link-Kommunikation gesendet werden (Index 2 : Wert ordnungsgemäß gegen Verdrehung gesichert ist. 163). Visit our website at Emerson.com/ASCO...
- Página 7 Bei einem Fehler steht ein Fehlercode im Statusbyte in den IO-Link-Prozessdaten. e. Schließen Sie die Abdeckung mit der entsprechenden Dichtung und ziehen Sie sie von Hand an, bis der Deckel VII). vollständig am Gehäuse anliegt ( Visit our website at Emerson.com/ASCO...
-
Página 8: Funcionamiento
Vibraciones gradualmente la temperatura ambiente antes de usarse. Máximo 1g /10-150Hz en 3 ejes según EN 60068-2-6. IO-Link es una marca registrada de Profibus Nutzerorganisation e.V. ® Visit our website at Emerson.com/ASCO... -
Página 9: Instalación Y Mantenimiento
- Para salir del modo manual, vuelva a pulsar simultáneamente VI, "4" + "6") entre 3 y 5 segundos; el disco se los botones ( restablecerá automáticamente en la posición de consigna. (totalmente abierto o cerrado) Visit our website at Emerson.com/ASCO... - Página 10 IO-Link. e. Cierre la tapa con la junta correspondiente y apriétela a mano hasta que haya un contacto completo entre la tapa VII). y el cuerpo ( Visit our website at Emerson.com/ASCO...
- Página 11 °C; umidità relativa: 95%. Dopo uno stoccaggio a bassa Max 1g /10-150Hz in 3 assi secondo la norma EN 60068-2-6. temperatura, il dispositivo deve essere gradualmente riportato alla temperatura ambientale prima dell’uso. IO-Link è un marchio registrato dif Profibus Nutzerorganisation e.V.. ® Visit our website at Emerson.com/ASCO...
-
Página 12: Installazione E Manutenzione
VI, "6") per chiudere: La valvola Premere il pulsante inferiore ( serrarlo a mano fino ad avere un contatto completo fra il VII). si chiuderà completamente. coperchio e il corpo ( Uscire dalla modalità manuale: Visit our website at Emerson.com/ASCO... - Página 13 IO-Link. e. Chiudere il coperchio con la guarnizione appropriata e serrarlo a mano fino ad avere un contatto completo fra il VII). coperchio e il corpo ( Visit our website at Emerson.com/ASCO...
-
Página 14: Installatie En Onderhoud
LED 4, rood = fout LED 5, oranje = controlefunctie LED 6, blauw = onderhoud nodig LED 7, groen = Signaal voor IO-Link ® ® IO-Link is een geregistreerd handelsmerk van Profibus Nutzerorganisation e. V.. Visit our website at Emerson.com/ASCO... - Página 15 ( teruggezet. (volledig open of dicht) - Sluit de kap met de juiste afdichting en draai hem met de hand VII, "3"). vast totdat de kap en het huis volledig contact maken ( Visit our website at Emerson.com/ASCO...
- Página 16 Als er een fout optreedt, kun je een foutcode vinden in de statusbyte in de IO-Link-procesgegevens. e. Sluit de kap met de juiste afdichting en draai hem met de hand vast totdat de kap en het huis volledig contact VII). maken ( Visit our website at Emerson.com/ASCO...
- Página 17 är åtdragna med alla LED 7, grön = Signal för IO-Link ® tätningar på plats. Enheten får endast användas med locket stängt. IO-Link är ett registrerat varumärke som tillhör Profibus Nutzerorganisation e.V. ® Visit our website at Emerson.com/ASCO...
- Página 18 - Om spindeln inte rör sig eller rör sig onormalt under en arbetscykel: Kontrollera trycket (ventil och pilot) samt ventilens och styrsystemets funktion. - Kontrollera om det finns invändiga skador eller förekomst av fukt. Om felet inte har åtgärdats eller identifierats, kontakta kundtjänst. Produktbyte Visit our website at Emerson.com/ASCO...
- Página 19 à Máx. 1g /10-150Hz em 3 eixos, de acordo com EN 60068-2-6. temperatura ambiente antes da utilização. IO-Link é uma marca registrada da Profibus Nutzerorganisation e.V. ® Visit our website at Emerson.com/ASCO...
-
Página 20: Instalação E Manutenção
- Para sair do modo manual, pressione novamente em simultâneo VI, "4"+"6") durante 3 a 5 segundos; o disco será os botões ( automaticamente restaurado para a posição do ponto de ajuste. (totalmente aberto ou fechado) Visit our website at Emerson.com/ASCO... - Página 21 IO-Link ® e. Feche a tampa com a junta adequada e aperte-a manualmente até ao contacto completo entre a tampa e VII). o corpo ( Visit our website at Emerson.com/ASCO...
- Página 22 LED 4, červená = chyba LED 5, oranžová = zkontrolujte funkci LED 6, modrá = požadována údržba LED 7, zelená = Signál pro IO-Link ® IO-Link je registrovaná ochranná známka společnosti Profibus Nutzerorganisation e.V. ® Visit our website at Emerson.com/ASCO...
- Página 23 úplnému kontaktu mezi krytem a tělem VII). - Zkontrolujte indikaci stavu vedené. - Pokud se během pracovního cyklu dřík nepohybuje, nebo se pohybuje neobvykle: Zkontrolujte tlaky (ventil a pilot), funkčnost ventilu a řídicího systému. Visit our website at Emerson.com/ASCO...
-
Página 24: Zasada Działania
Wibracje Specjalny zestaw montażowy służy do utrzymania ciśnienia w Maks. 1 g /10-150 Hz w 3 osiach wg normy EN 60068-2-6. obudowie. IO-Link jest zastrzeżonym znakiem towarowym firmy Profibus Nutzerorganisation e.V. ® Visit our website at Emerson.com/ASCO... - Página 25 Ręczne otwieranie i zamykanie VI). Alternatywnie użyć komunikacji IO-Link, aby Możliwe jest ręczne otwieranie i zamykanie zaworu podczas wysłać polecenie systemowe "Rozpocznij automatyczną normalnej pracy tylko w przypadku wersji z pilotem wewnętrznym. inicjalizację” (Indeks 2: Wartość 163). Visit our website at Emerson.com/ASCO...
- Página 26 Jeśli wystąpi błąd, kod błędu można znaleźć w bajcie statusu danych procesowych IO-Link ® e. Zamknąć pokrywę przy użyciu odpowiedniej uszczelki i dokręcić ją ręcznie aż do całkowitego zetknięcia pokrywy VII). z korpusem ( Visit our website at Emerson.com/ASCO...
- Página 27 Светодиод медленно мигает [7:4:4] Светодиод быстро мигает Уровень защиты от попадания посторонних частиц IP66 в соответствии с IEC 60529. IP69K (опция) в соответствии с ISO 20653. IO-Link является зарегистрированным товарным знаком Profibus Nutzerorganisation e.V. ® Visit our website at Emerson.com/ASCO...
-
Página 28: Установка И Обслуживание
1. Для нормально закрытых клапанов смонтируйте гибкую 3- Соединения ( III). Затяните с указанным трубку "9" на соединении (B) ( Установите все электрические и пневматические моментом. соединения. 2. Для нормально открытых клапанов смонтируйте гибкую Visit our website at Emerson.com/ASCO... - Página 29 текущем положении клапана. При возникновении ошибки ее код можно найти в байте состояния в данных процесса интерфейса связи IO-Link. e. Закройте крышку с соответствующей прокладкой и затяните крышку рукой до полного контакта крышки VII). с корпусом ( Visit our website at Emerson.com/ASCO...
- Página 30 ISO 20653 стандартына сәйкес IP69K (opcïya). Жарық диоды баяу жыпылықтайды Діріл Жарық диоды жылдам жыпылықтайды EN 60068-2-6 стандарты бойынша 3 білікте макс. 1 г/10–150 Гц. IO-Link – Profibus Nutzerorganisation e.V. компаниясының тіркелген сауда белгісі. ® Visit our website at Emerson.com/ASCO...
- Página 31 "9", "10") орындаңыз. 1. ҚЖ нұсқасы үшін иілгіш түтікті "9" қосылымда (B) 4 - Жаңа құрылғыны баптандыру III). Көрсетілген айналдыру моментімен құрастырыңыз ( Бұл процедура қозғалыстың соңғы позицияларын жазып бекітіңіз. алу үшін қажет Visit our website at Emerson.com/ASCO...
- Página 32 клапанның ағымдағы күйі туралы сигнал береді. Егер қате орын алса, қате кодын IO-Link процесінің деректеріндегі күй байтынан табуға болады. e. Қақпақты тиісті төсеммен жауып, қақпақ және корпус VII). бір-біріне толық тигенше, қолмен бекітіңіз ( Visit our website at Emerson.com/ASCO...
- Página 33 工作, 请参阅相应的安装和维护指南。 警告 在盖子打开的情况下, 打开信号箱的电源和先导压力时务必小心. 注意 如果遇到有灰尘或水喷射的恶劣环境时, 信号箱和阀门的排气口应采 用管道排放方式。 为避免因灰尘或湿气渗透而造成损坏, 请确保在所有密封件都已到位 的情况下拧紧电缆密封套和盖子。 操作设备必须关闭其盖子。 确保未使用的孔口 ( “I” 、 “ III” 、 “ A” ) 没有用塞子密封。 孔口必须保 持打开。 IO-L ® 是 P .V. 的注册商标。 rOfIbus utzerOrganIsatIOn e Visit our website at Emerson.com/ASCO...
- Página 34 确保螺钉 “11” 是松开的。 ( III, "11" + VIII, "11") c. 将新的装置组装到支架 “12” 上。 (X/XII) d. 确定气动连接方向 “8” , 使其面向阀门的导向孔 “9” 并连接管 “10” 。 ( III, "10") e. 用螺钉 “11” 将装置固定到位; 以规定的扭矩拧紧。 ( X/XII) Visit our website at Emerson.com/ASCO...
-
Página 35: Supply Connection
LED 5 LED 6 Piloting connection Supply connection Exhaust connection Visit our website at Emerson.com/ASCO Visit our website at Emerson.com/ASCO... - Página 36 LED 5 LED 6 LED 2 LED 2 LED 3 LED 1 LED 4 LED 7 Visit our website at Emerson.com/ASCO Visit our website at Emerson.com/ASCO...
- Página 37 VIII 3 mm 6 mm Visit our website at Emerson.com/ASCO Visit our website at Emerson.com/ASCO...
- Página 38 items Inch.pounds 5 ±10% 44 ± 10% 1.5 ±10% 13.3 ± 10% Visit our website at Emerson.com/ASCO Visit our website at Emerson.com/ASCO...
- Página 39 5 ±10% 44 ± 10% 1.5 ±10% 13.3 ± 10% Emerson Automation Fluid Control & Pneumatics Poland Sp. z o. o. Emerson Automation Fluid Control & Pneumatics Poland Sp. z o. o. ul. Kurczaki 132 ul. Kurczaki 132 93-331 Lodz POLAND Visit our website at Emerson.com/ASCO...