Tabla de contenido
Publicidad
Idiomas disponibles
Idiomas disponibles
Enlaces rápidos
Publicidad
Capítulos
Tabla de contenido

Manuales relacionados para EAS ELECTRIC EMIH290-3S


Resumen de contenidos para EAS ELECTRIC EMIH290-3S
- Página 1 Placa de inducción Induction Hob MANUAL EMIH290-3S www.easelectric.es...
-
Página 2: Tabla De Contenido
Contenidos 1. Prefacio.................... 4 1.1 Advertencias de seguridad............4 1.2 Instalación................. 4 1.2.1 Peligro de descarga eléctrica..........4 1.2.2 Peligro de corte.............. 4 1.2.3 Instrucciones importantes de seguridad....... 4 1.3 Funcionamiento y mantenimiento..........6 1.3.1 Peligro de descarga eléctrica..........6 1.3.2 Peligro para la salud............ - Página 3 9.6 Precauciones................24 9.7 Conexión de la encimera a la red eléctrica........24...
-
Página 4: Prefacio
1. Prefacio 1.1 Advertencias de seguridad Su seguridad es importante para nosotros. Lea esta información antes de usar su aparato. 1.2 Instalación 1.2.1 Peligro de descarga eléctrica • Desconecte el aparato de la red eléctrica antes de realizar cualquier trabajo o mantenimiento en él. •... - Página 5 • No instalar el aparato correctamente podría invalidar cualquier garantía o reclamo de responsabilidad. • Este electrodoméstico no está diseñado para ser utilizado por personas (incluidos niños) con capacidades físicas, sensoriales o mentales reducidas, o falta de experiencia y conocimiento, a menos que hayan recibido supervisión o instrucciones sobre el uso del electrodoméstico por parte de una persona responsable de su seguridad.
-
Página 6: Funcionamiento Y Mantenimiento
ADVERTENCIA: La cocción desatendida en una placa con grasa o aceite puede ser peligrosa y provocar un incendio • ADVERTENCIA: El aparato y sus partes accesibles se calientan durante el uso. Se debe tener cuidado para evitar tocar elementos calefactores. Los niños menores de 8 años se mantendrán alejados a menos que sean supervisados continuamente. -
Página 7: Peligro Por Superficie Caliente
antes de usar este aparato para asegurarse de que sus implantes no se vean afectados por el campo electromagnético. • El incumplimiento de este consejo puede provocar la muerte. 1.3.3 Peligro por superficie caliente • Durante el uso, las partes accesibles de este aparato se calientan lo suficiente como para causar quemaduras. - Página 8 sienten, se pogan de pie o trepen sobre el aparato. • No almacene artículos de interés para niños en armarios encima del electrodoméstico. Los niños que se suben a la aparato pueden lesionarse gravemente. • No deje a los niños solos o desatendidos en el área donde se usa el electrodoméstico.
-
Página 9: Instrucciones Del Producto
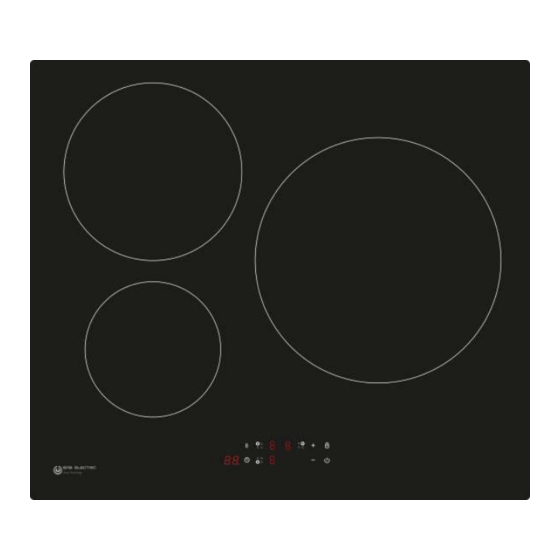
2. Instrucciones del producto 2.1 Vista superior 1. Zona Max. 1300/1500W 2. Zona Max. 2300/2600W 3. Zona Max. 2600/3000W 4. Placa de vidrio 5. Panel de control 6. Control ON/OFF 2.2 Panel de control 1. Control On/Off 2. Control del temporizador 3. -
Página 10: Antes De Usar Su Nueva Placa De Inducción
• Lea esta guía y tome nota especial de la sección "Advertencias de seguridad". • Retire cualquier película protectora que aún pueda estar en su placa de inducción. 2.5 Especificaciones técnicas Modelo EMIH290-3S Zonas de cocinado 3 Zonas Voltaje 220-240V~ 50Hz o 60Hz Energía eléctrica instalada... -
Página 11: Cómo Usarlo
No use utensilios de cocina con bordes dentados o una base curva. Asegúrese de que la base de su sartén u olla sea lisa, se apoye de forma plana contra el vidrio y sea del mismo tamaño que la zona de cocción. Utilice recipientes cuyo diámetro sea tan grande como el gráfico de la zona seleccionada. -
Página 12: Fin Del Cocinado
Seleccione un ajuste de calor tocando el control "-" o "+". • Si no elige una configuración de calor dentro de 1 minuto, la placa de inducción se apagará automáticamente. Deberá comenzar de nuevo con el paso 1. • Puede modificar el ajuste de calor en cualquier momento del cocinado. -
Página 13: Bloqueo De Los Cotroles
Activar la función Boost Toque el control de selección de zona de calentamiento. Toque el control Boost o Turbo "B", el indicador de zona muestra "P" y la potencia alcanza su máximo valor. Cancelar la función Boost Cuando toque el control "Boost" o el botón "-" para cancelar la función Boost, la zona de cocción volverá... -
Página 14: Temporizador
3.3.5 Temporizador Puede usar el temporizador de dos formas distintas: Puede usarlo como un minutero. En este caso, el temporizador no apagará ninguna zona de cocción cuando se acabe el tiempo establecido. Puede configurarlo para que apague una o más zonas de cocción una vez transcurrido el tiempo establecido. -
Página 15: Tiempos De Trabajo Predeterminados
Toque el control del temporizador, el indicador de aviso comenzará a parpadear y se mostrará "10" en la pantalla del temporizador. Ajuste el tiempo tocando el control del temporizador Sugerencia: toque el control “-” o “+” del temporizador una vez para disminuir o aumentar en 1 minuto. Toque y mantenga presionado el control "-"... -
Página 16: Consejos De Cocinado
4.1 Consejos de cocinado • Cuando la comida hierva, reduzca la temperatura. • El uso de una tapa reducirá los tiempos de cocción y ahorrará energía al retener el calor. • Minimice la cantidad de líquido o grasa para reducir los tiempos de cocción. •... -
Página 17: Cuidados Y Limpieza
incluido sus utensilios de cocina y la cantidad de alimentos que esté cocinando. Experimente con la placa de inducción para encontrar la configuración que más le convenga. Configuración de calor Idoneidad • calentamiento delicado para pequeñas cantidades de comida 1 - 2 •... -
Página 18: Consejos
Derrames en los 1. Desconecte la alimentación. • El aparato puede emitir un pitido y controles 2. Absorba el derrame apagarse, y los controles táctiles táctiles 3. Limpie el área de control táctil con pueden no funcionar mientras haya una esponja o paño limpio y líquido en ellos. -
Página 19: Visualización E Inspección De Fallos
Las sartenes no se La placa de inducción no puede Use utensilios de cocina adecuados calientan y aparece detectar la sartén porque no es para la cocción por inducción. en la pantalla. adecuada para la cocción por inducción. Consulte la sección "Elección de los utensilios de cocina adecuados". - Página 20 voltaje nominal. alimentación es normal. Encienda después de que la fuente de La tensión de alimentación está por alimentación sea normal. encima de la tensión nominal. Vuelva a insertar la conexión entre la placa de visualización y la placa de Error de comunicación alimentación.
-
Página 21: Instalación
La placa principal Reemplace la placa de está dañada. alimentación. El motor del ventilador El motor del ventilador Reemplace el ventilador. tiene un sonido anormal. está dañado. Lo descrito anteriormente es el juicio e inspección de fallos comunes. No desmonte la unidad usted mismo para evitar peligros y daños a la placa de inducción. 9. - Página 22 A(mm) B(mm) C(mm) Toma de aire Salida de aire 5mm 50 min. 20 min. ADVERTENCIA: Asegure una ventilación adecuada Asegúrese de que la placa de inducción esté bien ventilada y que la entrada y salida de aire no estén bloqueadas. Para evitar el contacto accidental de la encimera con el fondo sobrecalentado de la placa, o de recibir una descarga eléctrica inesperada durante el trabajo, es necesario colocar un inserto de madera, fijado por tornillos, a una distancia mínima de 50 mm desde la parte inferior de la placa.
-
Página 23: Antes De Instalar La Placa, Asegúrese De Que
9.2 Antes de instalar la placa, asegúrese de que La superficie de trabajo es cuadrada y está nivelada, y ningún miembro estructural interfiere • con los requisitos de espacio. La superficie de trabajo está hecha de un material resistente al calor y aislante. •... - Página 24 Bajo ninguna circunstancia, los soportes no pueden tocar las superficies internas de la encimera después de la instalación (ver imagen). 9.6 Precauciones 1. La placa de inducción debe ser instalada por personal cualificado o técnicos. Contamos con profesionales a su servicio. Por favor, nunca realice la operación usted mismo. 2.
- Página 25 3. Las secciones del cable de la fuente de alimentación pueden soportar la carga especificada en la placa de características. Para conectar la placa a la fuente de alimentación principal, no use adaptadores, reductores o dispositivos de derivación, ya que pueden causar sobrecalentamiento e incendios. El cable de la fuente de alimentación no debe tocar ninguna parte caliente y debe colocarse de modo que su temperatura no supere los 75 °...
- Página 26 En base a la directiva europea 2012/19/UE de residuos de aparatos eléctricos y electrónicos (RAEE), los electrodomésticos no pueden ser arrojados en los contenedores municipales habituales; tienen que ser recogidos selectivamente para optimizar la recuperación y reciclado de los componentes y materiales que los constituyan, y reducir el impacto en la salud humana y el medio ambiente.
- Página 27 Placa de inducción Induction Hob MANUAL EMIH290-3S www.easelectric.es...
- Página 28 Content 1. Foreword ..................4 1.1 Safety Warnings ................. 4 1.2 Installation ................4 1.2.1 Electrical Shock Hazard ..........4 1.2.2 Cut Hazard ..............4 1.2.3 Important safety instructions .......... 4 1.3 Operation and maintenance............6 1.3.1 Electrical Shock Hazard ..........6 1.3.2 Health Hazard ..............
- Página 29 9.6 Cautions ................... 24 9.7 Connecting the hob to the mains power supply ......24...
-
Página 30: Foreword
1. Foreword 1.1 Safety Warnings Your safety is important to us. Please read this information before using your cooktop. 1.2 Installation 1.2.1 Electrical Shock Hazard • Disconnect the appliance from the mains electricity supply before carrying out any work or maintenance on it. •... - Página 31 • Failure to install the appliance correctly could invalidate any warranty or liability claims. • This appliance is not intended for use by persons(including children) with reduced physical, sensory or mental capabilities, or lack of experience and knowledge, unless they have been given supervision or instruction concerning use of the appliance by a person responsible for their safety.
-
Página 32: Operation And Maintenance
WARNING: Unattended cooking on a hob with fat or oil can be dangerous and may result in a fire. • WARNING: The appliance and its accessible parts become hot during use. Care should be taken to avoid touching heating elements. Children less than 8 years of age shall be kept away unless continuously supervised. -
Página 33: Hot Surface Hazard
with their doctor or implant manufacturer before using this appliance to make sure that their implants will not be affected by the electromagnetic field. • Failure to follow this advice may result in death. 1.3.3 Hot Surface Hazard • During use, accessible parts of this appliance will become hot enough to cause burns. - Página 34 stand, or climb on it. • Do not store items of interest to children in cabinets above the appliance. Children climbing on the cooktop could be seriously injured. • Do not leave children alone or unattended in the area where the appliance is in use. •...
-
Página 35: Product Introduction
2. Product Introduction 2.1 Top View 1. Max. 1300/1500W zone 2. Max. 2300/2600W zone 3. Max. 2600/3000W zone 4. Glass plate 5. Control panel 6. ON/OFF control 2.2 Control Panel 1. On/Off control 2. Timer control 3. Boost 4. Heating zone selection controls 5. -
Página 36: Before Using Your New Induction Hob
Read this guide, taking special note of the ‘Safety Warnings’ section. • Remove any protective film that may still be on your Induction hob. • 2.5 Technical Specification Cooking Hob EMIH290-3S Cooking Zones 3 Zones Supply Voltage 220-240V~ 50Hz or 60Hz Installed Electric Power 6600W Product Size L×W×H(mm) -
Página 37: How To Use
Do not use cookware with jagged edges or a curved base. Make sure that the base of your pan is smooth, sits flat against the glass, and is the same size as the cooking zone. Use pans whose diameter is as large as the graphic of the zone selected. Using a pot a slightly wider energy will be used at its maximum efficiency. -
Página 38: Finish Cooking
Select a heat setting by touching the “-” or “+” control. • If you don’t choose a heat setting within 1 minute, the Induction hob will automatically switch off. You will need to start again at step 1. • You can modify the heat setting at any time during cooking. -
Página 39: Locking The Controls
Activate the boost function Touching the heating zone selection control. Touching the boost control , the zone indicator show “P” and the power reach Max. Cancel the Boost function Touching the "Boost" control or the “-” button to cancel the Boost function, then the cooking zone will revert to its original setting. -
Página 40: Timer Control
3.3.5 Timer control You can use the timer in two different ways: You can use it as a minute minder. In this case, the timer will not turn any cooking zone off when the set time is up. You can set it to turn one or more cooking zones off after the set time is up. The timer of maximum is 99 min. -
Página 41: Default Working Times
Touch timer control, the minder indicator will start flashing and “10” will show in the timer display. Set the time by touching the or control of the timer Hint: Touch the “-” or “+” control of the timer once will decrease or increase by 1 minute. Touch and hold the “-”... -
Página 42: Cooking Tips
4.1 Cooking Tips When food comes to the boil, reduce the temperature setting. • Using a lid will reduce cooking times and save energy by retaining the heat. • Minimize the amount of liquid or fat to reduce cooking times. •... -
Página 43: Care And Cleaning
cookware and the amount you are cooking. Experiment with the induction hob to find the settings that best suit you. Heat setting Suitability • delicate warming for small amounts of food 1 - 2 • melting chocolate, butter, and foods that burn quickly •... -
Página 44: Hints And Tips
Spillovers on the 1. Switch the power to the cooktop • The cooktop may beep and turn touch controls off. itself off, and the touch controls 2. Soak up the spill may not function while there is 3. Wipe the touch control area with a liquid on them. -
Página 45: Failure Display And Inspection
Pans do not become The induction hob cannot Use cookware suitable for induction hot and appears in the detect the pan because it is not cooking. See section ‘Choosing the display. suitable for induction cooking. right cookware’. The induction hob cannot detect Centre the pan and make sure that its the pan because it is too small base matches the size of the cooking... - Página 46 voltage. normal. Power on after the power supply is Supply voltage is above the rated normal. voltage. Reinsert the connection between the display board and the power board. Communication error. Replace the power board or the display board. 2) Specific Failure & Solution Failure Problem Solution A...
-
Página 47: Installation
The Main board is Replace the power damaged. board. Fan motor sounds The fan motor is Replace the fan. abnormal. damaged. The above are the judgment and inspection of common failures. Please do not disassemble the unit by yourself to avoid any dangers and damages to the induction hob. - Página 48 A(mm) B(mm) C(mm) 50 min. 20 min. Air intake Air exit 5mm WARNING: Ensuring Adequate Ventilation Make sure the induction cooker hob is well ventilated and that air inlet and outlet are not blocked. In order to avoid accidental touch with the overheating bottom of the hob, or getting unexpectable electric shock during working, it is necessary to put a wooden insert, fixed by screws, at a minimum distance of 50mm from the bottom of the hob.
-
Página 49: Before Installing The Hob, Make Sure That
9.2 Before installing the hob, make sure that The work surface is square and level, and no structural members interfere with space • requirements. The work surface is made of a heat-resistant and insulated material. • If the hob is installed above an oven, the oven has a built-in cooling fan. •... - Página 50 Under any circumstances, the brackets cannot touch with the inner surfaces of the worktop after installation (see picture) 9.6 Cautions 1. The induction hotplate must be installed by qualified personnel or technicians. We have professionals at your service. Please never conduct the operation by yourself. 2.
- Página 51 3. The power supply cable sections can withstand the load specified on the rating plate. To connect the hob to the mains power supply, do not use adapters, reducers, or branching devices, as they can cause overheating and fire. The power supply cable must not touch any hot parts and must be positioned so that its temperature will not exceed 75˚C at any point.
- Página 52 The european directive to 2012/19 /UE on wasted electrical and electronic equipments (WEEE), requires that household electrical appliances must not be disposed of in the normal unsorted municipal waste stream. appliances must be collected separately in order to optimize the recovery and recycling of the materials they contain, and reduce the impact on human health and the environment.