Tabla de contenido
Publicidad
Idiomas disponibles
Idiomas disponibles
Enlaces rápidos
Sierra circular de mesa / Sega circolare da banco
PTKS 2000 H5
Sierra circular de mesa
Traducción del manual de instrucciones original
Table Saw
Translation of the original instructions
IAN 382534_2110
Sega circolare da banco
Traduzione delle istruzioni d'uso originali
Tischkreissäge
Originalbetriebsanleitung
Publicidad
Capítulos
Tabla de contenido

Manuales relacionados para Parkside PTKS 2000 H5


Resumen de contenidos para Parkside PTKS 2000 H5
- Página 1 Sierra circular de mesa / Sega circolare da banco PTKS 2000 H5 Sierra circular de mesa Sega circolare da banco Traducción del manual de instrucciones original Traduzione delle istruzioni d’uso originali Table Saw Tischkreissäge Translation of the original instructions Originalbetriebsanleitung...
- Página 2 Antes de empezar a leer abra la página que contiene las imágenes y, en seguida, familiarícese con todas las funciones del dispositivo. Prima di leggere aprire la pagina con le immagini e prendere confidenza con le diverse funzioni dell’apparecchio. Before reading, unfold the page containing the illustrations and familiarise yourself with all functions of the device.
- Página 5 max. 3-5 mm...
-
Página 6: Tabla De Contenido
Contenido Introducción ............. 6 Trabajar con el tope paralelo ......... 15 Ajustar el ancho de corte ..........15 Uso previsto ............. 6 Descripción general ..........7 Montar/desmontar el riel de tope Volumen de suministro ............7 en el tope paralelo/tope transversal ........15 Vista sinóptica ..............7 Ajuste de la escala del tope paralelo ...... -
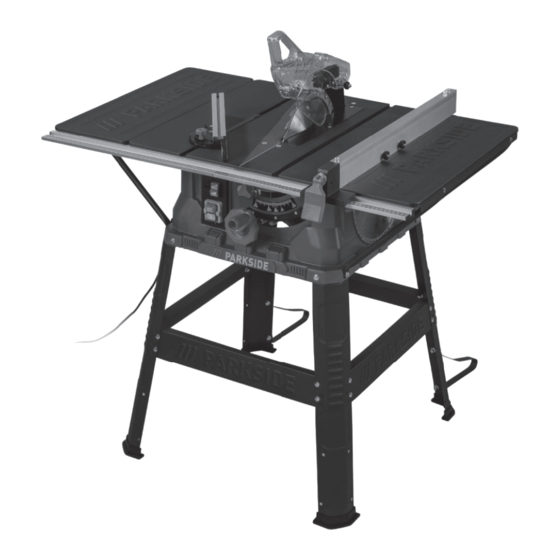
Página 7: Descripción General
(f) tuercas autofi jadoras, 20 unidades Datos técnicos Herramientas Sierra circular ............PTKS 2000 H5 (h) Llave Allen HX 6 (k) Llave poligonal SW 10/22 Motor de corriente alterna ......230-240 V~ 50 Hz Régimen de ralentí... -
Página 8: Instrucciones De Seguridad
Instrucciones de seguridad Régimen de trabajo ..........S6 40%* Clase de protección ............¡ATENCIÓN! Al hacer uso de herramientas eléctricas, deberán te- Tipo de protección ............IPX0 Hoja de sierra nerse en cuenta las siguientes medidas de seguridad fundamentales Hoja de sierra de metal endurecido (dimensiones a utilizar) para protegerse contra descargas eléctricas, peligro de lesiones o HW 24 ........ -
Página 9: Instrucciones Generales De Seguridad Para Herramientas Eléctricas
Símbolos en las instrucciones de uso en movimiento. Los cables deteriorados o bobinados au- mentan el riesgo de descarga eléctrica. e) Si trabaja con la herramienta eléctrica en el exte- Señales indicadoras de peligro con información para la prevención de daños a las personas y a rior, utilice solamente cables de alargo que estén autorizados para exterior. -
Página 10: Instrucciones De Seguridad Para Sierras Circulares De Mesa
c) Saque el enchufe de la toma de corriente y/o quite no puede evitar el retroceso. la batería extraíble antes de realizar ajustes en la e) Utilice la hoja de sierra adecuada para la cuña herramienta, cambiar piezas intercambiables de abridora. - Página 11 k) No retire el material aserrado mientras la sierra que los dientes de la sierra no queden atrapados esté en funcionamiento. El material cortado puede que- en la pieza. Si la hoja de sierra está atascada, volver a dar atascado entre la hoja de sierra y riel de tope o en la poner en marcha el aparato puede levantar la pieza y provo- cubierta de protección y arrastrar los dedos hacia la hoja de car un retroceso.
-
Página 12: Advertencias De Seguridad Para Manejar El Láser
• No sobrecargue demasiado la máquina, ejercer demasiada Advertencias de seguridad para manejar el láser presión al serrar daña rápidamente la hoja de sierra. Esto puede provocar que la máquina pierda potencia al trabajar – Atención: Radiación láser: no dirigir la mirada hacia el rayo y reduce la exactitud de corte. -
Página 13: Motor De Corriente Alterna
5. Ahora, atornille sin apretar los cuatro travesaños intermedios vamente líneas de conexión marcadas con H05VV-F. Es obligatorio que la designación del tipo esté marcada en la (20/21) a las patas de apoyo (19). Utilice los tirafondos (b) y las tuercas autofi jadoras (f). línea de conexión. -
Página 14: Montar/Desmontar El Láser; Introducir Las Pilas
5. Afl oje el tornillo de fi jación (27) con la llave de boca (k) Sustituir el suplemento de la mesa SW8 suministrada. (Fig. 6. Empuje la cuña abridora (3) hasta el fi nal. La distancia en- tre la cuña abridora y la hoja de sierra debe oscilar entre 1. -
Página 15: Antes De La Puesta En Funcionamiento
En el carril guía (7) hay 2 escalas (o/n) (fi g. Antes de la puesta en funcionamiento ). Estas muestran la distancia entre el tope paralelo (16) y la hoja de sierra (4). • La máquina ha de estar colocada en un sitio estable, es de- En función del espesor de la pieza de trabajo que vaya a cir, atornillada fi... -
Página 16: Ajuste Del Ángulo
Asegurar las piezas de labor largas para evitar que se vuelquen ¡Atención! No empujar demasiado el riel de tope (35) en la dirección cuando haya fi nalizado el proceso de corte (p.ej. un bastidor de la hoja de sierra. sobre el que puedan ir rodando) La distancia entre el riel de tope (35) y la hoja de sierra (4) Utilice únicamente hojas de sierra con una velocidad igual o su- debería ser de unos 2 cm. -
Página 17: Cortar Piezas De Labor Muy FI Nas
Cortar piezas de labor muy fi nas 4. La herramienta electrónica deberán portarla al menos entre dos personas. No la agarre de la zona de ampliación de (Fig. la mesa. Para transportar la máquina utilice solo los puntos Para cortes longitudinales de piezas de labor muy fi nas con un mostrados en la fi... -
Página 18: Mantenimiento General
Mantenimiento general Esto no afecta a los accesorios y a otros medios sin componentes electrónicos. • Antes de cualquier uso, compruebe el aparato y sus acce- Entregue el aparato en un punto de reciclaje. Las piezas de sorios en busca de desperfectos visibles como pueden ser piezas sueltas, desgastadas o dañadas. -
Página 19: Garantía
Garantía • Tras consultar con nuestro servicio de postventa, un aparato identifi cado como defectuoso puede ser enviado libre de franqueo a la dirección de servicio ya conocida por usted, Estimada clienta, estimado cliente: Por este aparato se le concede una garantía de 3 años a partir adjuntando el comprobante de compra (resguardo de caja) e indicando en qué... -
Página 20: Introduzione
Contenuto Introduzione ............20 Lavorare con il registro parallelo ......29 Utilizzo ..............20 Regolazione dell’ampiezza di taglio ....... 29 Descrizione general ..........21 Montare / smontare la guida di battuta Scope d´uso ..............21 sulla battuta trasversale / trasversale ....... 29 Registrazione della scala graduata del registro parallelo ... 29 Vista d´insieme ............. -
Página 21: Descrizione General
(e) Dadi, 16 pezzi (f) Dadi autobloccanti, 20 pezzi Dati tecnici Sega circolare da banco ........PTKS 2000 H5 Utensili (h) Chiave a brugola esagonale HX 6 Motorino a corrente alternata ......230-240 V~ 50 Hz... -
Página 22: Consigli Di Sicurezza
Consigli di sicurezza Modalità di alimentazione ......S6 40%*, S1** Classe di protezione ............Tipo di protezione ............IPX0 ATTENZIONE! Durante l’uso di elettroutensili si devono osserva- Lama re le seguenti misure di sicurezza fondamentali come protezione contro scossa elettrica, pericolo di lesioni e incendi: Prima di Lama in metallo duro (misure da utilizzare) HW 24 ........ -
Página 23: Indicazioni Di Sicurezza Generali Per Utensili Elettrici
Simboli riportati nelle istruzioni: e) Quando si lavora con un utensile elettrico all‘a- perto, usare solo prolunghe adatte anche per l‘e- Simboli di pericolo con indicazioni relative alla sterno. L‘uso di una prolunga adatta per l‘esterno riduce il prevenzione di danni a cose e persone. rischio di scosse elettriche. -
Página 24: Assistenza Tecnica
o rimuovere l’utensile elettrico. Questa misura previe- più spessa del coprilama. ne l‘avviamento involontario dell‘utensile elettrico. d) Conservare gli utensili elettrici non usati fuori dalla 2) Istruzioni di sicurezza per il taglio portata di bambini. Non lasciare usare l‘apparec- chio a persone che non hanno familiarizzato con PERICOLO: Non mettere le dita o le mani nei lo stesso o che non hanno letto le istruzioni. -
Página 25: Avvertenze Di Sicurezza Per L'uSo Del Laser
vo che sia in contatto con la superfi cie del banco. I 4) Indicazioni sulla sicurezza per l‘uso delle seghe cir- pezzi in lavorazione sottili possono incastrarsi sotto il registro colari da banco parallelo e causare contraccolpi. a) Spegnere la sega circolare da banco e staccarla 3) Cause di contraccolpo e relative avvertenze di sicu- dalla rete elettrica, prima di rimuovere l‘inserto rezza... -
Página 26: Rischi Residui
Non fare scaricare eccessivamente la batteria! Collegamento elettrico Non utilizzare insieme batterie vecchie e nuove oppure bat- terie di tipo o produttore diverso! Sostituire contemporanea- Il motorino elettrico installato è collegato e operati- mente tutte le batterie di un set. vo. -
Página 27: Montaggio
Montaggio Montare le barre di guida con la scala (Fig. 10. Fissare le otto viti a testa quadra (b) con un dado sul banco Prima della prima messa in funzione controllare la sede salda della fl angia esterna della lama. sega (1) e all’ampliamento del banco (6) senza stringere sul lato della manovella (12) e dei restanti elementi di comando. -
Página 28: Montaggio/Smontaggio Della Protezione Per Lama
Inserimento delle batterie 5. Allentare la vite di serraggio ( – 11). Ruotando il volantino 1. Portare l’interruttore (29) laser on/off in posizione “0” (laser – 9), impostare la lama (4) di traverso per poter applica- off). re la chiave a brugola esagonale (h) e la chiave ad anello (k) 2. -
Página 29: Uso
3. Fissare la guida di battuta (35) stringendo entrambe le ghiere di fi ssaggio (r). 4. Per smontare, seguire l’ordine inverso. Accensione/spegnimento (Fig. Le ghiere di fi ssaggio (r) si possono anche allentare com- Premendo il pulsante verde (13) “I” è possibile attivare la pletamente per montare la guida di battuta (35) sul lato sega. -
Página 30: Utilizzo Del Laser
Utilizzo del laser registro parallelo (16), mentre il lato piatto si trova sul banco sega (1). (Fig. La protezione per lama (2) deve essere sempre abbassata sul Il laser (28) consente di effettuare tagli di precisione con la pezzo da lavorare. La posizione di lavoro durante il taglio longi- presente sega circolare. -
Página 31: Esecuzione Di Sezioni Trasversali
Esecuzione di sezioni trasversali Se è necessario sostituire il cavo, contattare il produttore o un suo agente per evitare pericoli per la sicurezza. (Fig. Spingere la guida di arresto trasversale in una delle due sca- Eseguire i seguenti lavori di pulizia e manutenzione regolarmen- te. -
Página 32: Ordinazione Di Pezzi Di Ricambio
Ordinazione di pezzi di ricambio Direttiva 2012/19/UE sui rifi uti di apparecchiature elettriche ed elettroniche: i dispositivi elettrici usati devono essere raccolti È possibile ordinare pezzi di ricambio e accessori separatamente e riciclati secondo procedure ecologicamente all’indirizzo www.grizzlytools.shop corrette. A seconda del recepimento nel diritto nazionale, le possibilità In caso di problemi con la procedura d’ordine, utilizzare il sono le seguenti: •... -
Página 33: Garanzia
Garanzia • Un prodotto rilevato come difettoso può essere inviato con porto franco all’indirizzo di assistenza comunicato, previa consultazione del nostro servizio di assistenza tecnica, alle- Gentile cliente, Su questo apparecchio Le viene concessa una garanzia di 3 anni gando la prova d‘acquisto (scontrini fi scali) e l’indicazione, a partire dalla data di acquisto. -
Página 34: Introduction
Content Introduction Congratulations on the purchase of your new device. With it, you Introduction ............34 have chosen a high quality product. Intended purpose ..........34 During production, this equipment has been checked for quality General description ..........35 and subjected to a fi nal inspection. The functionality of your Extent of the delivery ............35 Overview ..............35 equipment is therefore guaranteed. -
Página 35: General Description
All types of round timbers must not be cut with it. (e) Nuts, 16 pieces; Technical data (f) Self-securing nuts, 20 pieces; Bench circular saw ..........PTKS 2000 H5 Tools (h) Hexagon socket wrench HX 6 AC motor ..........230-240 V~ 50 Hz... -
Página 36: Safety Instructions
Laser power ............< 1 mW Caution! - Laser radiation. Do not look into the beam. Laser module power supply ....2 x 1.5 V Micro (AAA Laser class 2 ) ......97 dB(A); K Sound pressure level (L = 3 dB Sound power level (L measured .......... -
Página 37: Safety Information For Circular Table Saws
from moving parts. Loose clothes, jewellery or long hair 1) WORK AREA SAFETY can be caught in moving parts. g) If devices are provided for the connection of dust a) Keep work area clean and well lit. Cluttered or dark extraction and collection facilities, ensure these are areas invite accidents. - Página 38 k) Do not remove sawn-off material while the saw is tion manual. Incorrect spacing, position and alignment can be the reason why the riving knife does not effectively prevent running. Sawn-off material can get stuck between the saw blade and the stop rail or in the protective cover. Your fi ngers kickback.
-
Página 39: Safety Instructions For Handling The Laser
4) Safety information for operating circular table Do not heat the batteries! saws Do not carry out any welding or soldering work directly to the batteries! a) Switch off the circular table saw and disconnect it Do not take the batteries apart! from the mains before removing the table insert, 10 Do not deform the batteries! changing the saw blade, making adjustments to... -
Página 40: Electrical Connection
Assembly Electrical Connection The installed electric motor is connected ready for op- Prior to fi rst use, check the tightness of the out- eration. The connection complies with the relevant BS er fl ange of the saw blade. standards. The customer‘s network connection and any extension cable used must comply with these Assembly, Replacement of Parts and Adjustments... -
Página 41: Mount/Adjust The Riving Knife
Mounting a guide rail with scale (Fig. 2. Remove the battery compartment cover (31). 3. Insert the batteries supplied (type AAA), ensuring the correct 10. Loosely attach the eight carriage bolts (b) to the saw table (1) polarity (see Fig. and table width extender (6) on the side of the crank handle 4. -
Página 42: Before Putting Into Operation
Changing the speed 9. Clean the saw blade fl anges carefully with a wire brush be- fore attaching the new saw blade. (Fig. 10. Insert and tighten the new saw blade in reverse order. Attention! Note the direction of motion; the slope The motor has two speeds which you can switch between on the of the cutting edge of the teeth must face the direc- speed switch:... -
Página 43: Adjusting The Scale Of The Parallel Stop
Adjusting the Laser 3. Fix the stop rail (35) by tightening the two knurled nuts (r). 4. Removal is carried out in reverse order. (Fig. Adjusting the scale of the parallel stop If the laser (28) no longer shows the correct cutting line, this can be readjusted. -
Página 44: Cutting Very Narrow Workpieces
• Advance the workpiece with both hands, making sure that 3. Insert the saw blade with the help of the crank handle (12). – 4) anticlockwise, it moves you use a push stick (18) as a pushing aid in the vicinity of By turning the saw blade ( the saw blade. -
Página 45: General Maintenance Work
General maintenance work This does not affect accessories enclosed with the old devices or tools without any electrical components. • Check the appliance and accessories before each use for ob- vious defects such as loose, worn or damaged parts. Replace Take the device to a recycling plant. -
Página 46: Guarantee
Guarantee when it occurred. In order to avoid acceptance problems and additional costs, please be sure to use only the address Dear Customer, communicated to you. Ensure that the consignment is not This equipment is provided with a 3-year guarantee from the date sent carriage forward or by bulky goods, express or other special freight. -
Página 47: Einleitung
Inhalt Einleitung Herzlichen Glückwunsch zum Kauf Ihres neuen Gerätes. Sie ha- Einleitung ............... 47 Bestimmungsgemäße Verwendung ......47 ben sich damit für ein hochwertiges Gerät entschieden. Dieses Allgemeine Beschreibung ........48 Gerät wurde während der Produktion auf Qualität geprüft und ei- Lieferumfang ..............48 ner Endkontrolle unterzogen. -
Página 48: Allgemeine Beschreibung
Rundhölzer aller Art dürfen nicht geschnitten werden. (e) Muttern, 16 Stück Technische Daten (f) selbstsichernde Muttern, 20 Stück Werkzeug Tischkreissäge ............PTKS 2000 H5 Wechselstrommotor ........230-240 V~, 50 Hz (h) Innensechskantschlüssel HX 6 (k) Ringschlüssel SW 10/22 Leerlaufdrehzahl n ..........5000 min... -
Página 49: Sicherheitshinweise
Schnitthöhe max. 90° ..........85 mm Tragen Sie einen Atemschutz. Schnitthöhe max. 45° ..........63 mm Höhenverstellung.............0 - 85 mm Achtung - Risiko einer Verletzung. Greifen Sie niemals in Absauganschluss ............ø 34 mm das laufende Sägeblatt. Gewicht ca..............22 kg Laser Setzen Sie die Maschine nicht dem Regen aus. - Página 50 nachfolgenden Anweisungen können elektrischen Schlag, Elek tro werk zeuges kann zu ernsthaften Verletzungen führen. b) Tragen Sie persönliche Schutzausrüstung und im- Brand und/oder schwere Verletzungen verursachen. mer eine Schutzbrille. Das Tragen persönlicher Schutz- Bewahren Sie alle Sicherheitshinweise und Anweisun- ausrüstung, wie Staubmaske, rutschfeste Sicherheitsschuhe, gen für die Zukunft auf.
-
Página 51: Sicherheitshinweise Für Tischkreissägen
dass die Funktion des Elek tro werk zeuges beein- und Ihre Hand in das Sägeblatt gezogen werden. trächtigt ist. Lassen Sie beschädigte Teile vor dem c) Verwenden Sie bei Längsschnitten niemals den Gehrungsanschlag zur Zuführung des Werkstücks, Einsatz des Gerätes reparieren. Viele Unfälle haben und verwenden Sie bei Querschnitten mit dem ihre Ursache in schlecht gewarteten Elek tro werk zeugen. -
Página 52: Sicherheitshinweise Zum Umgang Mit Dem Laser
fernen, das Sägeblatt wechseln, Einstellungen an auf das Sägeblatt schräg geführten Schnitts in das Werkstück Spaltkeil oder der Sägeblattschutzabdeckung vor- oder wenn ein Teil des Werkstücks zwischen Sägeblatt und Pa- nehmen und wenn die Maschine unbeaufsichtigt rallelanschlag oder einem anderen feststehenden Objekt einge- klemmt wird. -
Página 53: Restrisiken
Elektrischer Anschluss Batterie nicht überentladen! Alte und neue Batterien sowie Batterien unterschiedlichen Typs oder Herstellers nicht mischen! Alle Batterien eines Sat- Der installierte Elektromotor ist betriebsfertig ange- schlossen. Der Anschluss entspricht den einschlägigen zes gleichzeitig wechseln. Verbrauchte Batterien unverzüglich aus dem Gerät entfernen VDE- und DIN-Bestimmungen. -
Página 54: Montage
Montage 9. An den Befestigungspunkten (25) in den hinteren Standbei- nen (19) die Standbügel (23) verschrauben. Montagemate- Vor der Erstinbetriebnahme prüfen Sie den fes- rial: jeweils 2 Schlossschrauben (b) und die selbstsichernden ten Sitz des äußeren Flansches des Sägeblattes. Muttern (f). Montage, Teile austauschen und Führungsschiene mit Skala montieren (Abb. -
Página 55: Laser Montieren/Demontieren; Batterie Einsetzen
Laser montieren/demontieren; Montage/Wechsel des Sägeblattes Batterie einsetzen (Abb. (Abb. 1. Achtung! Netzstecker ziehen und Schutzhandschuhe tragen. Laser montieren 1. Montieren Sie den Laser (28) von vorne gesehen rechts auf 2. Sägeblattschutz ( – 2) demontieren. dem Spaltkeil (3), indem Sie ihn mit den Schrauben (z) befes- –... -
Página 56: Bedienung
Anschlagschiene am Parallel-/ • Schließen Sie die Maschine nur an eine ordnungsgemäß Queranschlag montieren/demontieren installierte Schutzkontakt-Steckdose an, die mit mindestens 16 A abgesichert ist. • Schließen Sie das Gerät an eine Steckdose mit RCD (Residual Die Anschlagschiene (35) kann wahlweise am Parallelanschlag Current Device) mit einem Bemessungsfehlerstrom von nicht (16) oder am Queranschlag (36) montiert werden. -
Página 57: Winkeleinstellung
Nur Sägeblätter zu verwenden, die mit einer gleich großen oder Winkeleinstellung (Abb. höheren Drehzahl als der auf dem Elek tro werk zeug gekennzeich- net sind. Mit der Tischkreissäge können Schrägschnitte nach links von Achtung beim Einschneiden. 0° - 45° zur Anschlagschiene ausgeführt werden. Betreiben Sie das Gerät nur mit Absaugung. -
Página 58: Ausführen Von Schrägschnitten
- Im Lieferumfang ist kein Schiebeholz enthalten. Ein Schiebe- Lassen Sie den Motor abkühlen holz können Sie im einschlägigen Fachhandel erwerben. Drücken Sie die Überlastungsschutzschalter (37). Starten Sie das Gerät wie unter „Ein-, Ausschalten“ beschrie- - Ersetzen Sie ein verschlissenes Schiebeholz rechtzeitig. ben. -
Página 59: Lagerung
Ersatzteile/Zubehör Lagerung Ersatzteile und Zubehör erhalten Sie unter Bewahren Sie das Gerät an einem trockenen und staubgeschütz- www.grizzlytools.shop ten Ort auf, und außerhalb der Reichweite von Kindern. Sollten Sie Probleme mit dem Bestellvorgang haben, verwenden Entsorgung/ Umweltschutz Sie bitte das Kontaktformular. Bei weiteren Fragen wenden Sie sich an das „Service-Center“... -
Página 60: Garantie
Garantie • Die Artikelnummer entnehmen Sie bitte dem Typenschild. • Sollten Funktionsfehler oder sonstige Mängel auftreten, kon- Sehr geehrte Kundin, sehr geehrter Kunde, taktieren Sie zunächst die nachfolgend benannte Serviceab- Sie erhalten auf dieses Gerät 3 Jahre Garantie ab Kaufdatum. teilung telefonisch oder per E-Mail. -
Página 61: Traducción De La Declaración De Conformidad Ce Original
CE original Mediante la presente declaramos que el la Sierra circular de Con la presente dichiariamo che Sega circolare da banco mesa, de la serie PTKS 2000 H5 serie PTKS 2000 H5 Número de serie 000001 - 065000... - Página 64 GRIZZLY TOOLS GMBH & CO. KG Stockstädter Straße 20 63762 Großostheim GERMANY Estado de las informaciones · Versione delle informazioni · Last Information Update · Stand der Informationen: 03/2022 Ident.-No.: 72037558032022-ES/IT IAN 382534_2110...