Tabla de contenido
Publicidad
Enlaces rápidos
Publicidad
Tabla de contenido

Manuales relacionados para Bticino CLASSE 100X16E


Resumen de contenidos para Bticino CLASSE 100X16E
- Página 1 364614 Video Kit Manuale installatore • Installation manual...
- Página 2 Attenzione: Le operazioni di installazione, configurazione, messa in servizio e manutenzione devono essere effettuate da personale qualificato. Caution: Installation, configuration, starting-up and maintenance must be performed by qualified personnel Attention: Les opérations d’installation, de configuration, de mise en service et d’entretien doivent être confiées à...
- Página 3 Video - Kit 230 Vac 230 Vac 230 Vac 12 V 230 Vac 12 V • Vecchio impianto a campanello • Nuovo impianto citofonico Impianto esistente con 3 fili e sola chiamata. Impianto realizzato senza modifiche ai 2 fili esistenti: chiamata, videocitofono e serratura. •...
- Página 4 • Instalación con un máximo de 3 PI • Installation of up to 3 handsets • Installatie tot 3 PI • Montage jusqu’à 3 PI • Instalação até 3 UI • Installation von bis zu 3 Türstationen BTicino BTicino BTicino One PTT OneSYT OneSYT...
- Página 5 Video - Kit • Schema monofamiliare • Esquema monofamiliar • One-family diagram • Schema eensgezins • Schéma mono-familial • Esquema monofamiliar • Schema Einfamilienhaus = – = – = – = – = – = – 5M 1 S+S- P = – Bifamiliare - Two family –...
- Página 6 • Schema bifamiliare • Esquema bifamiliar • Two-family diagram • Schema tweegezins • Schéma bi-familiale • Esquema bifamiliar • Schema Zweifamilienhaus = – – = – = – = – = – = – = – = – = – = –...
- Página 7 Video - Kit • Schema bifamiliare 2 • Esquema bifamiliar 2 • Two-family diagram 2 • Schema tweegezins 2 • Schéma bi-familiale 2 • Esquema bifamiliar 2 • Schema Zweifamilienhaus 2 * • Il secondo posto interno ed il configuratore 3501/1 devono essere acquistati separatemente. = –...
- Página 8 • Opzione serratura a relè • Option Relais-Schloss • Opção trinco de relê • Relay door lock option • Opción cerradura de relé • Option serrure à relais • Optie relaisslot P = – – N = – = – S+S- T = –...
-
Página 9: Dati Dimensionali
Video - Kit • Dati dimensionali • Données • Maße • Formaatgegevens • Dimensional data dimensionnelles • Datos dimensionales • Dados dimensionais 100 mm 26 mm 164 mm 20,5 mm • Altezza consigliata salvo diversa normativa vigente. • Recommended height, unless different regulations are specified. •... -
Página 10: Unidade Externa
• Posto esterno • Poste extérieur • Placa exterior • Unidade externa • Entrance panel • Türstation • Externe plaats Morsetti di collegamento Connection clamp Pulsanti di chiamata Call pushbuttons LED connessione attiva Active connection LED LED indicazione porta aperta Open door notification LED Microfono Microphone... -
Página 11: Unidade Interna
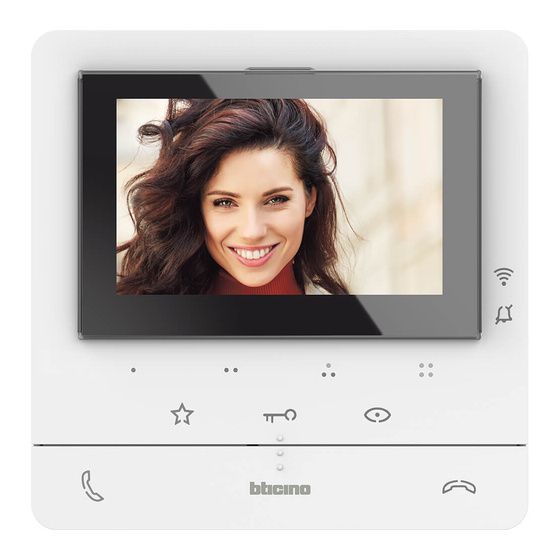
Video - Kit • Posto interno • Poste interne • Unidad interior • Unidade interna • Handset • Hausstation • Intern punt Alla pressione i tasti si illuminano ed emettono un When pressed, the keys light up and emit a “beep” “beep”... -
Página 12: Haut-Parleur
À la pression, les touches s’illuminent et émettent un Bei Betätigung leuchten die Tasten auf und geben « bip » (désactivable à travers la procédure prévue à einen „Piepton“ ab (kann durch eine Prozedur cet effet). deaktiviert werden.) 1. Haut-parleur 1. Lautsprecher 2. -
Página 13: Altifalante
Video - Kit Con la presión, los botones se iluminan y emiten un profesional” activa “beep” (desactivable según el procedimiento.). 7. Botón de membrana para activación placa de exterior / vista cíclica 1. Altavoz 8. Guías táctiles para invidentes 2. Pantalla 5” (16:9) 9. - Página 14 • Posto interno • Poste interne • Unidad interior • Unidade interna BTICINO • Handset • Hausstation • Intern punt V.le Borri, 231 21100 (VA) ITALY Made in Italy 1. Mini USB socket for device Firmware update 2. ON / OFF micro-switch for “safe door lock”...
-
Página 15: Activeer De Functie Wanneer Het Apparaat Niet Wordt Gevoed
21100 (VA) ITALY Made in Italy Video - Kit BTICINO 1. Mini-USB-Steckbuchse zur Aktualisierung der 6. Klemmen zum Anschluss an BUS, SCS, 2-Draht V.le Borri, 231 Firmware der Vorrichtung 7. Klemmen zum Anschluss an eine externe 21100 (VA) ITALY 2 1 5M 1 2. -
Página 16: Installazione Posto Esterno
• Installazione posto esterno • Instalación de la placa exterior • Entrance panel installation • Installatie externe plaats • Installation du poste extérieur • Instalação da unidade externa • Installation der Türstation * Per garantire l’impermeabilità montare le guarnizioni a corredo. * To guarantee water tightness make sure to fit the seals supplied. - Página 17 Video - Kit...
- Página 18 • Se si manifestasse il disturbo del fischio, (effetto Larsen), ridurre prima la potenza del microfono • Se si manifestasse il disturbo del fischio, (effetto Larsen), ridurre prima la potenza del microfono , agendo , agendo con un cacciavite sul potenziometro corrispondente, fino ad un livello accettabile. Qualora il fenomeno persi- con un cacciavite sul potenziometro corrispondente, fino ad un livello accettabile.
- Página 19 Video - Kit • Configurazione posto esterno • Konfiguration Türstation • Configuração unidade externa • Entrance panel configuration • Configuración placa exterior • Configuration poste extérieur • Configuratie externe plaats - Possono non essere configurati. - They do not need to be configured. - Ils peuvent ne pas être configurés - Brauchen nicht konfiguriert zu werden.
- Página 20 • Programmazione Badge • Programación de credenciales • Badge programming • Badge Programmeren • Programmation des badges • Programação do Crachá • Badge programmieren • Nuovo badge gestore impianto Per motivi di sicurezza è previsto un badge “Gestore“ programmato direttamente dall’installatore. Per accedere alla programmazione di un badge “RESIDENTE”...
- Página 21 Video - Kit • Nieuwe master beheerder badge Om veiligheidsredenen is een “beheerdersbadge” voorzien die direct door de installateur wordt geprogrammeerd. Voor toegang tot de programmering van een “INWONERSBADGE” moet over een beheerdersbadge worden beschikt Het externe punt geeft met behulp van geluids- en lichtsignalen van de leds op het externe punt aan of de badge geac- cepteerd of gewist is.
- Página 22 2 beep 2 beeps 2 beep 2 Pieptöne 2 bips 2 beep 2 beep • Gestore impianto • Credencial maestra • Manager master de administrador • Master de gestion • Master beheerder • Master Verwaltung • Master gestor • Avvicinare al lettore il badge gestore impianto da aufleuchtet und das Bestätigungssignal zwei Mal ertönt.
- Página 23 Video - Kit • • Nota: Il badge gestore impianto non comanda la serratura Nota: La credencial del administrador del sistema no accio- ma abilita solo la programmazione dei badge residenti na la cerradura pero habilita la programación de las creden- ciales de los residentes.
- Página 24 • Programmazione badge residente • Programación de la credencial del residente • System management key card programming • Programmering inwonersbadge • Programmation badge résident • Programação de crachá residente • Programmierung des Badges Bewohner 1 beep • Gestore impianto 1 beep •...
- Página 25 Video - Kit • Dem Lesegerät das Badge des Bewohners nähern, das gespei- • Houd de inwonerbadge die opgeslagen moet worden voor het chert werden soll, bis die LED des Schlosses blinkt und das Be- leesapparaat tot de LED slot gaat knipperen en u ter bevesti- stätigungssignal ertönt.
- Página 26 • Cancellazione di tutti i badge residenti in memoria • Cancelación de todas las credenciales residentes • Cancellation of all the residents badges saved in the memory memorizadas • Effacement de tous les badges résidents mémorisés • Alle inwonerbadges uit het geheugen wissen •...
- Página 27 Video - Kit • Reset • Reset Nel caso si avesse la necessità di cancellare tutti i En caso de que fuera necesario cancelar todas las badge (gestore impianto e residenti) precedentemente credenciales memorizadas(administrador del sistema y memorizzati è possibile resettare il posto esterno. residentes), es posible restablecer la placa exterior.
-
Página 28: Instalación De La Unidad Interior
• Installazione del posto interno • Instalación de la unidad interior • Handset installation • Installatie van het intern punt • Installation du poste interne • Instalação da unidade interna • Installation der Hausstation • Installazione a parete • Instalación mural •... - Página 29 Video - Kit...
-
Página 30: Configurazione Posto Interno
• Configurazione posto interno • Configuración unidad interior • Handset configuration • Configuratie intern punt • Configurationposte interne • Configuração unidade interna • Konfiguration Hausstation • Il dispositivo deve essere configurato solo fisicamente. • The device must be only physically configured. •... - Página 31 Video - Kit N - Nummer der Hausstation Die in die N-Steckplätze des Gerätes eingesetzten Konfiguratoren weisen jeder Videogegensprechanlage innerhalb des Systems eine Identifikationsnummer zu. Die Hausstationen müssen fortlaufend nummeriert werden. Bei parallel geschalteten Haussta- tionen (in Wohnungen ohne 346850, max. 3) müssen diese mit dem gleichen Konfigurator N konfiguriert werden. Parallel zur Basissprechanlage ist es möglich, Sprechanlagen und Videosprechanlagen und zusätzliche Läutwerke zu installieren.
- Página 32 FUNZIONE - FUNCTION - FONCTION - FUNKTION - FUNCIÓN - MODUS - MODO M = 00 • Intercom su se stesso, invia la chiamata a tutti gli apparecchi con uguale indirizzo • Internal intercom. It sends the call to all the handsets with the same address •...
- Página 33 Video - Kit FUNZIONE - FUNCTION - FONCTION - FUNKTION - FUNCIÓN - MODUS - MODO M = 01 • Intercom su se stesso, invia la chiamata a tutti gli apparecchi con uguale indirizzo • Internal intercom. It sends the call to all the handsets with the same address •...
- Página 34 FUNZIONE - FUNCTION - FONCTION - FUNKTION - FUNCIÓN - MODUS - MODO M = 02 • Intercom all’interno dell’appartamento in impianti con interfaccia di appartamento 346850 oppure intercom tra appartamenti in impianti senza interfaccia di appartamento • Intercom inside the apartment, in systems with apartment interface 346850, or intercom among apartments in systems without apartment interface.
- Página 35 Video - Kit FUNZIONE - FUNCTION - FONCTION - FUNKTION - FUNCIÓN - MODUS - MODO M = 22 Funzioni tasti sopra descritte + Studio professionale; Key functions described above + Professional studio ; Fonctions des touches ci-dessus + Bureau ; Oben beschriebene Tastenfunktionen + Professional Studio ;...
- Página 36 FUNZIONE - FUNCTION - FONCTION - FUNKTION - FUNCIÓN - MODUS - MODO M = 03 • Intercom all’interno dell’appartamento in impianti con interfaccia di appartamento 346850 oppure intercom tra appartamenti in impianti senza interfaccia di appartamento • Intercom inside the apartment, in systems with apartment interface 346850, or intercom among apartments in systems without apartment interface •...
- Página 37 Video - Kit FUNZIONE - FUNCTION - FONCTION - FUNKTION - FUNCIÓN - MODUS - MODO M = 04 • Attivazione del PE (configurato con P+1) in modo diretto senza la chiamata oppure attivazione attuatore 346210 (configurato con P+1 e MOD=9) •...
- Página 38 FUNZIONE - FUNCTION - FONCTION - FUNKTION - FUNCIÓN - MODUS - MODO • Apertura serratura del PE (configurato con P+1) in modo diretto senza la chiamata oppure attivazione attuatore 346210 (configurato con P+1 e M = 05 MOD=5) oppure attivazione attuatori serratura 346230 - 346260 (configurati con P+1) •...
- Página 39 Video - Kit FUNZIONE - FUNCTION - FONCTION - FUNKTION - FUNCIÓN - MODUS - MODO M = 06 • Funzione “INTERCOM PRE IMPOSTATO” con chiamata intercomunicante al PI configurato con N= 1. Dai posti interni presenti nell’impianto è possibile inviare una chiamata Intercom al posto interno configurato con N= 1. Il posto interno configurato con N= 1 riceve le chiamate Intercom ma NON le invia.
- Página 40 FUNZIONE - FUNCTION - FONCTION - FUNKTION - FUNCIÓN - MODUS - MODO • Intercom generale, invia una chiamata a tutti gli apparecchi dell’appartamento in impianti con interfaccia di appartamento 346850 oppure Intercom verso M = 10 tutti gli apparecchi dell’impianto in installazioni senza interfaccia di appartamento 346850; •...
- Página 41 Video - Kit FUNZIONE - FUNCTION - FONCTION - FUNKTION - FUNCIÓN - MODUS - MODO • Apertura serratura del PE (configurato con P+1) in modo diretto senza la chiamata oppure attivazione attuatore 346210 (configurato con P+1 e MOD=5) oppure attivazione attuatori serratura 346230 - 346260 (configurati con P+1) •...
- Página 42 FUNZIONE - FUNCTION - FONCTION - FUNKTION - FUNCIÓN - MODUS - MODO M = 33 Funzioni tasti sopra descritte + Studio professionale; Key functions described above + Professional studio ; Fonctions des touches ci-dessus + Bureau ; Oben beschriebene Tastenfunktionen + Professional Studio ; Funciones de las teclas descritas anteriormente + Estudio profesional ; Bovenstaande functietoetsen + professionele studio - Funções teclas descritas acima + Escritório profissional M = 53 Funzioni tasti sopra descritte + Cerca persone ;...
- Página 43 Video - Kit Legenda simboli – Symbol legend - Signification des symboles - Erläuterung der Symbole- Leyenda de los símbolos - Legenda symbolen - Legenda símbolos SIMBOLO - SYMBOL - SYMBOLE AZIONE DA EFFETTUARE - ACTIONS TO BE PERFORMED - ACTION FUNZIONE - FUNCTION - FONCTION - FUNKTION - FUNCIÓN - - SYMBOL - SÍMBOLO - SYMBOOL À...
- Página 44 • Regolazioni e Impostazioni Wi-Fi • Regulaciones y ajustes del Wi-Fi Menù regolazioni e Impostazioni Wi-Fi Menú de regulaciones y ajustes del Wi-Fi • Wi-Fi adjustments and settings • Afstellingen en Wifi-instellingen Wi-Fi adjustments and settings menu Menu afstellingen en Wifi-instellingen •...
- Página 45 Video - Kit • Attiva/disattiva la funzione studio professionale • Pagina impostazioni Wi-Fi dove puoi attivare/disattivare/resettare Wi- Fi, eseguire la prima associazione con l’app, e resettare il dispositivo • Activate/deactivate the Professional studio-Office function • Wi-Fi settings page, where it is possible to enable/disable/reset the Wi- •...
- Página 46 • Regolazione volume suoneria • Regulación del volumen del timbre • Ringtone volume adjustment • Volumeregeling beltoon • Réglage volume sonnerie • Regulação do volume da campainha • Ruftonlautstärke einstellen • Da stand-by premi il joystick per attivare il display e selezionare la pagina relativa •...
- Página 47 Video - Kit • 4 Agisci sul joistick verso l’alto/basso per selezionare un’altra impostazione o l’ultima pagina per uscire • 4 Move the joystick up/down to select another setting or the last page to exit • 4 Actionner le joystick vers le haut/bas pour sélectionner un autre réglage ou la dernière page pour quitter •...
- Página 48 • Attiva/disattiva studio professionale • Activación/desactivación estudio profesional • Activate/deactivate the professional studio-office • Activering/deactivering professionele studio function • Activação/desactivação do escritório profissional • Activer/désactiver bureau • Professional studio (büro)-funktion aktivieren/ deaktivieren • Questa funzione, all’arrivo di una chiamata da posto esterno, attiva automaticamente la serratura associata senza dover premere il tasto serratura.
- Página 49 Video - Kit • Da stand-by premi il joystick per attivare il display e selezionare la pagina relativa • From stand-by press the joystick to activate the display and select the corresponding page • Depuis la condition de stand-by appuyer sur le joystick pour activer l’ é cran et sélectionner la page correspondante •...
- Página 50 • Impostazioni Wi-Fi • Ajustes Wi-Fi • WI-FI settings • Wi-fi instellingen • Réglages Wi- Fi • Configurações Wi-Fi • Wi-Fi-Einstellungen • Da stand-by premi il joystick per attivare il display e selezionare la pagina relativa • From stand-by press the joystick to activate the display and select the corresponding page •...
- Página 51 Video - Kit • In questa pagina puoi eseguire il reset della rete Wi-Fi. • This page can be used to reset the Wi-Fi network. • Cette page permet d’ e ffectuer le reset du réseau Wi-Fi. • In dieser Seite können Sie das Wi-Fi-Netz zurücksetzen (Reset). •...
- Página 52 • Attiva/disattiva rete Wi-Fi • Activar/desactivar la red Wi-Fi • Enable/disable the Wi-Fi Network • Activeer/deactiveer het wifi-netwerk • Active/désactive le réseau Wi-Fi • Ativar/desativar Rede Wi-Fi • Wi-Fi-Netz aktivieren/deaktivieren • A Nome rete Wi-Fi a cui è collegato il dispositivo; premi il joystick per disattivare la rete Wi-Fi •...
- Página 53 Video - Kit • Premi il joystick per resettare la rete Wi-Fi • Press the joystick to reset the Wi-Fi network • Appuyer sur le joystick pour effectuer le reset du réseau Wi-Fi • Den Joystick drücken, um das Wi-Fi-Netz zurückzusetzen •...
- Página 54 • Reset dispositivo • Reset del dispositivo • Device reset • Apparaat resetten • Reset du dispositif • Rearme (reset) do dispositivo • Reset der Vorrichtung • Premi il joystick per resettare il dispositivo • Press the joystick to reset the device •...
- Página 55 Video - Kit • Info dispositivo • Información sobre el dispositivo • Device info • Informatie over het apparaat • Info dispositif • Informações sobre o dispositivo • Informationen Über Die Vorrichtung • Da stand-by premi il joystick per attivare il display e selezionare la pagina relativa •...
- Página 56 • 1 Durante una connessione premi il joistick per modificare I parametri • 1 During a connection press the joystick to modify the parameters • 1 Pendant une connexion, appuyer sur le joystick pour modifier les paramètres • 1 Während einer Verbindung, den Joystick drücken, um die Parameter zu ändern •...
- Página 57 Video - Kit • 3 Premi il joystick per modificare il livello • 3 Press the joystick to modify the level • 3 Appuyer sur le joystick pour modifier le niveau • 3 Den Joystick drücken, um das Niveau zu regeln •...
- Página 58 • Impostazioni • Réglages • Ajustes • Configurações Menù impostazioni Menu réglages Menú ajustes Menu programações • Settings • Einstellungen • Instellingen Settings menu Menü einstellungen Menu instellingen • Da stand-by tieni premuto il joystick per almeno 5 secondi per attivare il display ed entrare nel menù...
- Página 59 Video - Kit • Attivazione / disattivazione tono tasti • Activación/desactivación tono teclas • Activering/deactivering geluid toetsen • Enable/disable the key sound • Activation/désactivation tonalité touches • Tastenton aktivieren/deaktivieren • Questa funzione abilita/disabilita la riproduzione di un BEEP alla pressione dei tasti. Di default la funzione è disabilitata, per modificarla, eseguire la procedura seguente: •...
- Página 60 • Associazione di una suoneria ad un evento (chiamata) • Asociar un timbre a un evento (llamada) • Associate a ringtone to an event (call) • Een beltoon met een gebeurtenis (oproep) koppelen • Association d’une sonnerie à un événement (appel •...
- Página 61 Video - Kit • La página muestra el tipo de llamada (A) y el número de timbre corriente (B) 2 Accione el joystick hacia arriba/abajo para seleccionar el tipo de llamada para la que quiere ajustar el timbre (véase la tabla siguiente). •...
- Página 62 • 3 Premi il joystick per proseguire • 3 Press the joystick to continue • 3 Appuyer sur le joystick pour continuer • 3 Den Joystick drücken, um fortzufahren • 3 Pulse el joystick para continuar • 3 Druk op de joystick om verder te gaan •...
- Página 63 Video - Kit • Funzione STATO PORTA • Funktion TÜRSTATUS • Função ESTADO PORTA • DOOR STATE function • Función ESTADO PUERTA • Fonction ÉTAT PORTE • STAAT DEUR functie • Questa funzione segnala lo stato della Serratura, se è aperta il LED Serratura lampeggia, se è chiusa rimane spento.
- Página 64 • Funzione CERCA PERSONE • Funktion PERSONENSUCHE • Função PROCURA PESSOAS • PAGING function • Función BUSCADOR DE PERSONAS • Fonction CHERCHE-PERSONNES • Functie PERSONENZOEKSYSTEEM • Questa funzione permette di diffondere un messaggio vocale, dettato al microfono del Classe100 X16E, tramite gli altoparlanti dell’impianto di Diffusione sonora.
- Página 65 A abertura da fechadura é então permitida apenas quando a unidade externa e a unidade interna estão em comunicação sonora. • Spostare il microinterrutore ralativo sulla posizione ON BTICINO V.le Borri, 231 21100 (VA) ITALY Made in Italy •...
- Página 66 • • TELELOOP verwenden • Utilização TELELOOP Utilizzo TELELOOP • INDUCTIVE LOOP use • Utilizar TELELOOP •Utilisation TÉLÉLOOP • Gebruik TELELOOP • La funzione TELELOOP consente l’utilizzo del dispositivo ai portatori di protesi acustiche dotate di selettore (T). Commutare l’apparecchio acustico in posizione T e per garantire un corretto accoppiamento magnetico tra videoci- tofono ed apparecchio acustico si consiglia di posizionarsi frontalmente al dispositivo ad una distanza di 25 - 35 cm.
- Página 67 Video - Kit • Servizi ausiliari • Hilfsdienste • Serviços auxiliares • Auxiliary services • Servicios auxiliares • Services auxiliaires • Hulpservices • Gli schemi di seguito illustrati sono solo a titolo dimostrativo, per la configurazione dei dispositivi fare riferimento alla documentazione specifica. •...
- Página 68 • COMANDO SERRATURA CONTATTO PULITO O ALIMENTAZIONE DEDICATA; CLEAN CONTACT OR DEDICATED POWER SUPPLY DOOR LOCK CONTROL; • COMMANDE SERRURE CONTACT LIBRE OU ALIMENTATION DÉDIÉE; SCHLOSSSTEUERUNG REINER KONTAKT ODER SPEZIFISCHE VERSORGUNG; • COMANDO CERRADURA CONTACTO LIMPIO O ALIMENTACIÓN ESPECÍFICA; BEDIENING SLOT POTENTIAALVRIJ CONTACT OF SPECIFIEKE VOEDING; •...
- Página 69 Video - Kit • COMANDO LUCI SCALE; STAIRCASE LIGHT CONTROL; COMMANDE LUMIÈRES ESCALIERS; STEUERUNG TREPPENLICHT; COMANDO LUCES ESCALERAS; • BEDIENING TRAPHUISVERLICHTING; COMANDO DA LUZ DAS ESCADAS MOD = – = – 110-240Vac = – = – = – T = – 346210 230 Vac •...
- Página 70 • Avvertenze e diritti del consumatore • Advertencias y derechos del consumidor • Warnings and consumer rights • Waarschuwingen en rechten van de consument • Avertissements et droits du consommateur • Advertências e direitos do consumidor • Hinweise und Rechte der Verbraucher Leggere attentamente prima dell’uso e conservare per un riferimento futuro Read carefully before use and keep for future reference Divieto di toccare le unità...
- Página 71 Video - Kit Lea detenidamente antes del uso y conserve la documentación para Vóór het gebruik doorlezen en voor naslag bewaren consultas futuras Het is verboden het apparaat met natte handen aan te raken Se prohíbe tocar las unidades con las manos mojadas Het is verboden vloeibare reinigers of verstuivers te gebruiken Se prohíbe el uso de limpiadores líquidos o aerosoles Het is verboden de ventilatie-openingen af te sluiten...
- Página 72 Il testo completo della dichiarazione di conformità UE è disponibile al seguente indirizzo Internet: www.bticino.it/red • Hereby BTicino S.p.A., declares that the radio equipment 364614 (type Classe 100X16E kit + L3000 badge) is in compliance with Directive 2014/53/EU. The full text of the EU declaration of conformity is available at the following internet address: www.bticino.it/red...
- Página 73 Video - Kit • App Door Entry CLASSE100X • App Door Entry CLASSE100X • Door Entry CLASSE100X app • Door Entry CLASSE100X App • Appli Door Entry CLASSE100X • App Door Entry CLASSE100X • App Door Entry CLASSE100X • Puoi interagire con il tuo Classe100 X16E tramite l’app gratuita Door Entry CLASSE100X. Dopo esserti registrato ed aver effettuato l’autenticazione, devi eseguire l’associazione con il dispositivo;...
- Página 74 • Gebruik de gratis Door Entry CLASSE100X app om met uw Classe100 X16E te communiceren. Als u zich heeft geregistreerd en aangemeld, moet u de telefoon met het apparaat koppelen. Nu kunt u: – een oproep van de beeldhuistelefoon afkomstig van de Buitenposten beantwoorden; –...
- Página 75 Video - Kit...
- Página 76 Timbro installatore Installer stamp BTicino SpA si riserva il diritto di variare in qualsiasi momento i contenuti illustrati nel presente stampato e di comunicare, in qualsiasi forma e modalità, i cambiamenti apportati. BTicino SpA reserves at any time the right to modify the contents of this booklet and...