Tabla de contenido
Publicidad
Idiomas disponibles
Idiomas disponibles
Enlaces rápidos
Publicidad
Capítulos
Tabla de contenido

Manuales relacionados para Gossen MetraWatt GEOHM C


Resumen de contenidos para Gossen MetraWatt GEOHM C
- Página 1 Bedienungsanleitung ® GEOHM 3-349-089-01 Erdungsmessgerät 12/3.11...
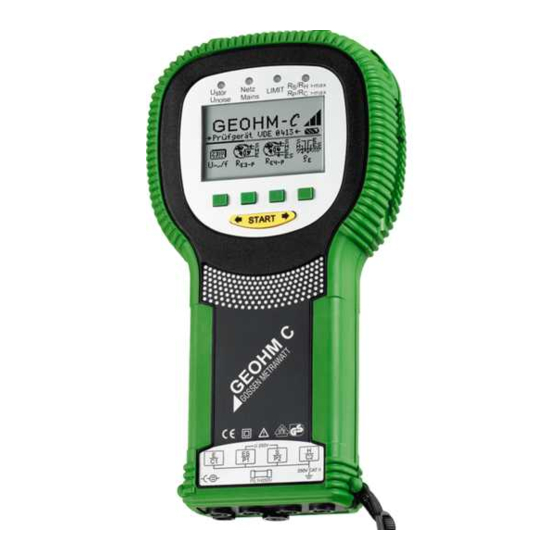
- Página 2 ® ® Mess- und Prüfgerät GEOHM Bedien- und Anzeigeeinheit GEOHM Schnittstellenadapter Infrarot-Schnittstelle (Anleitung zum Aufstecken siehe Seite 3) Bedien- und Anzeigeeinheit Signallampen >max LCD-Anzeigefeld Netz stör LIMIT Mains >max noise Anzeige Batteriezustand Der Verschiebe-Balken (scroll bar) zeigt an, wo man sich im Menü...
- Página 3 ® PC-Programm WinProfi zur Kommunikation mit dem GEOHM Das kostenlose PC-Einstiegsprogramm WinProfi dient der Kommunika- ® tion mit dem GEOHM C. Sie finden WinProfi auf unserer Homepage mit folgenden Inhalten und Funktionen: • aktuelle Prüfgeräte-Software – zum Laden einer anderen Landessprache für die Bedienerführung –...
-
Página 4: Tabla De Contenido
Inhalt Seite Inhalt Seite Anwendung ..................5 Datenbankfunktionen ..............25 Datensatz anlegen – Funktion Data ............... 25 Sicherheitsmerkmale und -vorkehrungen ........6 Messwerte speichern – Funktion STORE ............26 Begriffe ....................7 Datensätze abrufen – Funktion View .............. 27 6.3.1 Einen Datensatz innerhalb einer Speicheradresse löschen – Funktion View ..27 Inbetriebnahme ................8 6.3.2 Eine Speicheradresse löschen –... -
Página 5: Anwendung
Anwendung Dieses Gerät erfüllt die Anforderungen der geltenden europäischen und Platzierung der Erder nationalen EG-Richtlinien. Dies bestätigen wir durch die CE-Kennzeich- Ein Erder oder eine Erdungsanlage muss immer einen möglichst niedrigen nung. Die entsprechende Konformitätserklärung kann von Gesamtwiderstand gegenüber Bezugserde haben, um einen sicheren GMC-I Messtechnik GmbH angefordert werden. -
Página 6: Sicherheitsmerkmale Und -Vorkehrungen
Mess- und Funktionsprinzip Lesen Sie die Bedienungsanleitung vor dem Gebrauch Ihres Gerätes sorgfältig und ® vollständig. Beachten und befolgen Sie diese in allen Punkten. Die Messung des Erdungswiderstands mit dem GEOHM C erfolgt nach dem Strom-Spannungs-Messverfahren. Die von den Batterien gespeiste potentialfreie konstante Stromquelle (quarzgesteuerter Rechteck-Generator) liefert für die vier Messbereiche Achtung! Konstantströme bis maximal 10 mA mit einer Frequenz von 128 Hz. -
Página 7: Begriffe
Begriffe Damit keine Missverständnisse mit den verwendeten Fachausdrücken entstehen, sind nachfolgend die wichtigsten Begriffe erläutert. Erde ist die Bezeichnung sowohl für die Erde als Ort, als auch für die Erde als Stoff, z.B. Bodenart Humus, Lehm, Kies, Gestein. Bezugserde (neutrale Erde) ist der Bereich der Erde, insbesondere der Erd- oberfläche außerhalb des Einflussbereiches eines Erders bzw. -
Página 8: Inbetriebnahme
Inbetriebnahme Aufladbare NiCd- oder NiMH-Zellen können ebenfalls verwendet werden. Zum Ladevorgang und zum Ladenetzteil beachten Sie unbedingt Gerät ein-/ausschalten Kap. 8.2 auf Seite 31. Tauschen Sie immer einen kompletten Batteriesatz aus. Entsorgen Sie die Batterien umweltgerecht. Ð Lösen Sie an der Rückseite die beiden Schlitzschrauben des Batterie- fachdeckels und nehmen Sie ihn ab. -
Página 9: Menü Auswählen, Grundeinstellungen Vornehmen
Menü auswählen, Grundeinstellungen vornehmen Uhrzeit einstellen START Ð Betätigen Sie die Taste Time. Ð Der Eingabecursor steht zunächst auf der ersten Stelle des Datums. Geben Sie die gewünschte Ziffer über eine der Softkey-Tasten ein. Jeweils nicht eingeblendete Ziffern werden über die Taste oder eingeblendet. - Página 10 Werkseinstellungen – letzte Einstellungen Einschaltdauer festlegen, manuelles Ausschalten Hier können Sie vorgeben, ob Ihnen die Menüs entsprechend der Werkseinstellungen oder die jeweils zuletzt aufgerufenen Menüs angezeigt werden sollen. Ð Betätigen Sie die Taste Setup. Ð Drücken Sie die Taste T , und anschließend die Taste 10sec, 20sec, 30sec oder 60sec, je nachdem, nach welcher Zeit sich das Prüfgerät Ð...
- Página 11 Hintergrundbeleuchtung, Kontrast Selbsttest LCD-Beleuchtung Kontrast weniger mehr Ð Starten Sie aus dem Hauptmenü heraus den Selbsttest über die Taste Ð Betätigen Sie die Taste Display. Test. Der Test dauert einige Minuten. Ð Um die Lebensdauer der Batterien zu verlängern, können Sie die An- In den beiden Kopfzeilen werden folgende Informationen eingeblendet: zeigebeleuchtung völlig abschalten.
-
Página 12: Software-Update Laden, Protokolldaten Verwalten
Ð Position Display: zur Kontrolle der Anzeigeelemente, drücken Sie nach A Programm WinProfi auf PC installieren und starten jedem Testbild die Taste test. Ð Laden Sie die Software WinProfi von unserer Homepage herunter: Ð http://www.gossenmetrawatt.com Keytest: Führen Sie den Tastentest durch, indem Sie jede der Softkey- (... - Página 13 B Voraussetzung für den Software-Update oder Datenaustausch C Übertragung eines Software-Updates zum Prüfgerät ® Ð Schnittstelle suchen, an die das Prüfgerät GEOHM C angeschlossen ist. Ð PC: Wählen Sie die Funktion Alles neuester Stand im Menü Update. Fol- gen Sie den Hinweisen auf dem Monitor. Die Übertragungsdauer beträgt je nach Rechner 1 bis 2 Minuten.
- Página 14 D Protokolldaten verwalten • Protokollvorlagen bearbeiten oder senden ® Ð Stellen Sie die Verbindung zwischen PC und Prüfgerät GEOHM her. Verwenden Sie hierzu den Schnittstellenadapter IrDa-USB Con- verter. Ð Starten Sie das Programm WinProfi. Ð Schalten Sie das Prüfgerät ein. ®...
-
Página 15: Bedienung
Bedienung Lampen-Funktionen Lampe Anzeigefunktionen leuchtet Messfunktion Bedeutung Abhilfe Im LCD-Anzeigefeld werden angezeigt: • Messwerte mit ihrer Kurzbezeichnung und Einheit, Störspannung Die Störspannung in der zu Warten Sie, bis die Störung zurückgeht, Stör noise messenden Erde liegt über oder platzieren Sie die Prüfspieße an- •... -
Página 16: Spannungsmessung
Spannungsmessung Erdungsmessung allgemein Nach dem Aufbau der Messschaltung, wie in den nachfolgenden Abschnitten beschrieben, führen Sie die Messung wie folgt durch: Ð Drücken Sie zur Auswahl der Messung die Taste R für 3-polige E3-P oder R für 4-polige Erdungsmessungen entsprechend der Mess- E4-P schaltung. -
Página 17: Messbereich Einstellen - Funktion Range
5.4.1 Messbereich einstellen – Funktion RANGE Manuelle Messbereichswahl Automatische Messbereichswahl Die manuelle Messbereichswahl werden Sie in der Regel nicht benötigen, Bei der automatischen Messbereichswahl stellt das Gerät den größtmögli- es sei denn, Sie bekommen keinen Messwert oder sehr schwankende chen Strom ein, den es über die Strecke Erder – Hilfserder treiben kann. Messwerte in der automatischen Bereichswahl. -
Página 18: Grenzwert Einstellen - Funktion Limit
5.4.2 Grenzwert einstellen – Funktion LIMIT Messung des Erdwiderstandes Bei Bedarf können Sie einen Grenzwert für den Erdwiderstand R über die 5.5.1 Aufbau der Messschaltung, Messhinweise Taste LIMIT einstellen. Treten Messwerte oberhalb dieses Grenzwertes auf, so leuchtet die rote LED LIMIT. Dreileiterverfahren Menü... - Página 19 Hinweis Hinweis Um Nebenschlüsse zu vermeiden müssen die Messleitungen gut Um Nebenschlüsse zu vermeiden müssen die Messleitungen gut isoliert sein. Die Messleitungen sollten sich nicht kreuzen oder isoliert sein. Die Messleitungen sollten sich nicht kreuzen oder über lange Strecken parallel laufen, um den Einfluss von Verkopp- über lange Strecken parallel laufen, um den Einfluss von Verkopp- lungen auf ein Mindestmaß...
- Página 20 Ergeben die 3 Messungen den gleichen Messwert, dann ist dies der Richtige Messergebnisse können gesuchte Erdungswiderstand. Die Sonde befindet sich in der neutralen in solchen Fällen entweder durch Zone. Vergrößern des Abstandes Hilfser- der - Erder oder durch Versetzen Sind die drei Messwerte für den Erdungswiderstand jedoch voneinander der Sonde auf der Mittelsenkrech- abweichend, dann befindet sich der Sondenstandort entweder nicht in ten zwischen Hilfserder und Erder...
- Página 21 Ð Die gemessenen Widerstände werden tabellarisch und anschließend grafisch, wie in Bild 6 Seite 21 dargestellt aufgetragen (Kurve I). Kurve I (KI) Kurve II (KII) Legt man durch den Wendepunkt S1 eine Parallele zur Abszisse, so teilt diese Linie die Widerstandskurve in zwei Teile. Der untere Teil ergibt, an der Ordinate gemessen, den gesuchten Ausbrei- 1,28 0,98...
-
Página 22: Messung Des Spezifischen Erdwiderstandes
Messung des spezifischen Erdwiderstandes Maßgebend für die Größe des Ausbreitungswiderstandes eines Erders ist der spezifische Widerstand der Erde. Seine Kenntnis ist zur Vorausbe- rechnung des Ausbreitungswiderstandes bei der Planung von Erdungsan- lagen notwendig. Der spezifische Erdwiderstand (vgl. Kap. 3, Seite 7) kann mit dem ®... -
Página 23: Berechnen Von Ausbreitungswiderständen
5.6.2 Berechnen von Ausbreitungswiderständen Für die geläufigen Erderformen sind in dieser Tabelle die Formeln für die + Berechnung der Ausbreitungswiderstände angegeben. Für die Praxis genügen diese Faustformeln durchaus. Nummer Erder Faustformel Hilfsgröße 2 ---------- Banderder (Strahlenerder) — März Mai Juli Sept Nov ... -
Página 24: Messung Von Ohmschen Widerständen
Messung von ohmschen Widerständen ® Hinweis Mit dem Erdungsmessgerät GEOHM C kann der Widerstand flüssiger Die Zuleitungswiderstände werden in dieser Schaltung mitgemes- und fester Leiter gemessen werden, sofern diese kapazitäts- und indukti- sen. vitätsfrei sind. 5.7.1 Zweileiterverfahren 5.7.2 Vierleiterverfahren Ð... -
Página 25: Datenbankfunktionen
Datenbankfunktionen Zu jeder Messung können die angezeigten Messdaten mit oder ohne M-ART – Einstellungen Bedeutung Kommentar in einer internen Datenbank gespeichert werden. Um die ein- Durchgang zu metallenen Installationen zelnen Messwerte verschiedenen Gebäuden, Kunden, etc. zuordnen zu Durchgang zu metallenen Gasinstallationen können, muss zuvor ein Datensatz unter einer individuellen Speicherad- Durchgang zu metallenen Wasserinstallationen resse angelegt werden. -
Página 26: Messwerte Speichern - Funktion Store
Ð Mit Hilfe der Softkeys können Sie nacheinander die Datenfelder Messwerte speichern – Funktion STORE Ð GEBÄUDE, M-ART und KUNDEN-ID sowie die Bezeichnung des Gebäudes Starten Sie die jeweilige Messung. Die Taste STORE wird nach der eingeben. Messung statt der Taste INFO eingeblendet. Bei Messungen, die bereits ohne die Taste START erfolgen, z.B. -
Página 27: Datensätze Abrufen - Funktion View
Datensätze abrufen – Funktion View 6.3.1 Einen Datensatz innerhalb einer Speicheradresse löschen – Funktion View Ð Ð Wählen Sie View. Betätigen Sie die Taste Del. Es erfolgt keine Sicherheitsabfrage. Die Nummerierung der Datensätze ändert sich, sobald einzelne Da- Ð können Sie zwischen den Speicheradressen vorwärts mit tensätze gelöscht werden. -
Página 28: Alle Speicheradressen Löschen - Funktion Data
6.3.3 Alle Speicheradressen löschen – Funktion Data Ð Der Speicher kann maximal 250 Datensätze aufnehmen. Der Speicher ist Bei Betätigen von O und K gleichzeitig werden sämtliche gespei- voll, wenn das Rechteck rechts des Parameters „SPEICHER:“ gefüllt cherte Daten gelöscht. Der Balken rechts des Parameters „SPEICHER:“ erscheint. -
Página 29: Technische Kennwerte
Technische Kennwerte Mess- Impedanz Eigen- Betriebs- Anzeigebereich Messbereich größe Prüfstrom unsicherheit unsicherheit 0,01 ... 20 1,0 ... 20 (10% v.M. + 6D) 10 mA 0,1 ... 200 5 ... 200 (10% v.M. + 6D) 1 mA 1 ... - Página 30 Elektrische Sicherheit Anzeigewerte unter Berücksichtigung der Betriebsmessabweichung Schutzklasse II nach IEC 61010-1 Tabelle zur Ermittlung der maximalen Anzeigewerte für niederohmige Erdungswiderstände unter Berücksichtigung der Betriebsmess- Arbeitsspannung 250 V abweichung des Gerätes: Prüfspannung 2,3 kV maximaler maximaler Messkategorie 250 V CAT II Grenzwert Grenzwert Anzeigewert...
-
Página 31: Wartung
Wartung Batterie- und Akkubetrieb Wenn das Batteriesymbol nur noch aus einem gefüllten Segment besteht, Gehäuse dann wechseln Sie den Batteriesatz gegen einen neuen aus oder laden Eine besondere Wartung des Gehäuses ist nicht nötig. Achten Sie auf Sie den Akkusatz auf. eine saubere Oberfläche. -
Página 32: Sicherung
Ð Akkupack lagern Öffnen Sie die Verschlusskappe der Sicherung mit Hilfe eines geeigneten bei –20 +35 C Werkzeuges (z.B. Schraubendreher) durch Drücken und Linksdrehen. 1 Jahr bei –20 +45 C 3 Monate bei –20 +55 C 1 Monat Achtung! Falsche Sicherungen können das Messgerät schwer beschädigen. -
Página 33: Reparatur- Und Ersatzteil-Service
Gerne erstellen wir für Sie in unserem Kalibrierlabor DKD- oder Werkskali- Kompetenter Partner brierungen. Weitere Informationen hierzu finden Sie auf unserer Home- Die GMC-I Messtechnik GmbH ist zertifiziert nach page unter: DIN EN ISO 9001:2008. www.gossenmetrawatt.com ( Dienstleistungen DKD-Kalibrierzent- Unser DKD-Kalibrierlabor ist nach DIN EN ISO/IEC 17025:2005 beim rum oder ... - Página 34 GMC-I Messtechnik GmbH...
- Página 35 GMC-I Messtechnik GmbH...
- Página 36 Erstellt in Deutschland Änderungen vorbehalten Eine PDF-Version finden Sie im Internet Telefon+49 911 8602-111 GMC-I Messtechnik GmbH Telefax +49 911 8602-777 Südwestpark 15 E-Mail info@gossenmetrawatt.com 90449 Nürnberg • Germany www.gossenmetrawatt.com...
- Página 37 Operating Instructions ® GEOHM C-GB int. 3-349-089-03 Earth Tester 12/11.10...
- Página 38 ® ® GEOHM C Measuring and Test Instrument GEOHM C Control and Display Unit Interface Adapter Infrared Interface (for plug-on instructions see page 3) Control and Display Unit Signal Lamps >max Netz stör LIMIT Mains >max noise Battery Level Display The scroll bar indicates which menu is currently active.
- Página 39 ® PC software WinProfi for communication with GEOHM The free PC starter software WinProfi is used for communication with your ® GEOHM C test instrument. WinProfi is available on our homepage with the following content and functions: • up-to-date test instrument software –...
- Página 40 Contents Contents Page Page Applications ..................5 Database Function ................25 Creating a Data Record – Data Function ............25 Safety Features and Precautions ............6 Saving Measured Values to Memory – STORE Function ........26 Terminology ..................7 Querying Data Records – View Function ............27 6.3.1 Deleting a Data Record from within a Memory Address –...
-
Página 41: Applications
Applications This instrument fulfills the requirements of the applicable European and Correct Positioning of the Earth Electrode national EC guidelines. We confirm this with the CE marking. The relevant Earth electrodes and earthing systems must always demonstrate the declaration of conformity can be obtained from GMC-I Messtechnik lowest possible overall resistance relative to the ground reference plane GmbH. -
Página 42: Safety Features And Precautions
Measuring Method and Functional Principle Read the operating instructions carefully and thoroughly before using your ® instrument, and observe all instructions included therein. Earthing resistance is measured with the GEOHM C by means of the ammeter-voltmeter test method. The battery powered, potential-free constant power source (quartz- controlled square-wave generator) delivers constant current of up to Attention! 10 mA at a frequency of 128 Hz to the measuring ranges. -
Página 43: Terminology
Terminology In order to assure that the terminology used in these operating instruc- Φ tions is not misunderstood, the most important terms are defined below. Earth: a term used as a designation for the planet Earth, as well as a connection to ground. -
Página 44: Initial Start-Up
Initial Start-Up Rechargeable NiCd or NiMH batteries may be used as well. Be absolutely sure to refer to chapter 8.2 on page 31 regarding the charging cycle and Switching the Instrument On and Off the charging adapter. Always replace the batteries in complete sets. Dispose of batteries in an environmentally sound fashion. -
Página 45: Selecting Menus And Configuring Basic Settings
Selecting Menus and Configuring Basic Settings Setting the Clock START Ð Activate the Time key. Ð The cursor appears at the first digit in the date. Enter the desired numeral with one of the softkeys. Numerals which do not appear can be displayed with the help of the or the key. - Página 46 Default Settings – Last Used Settings Setting On-Time, Manual Shutdown A selection can be made here as to whether the menus will be displayed according to the default settings, or if the last opened menus should be displayed. Ð Press the Setup key. Ð...
- Página 47 Background Illumination and Contrast Self-Test LCD Illumination Contrast high Ð Ð Press the Display key. The self-test is started from the main menu with the Test key. The test has a duration of several minutes. Ð In order to extend battery service life, display illumination can be switched off entirely.
-
Página 48: Downloading A Software Update, Managing Report Data
Ð Display: Press the Test key after each test pattern has been displayed A Install WinProfi to the PC and Start the Program in order test the display elements. Ð Download the WinProfi software from our homepage: Ð http://www.gossenmetrawatt.com Keytest: Perform the key test by pressing each of the softkeys once, (→... - Página 49 B Prerequisites for Software Update or Data Exchange C Transmission of a Software Update to the Test Instrument ® Ð Find the interface to which the GEOHM C is connected. Ð PC: Select the Update All function from the Update menu. Follow the in- structions which appear at the monitor.
- Página 50 D Managing Report Data • Edit or transmit report templates ® Ð Connect the GEOHM C test instrument with your PC via the interface adapter IrDa-USB converter Ð Start WinProfi. Ð Switch on the test instrument. ® Ð Set the on-time period of the GEOHM C to „>>>>>“, to give you enough time for adjusting the settings in WinProfi before the test in- strument switches off again automatically, see chapter 4.5.
-
Página 51: Operation
Operation LED Functions LED lights Measuring Func- Significance Remedy Display Functions up red tion The following items are displayed at the LCD: Interference Interference voltage in the soil Wait until the interference voltage Stör noise voltage to be measured exceeds the clears on its own, or insert the test •... -
Página 52: Voltage Measurement
Voltage Measurement Earth Resistance Measurements in General Perform measurements as follows after setting up the measuring circuit as described in the following sections: Ð In order to select the desired measurement type, press the R E3-P key for 3-pole, or the R key for 4-pole earth resistance measure- E4-P ment in accordance with the measuring circuit setup. -
Página 53: Configuring The Measuring Range - Range Function
5.4.1 Configuring the Measuring Range – RANGE Function Manual Measuring Range Selection Automatic Measuring Range Selection As a rule, you will not need to use manual measuring range selection If automatic measuring range selection is used, the instrument selects the unless no measurement value is displayed, or if greatly fluctuating highest possible current it is capable of transmitting from the earth measurement values occur with automatic range selection. -
Página 54: Setting A Limit Value - Limit Function
5.4.2 Setting a Limit Value – LIMIT Function Measuring Earthing Resistance If required, an earthing resistance limit value R can be selected by press- 5.5.1 Measuring Circuit Setup, Measuring Instructions ing the LIMIT key. If measured values in excess of this limit value occur, the red LIMIT LED lights up. - Página 55 Note Note Measurement cables must be well insulated in order to avoid Measurement cables must be well insulated in order to avoid shunting. In order to reduce coupling influence to a minimum, shunting. In order to reduce coupling influence to a minimum, measurement cables should neither cross one another, nor should measurement cables should neither cross one another, nor should they run parallel to each other over long distances.
- Página 56 If the same measured value results from all 3 measurements, the correct In such cases, correct measure- earthing resistance value has been obtained and the probe is in the ment results can be obtained ground reference plane. either by increasing the distance between the earth electrode and However, if these 3 measured values differ from one another, either the the auxiliary earth electrode, or by...
- Página 57 Ð Measured resistance values are subsequently displayed as a table, and then as a graphic representation (curve I in Figure 6 on page 21). Curve I (CI) Curve II (CII) If a parallel line is drawn through inflection point S1 to the abscissa, the Ω...
-
Página 58: Measuring Soil Resistivity
Measuring Soil Resistivity The dissemination resistance value of a given earth electrode is depen- dent upon soil resistivity. Soil resistivity must be known in order to allow for advance calculation of dissemination resistance for the design of earthing systems. Soil resistivity ρ (see also chapter 3 on page 7) can be measured with the ®... -
Página 59: Calculating Dissemination Resistance
5.6.2 Calculating Dissemination Resistance The following table includes formulas for calculating dissemination +ρ resistance for various types of earth electrodes. These rule-of-thumb formulas are entirely adequate for practical application. Number Earth Electrode Type Formula Auxiliary Information ⋅ 2 ρ Jan. Sept. -
Página 60: Measuring Ohmic Resistance
Measuring Ohmic Resistance Note The resistance of liquid and solid conductors can be measured with the ® Cable resistance can be measured with this test setup. GEOHM C earth tester, as long as they are capacitance and induction- free. 5.7.2 4-Wire Connection 5.7.1 2-Wire Connection Ð... -
Página 61: Database Function
Database Function Displayed measurement data can be saved individually for each measure- M-TYPE Setting Significance ment to the internal database either with or without a comment. In order Continuity to metallic installations to assign the individual measured values to various buildings, customers Continuity to metallic gas lines etc., a data record must first be created with its own memory address. -
Página 62: Saving Measured Values To Memory - Store Function
Ð Entries can be made to the BUILDING, M-TYPE and CUSTOMER ID fields Saving Measured Values to Memory – STORE Function Ð one after the other, and a building designation can be entered with the Start the desired measurement. The STORE softkey is displayed after help of the softkeys. -
Página 63: Querying Data Records - View Function
Querying Data Records – View Function 6.3.1 Deleting a Data Record from within a Memory Address – View Function Ð Ð Press the View key. Press the Del key. No security requests appear. Data record numbering is changed as soon as an individual data re- Ð... -
Página 64: Delete All Memory Addresses - Data Function
6.3.3 Delete All Memory Addresses – Data Function Ð Up to 250 data records can be stored to memory. The memory is full Acknowledge by simultaneously pressing O and K to delete all data when the triangle to the right of the “MEMORY:” parameter is entirely filled in. from memory. -
Página 65: Characteristic Values
Characteristic Values Meas. Impedance, Intrinsic Measuring Display range Measuring Range Qty. Test Current Uncertainty Uncertainty 0.01 ... 20 Ω 1.0 ... 20 Ω ±(10% rdg. + 6d) 10 mA 0.1 ... 200 Ω 5 ... 200 Ω ±(10% rdg. + 6d) 1 mA 1 Ω... - Página 66 Electrical Safety Display Values including Allowances for Measuring Error Safety Class II per IEC 61010-1 Table for the determination of maximum display values for low earth resis- tances by making allowances for the tester’s measuring error: Operating Voltage 250 V Test Voltage 2.3 kV Maximum...
-
Página 67: Maintenance
Maintenance Battery Operation When only one solid segment remains in the battery symbol, the batteries Housing must be replaced, or recharged if rechargeable batteries are used. No special maintenance is required for the housing. Keep outside surfaces clean. Use a slightly dampened cloth and/or a special purifier for synthetic material for cleaning. -
Página 68: Fuses
Storing the Rechargeable Battery Pack at –20 … +35 °C 1 year at –20 … +45 °C 3 months Attention! at –20 … +55 °C 1 month Incorrect fuses may cause severe damage to the test instrument. Only original fuses from GMC-I Messtechnik GmbH assure the re- Replacing the Rechargeable Battery Pack quired protection by means of suitable breaking characteristics Ð... -
Página 69: Repair And Replacement Parts Service
www.gossenmetrawatt.com (→ Services → DKD Calibration Center or → Competent Partner FAQs → Calibration questions and answers). GMC-I Messtechnik GmbH is certified in accordance with DIN EN ISO 9001:2000. By having your measuring instrument calibrated regularly, you fulfill the Our DKD calibration laboratory is accredited by the Deutscher Kalibrierdi- requirements of a quality management system per DIN EN ISO 9001. - Página 70 GMC-I Messtechnik GmbH...
- Página 71 GMC-I Messtechnik GmbH...
- Página 72 Edited in Germany • Subject to change without notice • A pdf version is available on the internet. Telefon+49 911 8602-111 GMC-I Messtechnik GmbH Telefax +49 911 8602-777 Südwestpark 15 E-Mail info@gossenmetrawatt.com 90449 Nürnberg • Germany www.gossenmetrawatt.com...
- Página 73 Mode d’emploi ® GEOHM 3-349-089-04 Appareil de mesure de résistance de terre 12/4.11...
- Página 74 ® ® Appareil de mesure et de contrôle GEOHM Unité de commande et d'affichage du GEOHM Adaptateur d’interface Interface à infrarouges (instructions pour connecter voir à la page 3) Unité de commande et d'affichage Témoins lumineux >max Ecran LCD Netz stör LIMIT Mains...
- Página 75 ® Programme pour PC WinProfi pour communiquer avec le GEOHM Le logiciel d'initiation WinProfi pour PC gratuit permet la communication ® avec GEOHM C. Vous trouverez WinProfi sur notre site Internet avec les contenus et fonctions suivantes : • logiciel actuel pour appareils de contrôle –...
- Página 76 Sommaire Sommaire Page Page Application ..................5 Fonctions de banque de données ..........25 Création d'un jeu de données - Fonction Data ..........25 Remarques et mesures de sécurité ..........6 Mémorisation des valeurs de mesure - Fonction STORE ........26 Définitions ..................
-
Página 77: Application
Application Cet appareil justifie les exigences des directrices européennes et natio- Installation des prises de terre nales de la C.E. en vigueur. Nous confirmons cela avec le marquage CE. Une prise de terre ou une installation de mise à la terre doit toujours avoir La déclaration de conformité... -
Página 78: Remarques Et Mesures De Sécurité
Principe de mesure et de fonctionnement Veuillez lire attentivement et intégralement le présent mode d'emploi avant ® d'utiliser l'appareil et en observer tous les points. Le GEOHM C mesure les résistances de terre selon le principe de la mesure d'intensité/de tension. La source d'alimentation constante sans potentiel délivrée par les piles (générateur rectangle commandé... -
Página 79: Définitions
Définitions Pour éviter toute confusion avec les termes techniques employés, voici la Φ définition des principales expressions : Terre : désigne aussi bien le terrain en tant que lieu que la terre en tant que matière, p. ex. humus, argile, gravier, roche. Terre de référence (terre neutre) : zone de terre, en particulier à... -
Página 80: Mise En Service
Mise en service Vous pouvez également utiliser des accus NiCd ou NiMH rechargeables. Pour la procédure de chargement et le type de chargeur, reportez-vous Activation et désactivation de l'appareil impérativement au paragraphe 8.2, page 31. Il faut toujours remplacer le jeu de piles complet. Eliminez les piles conformément à... -
Página 81: Sélection Des Menus Et Programmation Des Réglages De Base
Sélection des menus et programmation des réglages de base Réglage de la date et de l'heure START Ð Appuyez sur la touche Time. Ð Le curseur d'entrée se trouve d'abord sur le premier caractère de la date. Entrez le chiffre souhaité avec une des touches programmables. Affichez les chiffres désirés avec les touches . - Página 82 Réglages en usine ou derniers réglages Programmation du délai de désactivation et désactivation manuelle Vous pouvez décider d'afficher les menus définis en usine ou les derniers menus appelés. Ð Appuyez sur la touche Setup. Ð Appuyez sur la touche T , puis sur la touche 10sec, 20sec, 30sec ou Ð...
- Página 83 Rétro-éclairage et contraste Test interne Eclairage de l'écran Contraste moins plus Ð Ð Appuyez sur la touche Display. Lancez le test interne à partir du menu principal avec la touche Test. Le test dure quelques minutes. Ð Pour prolonger la durée de vie des piles, vous pouvez complètement désactiver l'éclairage de l'écran.
-
Página 84: Chargement De La Mise À Jour Du Logiciel, Gestion Des Données De Procès-Verbaux
Ð Position Display : pour contrôler les éléments de l'écran, appuyez sur la A Installer et lancer le programme WinProfi sur le PC touche Test après chaque image de test. Ð Téléchargez le logiciel WinProfi de notre site Internet : Ð... - Página 85 B Conditions pour la mise à jour du logiciel ou l’échange des données C Transfert d’une mise à jour du logiciel à l’appareil de contrôle ® Ð Recherche de l'interface à laquelle l'appareil de contrôle GEOHM est raccordé. Ð PC : sélectionner la fonction Update all du Menu Update.
- Página 86 D Gestion des données de procès-verbaux • Traitement ou émission de modèles de procès-verbaux Ð Etablissez une liaison entre l’ordinateur et l’appareil de contrôle ® GEOHM C. Pour cela, utilisez le convertisseur IrDa-USB. Ð Lancez le programme WinProfi. Ð Activez l’appareil de contrôle avec la touche Menu. ®...
-
Página 87: Utilisation
Utilisation Fonctions des témoins lumineux Témoin Fonction de Signification Solution Fonctions d'affichage rouge mesure L'écran LCD affiche Tension para- La tension parasite présente Attendez que la perturbation reflue Stör noise • les valeurs de mesure avec leur symbole et l'unité de mesure site dans la terre à... -
Página 88: Mesure De Tension
Mesure de tension Généralités sur les mesures de résistance de terre Après avoir monter le circuit de mesure comme indiqué dans les para- graphes suivants, réalisez la mesure de la manière suivante : Ð Appuyez sur la touche R pour effectuer une mesure de résistance E3-P de terre à... -
Página 89: Réglage De La Plage De Mesure - Fonction Range
5.4.1 Réglage de la plage de mesure - Fonction RANGE Sélection manuelle de la plage de mesure Sélection automatique de la plage de mesure Il est généralement inutile de sélectionner manuellement la plage de En mode de sélection automatique de la plage de mesure, l'appareil pro- mesure, sauf si le mode de sélection automatique de la plage de mesure gramme automatiquement la plus forte intensité... -
Página 90: Programmation De La Valeur Limite - Fonction Limit
5.4.2 Programmation de la valeur limite - Fonction LIMIT Mesure de la résistance de terre Vous pouvez si nécessaire programmer une valeur limite de résistance de 5.5.1 Montage du circuit de mesure et remarques concernant la mesure terre R avec la touche LIMIT. Si des valeurs supérieures à ce seuil sont mesurées, la LED rouge LIMIT s'allume. - Página 91 Remarque Remarque Pour éviter les dérivations, les cordons de mesure doivent être Pour éviter les dérivations, les cordons de mesure doivent être bien isolés. Les cordons de mesure ne doivent pas se croiser ni bien isolés. Les cordons de mesure ne doivent pas se croiser ni courir parallèlement sur de grandes distances pour limiter au mini- courir parallèlement sur de grandes distances pour limiter au mini- mum les effets de couplage.
- Página 92 Si les 3 mesures donnent la même valeur, c'est la résistance de terre Dans ce cas, on peut obtenir des recherchée. La sonde se trouve dans la zone neutre. résultats de mesure corrects soit en augmentant la distance entre la En revanche, si les trois valeurs de résistance de terre sont différentes, prise de terre et la prise de terre soit la sonde ne se trouve pas dans la zone neutre, soit la courbe de ten-...
- Página 93 Ð Enregistrer les valeurs de résistance mesurées sous forme de tableau, puis de graphique, comme indiqué sur la figure 6, page 21 (courbe I). Courbe I (KI) Courbe II (KII) Si une droite parallèle à l'abscisse passe par le point d'inflexion S1, elle divise la courbe de résistance en deux parties.
-
Página 94: Mesure De La Résistance De Terre Spécifique
Mesure de la résistance de terre spécifique La résistance spécifique de la terre est un élément important pour la résis- tance de diffusion d'une prise de terre. Il faut la connaître pour calculer la résistance de diffusion lors de l'étude des installations de mise à la terre. On peut mesurer la résistance de terre spécifique ρ... -
Página 95: Calcul Des Résistances De Diffusion
5.6.2 Calcul des résistances de diffusion Le tableau suivant présente les formules de calcul des résistances de dif- +ρ fusion des types courants de prises de terre. Ces formules empiriques sont largement suffisantes pour la pratique. Numéro Prise de terre Formule Paramètre ⋅... -
Página 96: Mesure De Résistances Ohmiques
Mesure de résistances ohmiques ® Remarque L'appareil de mesure de résistance de terre GEOHM C permet de mesu- Avec ce type de montage, les résistances de ligne sont prises en rer la résistance de conducteurs liquides ou solides, à condition qu'ils ne compte. -
Página 97: Fonctions De Banque De Données
Fonctions de banque de données Les données de mesure affichées pour chaque mesure peuvent être Types de mesure Signification mémorisées, avec ou sans commentaire, dans une banque de données Transmission à des installations métalliques interne. Pour pouvoir associer les valeurs de mesure à différents bâti- Transmission à... -
Página 98: Mémorisation Des Valeurs De Mesure - Fonction Store
Ð Avec les touches programmables, vous pouvez sélectionner succes- Mémorisation des valeurs de mesure - Fonction STORE Ð sivement les champs de données BÂTIMENT, M-TYPE et CLIENT-ID, ainsi Lancez la mesure. La touche STORE s'affiche après la mesure, à la que la désignation du bâtiment. -
Página 99: Visualisation Des Jeux De Données - Fonction View
Visualisation des jeux de données - Fonction View 6.3.1 Effacer un jeu de données dans une adresse mémoire - Fonction View Ð Ð Sélectionnez View. Appuyez sur la touche Del. Le système ne vous demande pas de confirmer. La numérotation des jeux de données est modifiée dès que Ð... -
Página 100: Effacer Toutes Les Adresses Mémoire - Fonction Data
6.3.3 Effacer toutes les adresses mémoire - Fonction Data Ð La mémoire peut contenir 250 jeux de données maximum. La mémoire En appuyant simultanément sur O et K, vous effacez toutes les don- est pleine lorsque la barre à droite du paramètre "MÉMOIRE“ est remplie. nées mémorisées. -
Página 101: Caractéristiques Techniques
Caractéristiques techniques Impé- Gran- Plage dance Insécurité in- Ecart de mesure deur de Plage de mesure d'affichage Courant trinsèque de service mesure d'essai 0,01 ... 20 Ω 1,0 ... 20 Ω ±(10% VM + 6D) 10 mA 0,1 ... 200 Ω 5 ... - Página 102 Sécurité électrique Valeurs d’affichage compte tenu de l’écart de mesure de service maximale de l’appareil Classe de protection II selon CEI 61010-1 Tableau de calcul des valeurs maximales d’affichage pour de basses Tension de service 250 V résistances de terre compte tenu de l’écart de mesure de service de Tension d'essai 2,3 kV l’appareil:...
-
Página 103: Maintenance
Maintenance Fonctionnement sur piles et sur accus Lorsque le symbole des piles ne comporte plus qu'un segment plein, Boîtier vous devez remplacer le jeu de piles par un jeu neuf ou charger le jeu Le boîtier ne nécessite aucune maintenance particulière. Veillez à ce que d'accus. -
Página 104: Fusible
Ð Stockage des packs d'accus Ouvrez le capot du fusible en appuyant et en tournant à gauche avec un outil approprié (p. ex., un tournevis). 1 an entre –20 et +35°C 3 mois entre –20 et +45°C 1 mois entre –20 et +55°C Attention ! Des fusibles inadaptés peuvent gravement endommager l'appareil de Remplacement de pack d'accus... -
Página 105: Service Réparation Et Pièces De Rechange Centre D'éTalonnage Et Service De Location D'aPpareils
aux valeurs normales à rajuster sont mesurés et documentés. Ces écarts Partenaire compétent ainsi déterminés vous serviront à corriger les valeurs lues lors de la pro- La société GMC-I Messtechnik GmbH est certifiée selon DIN EN ISO chaine application. 9001:2008. Nous réalisons volontiers à... - Página 106 GMC-I Messtechnik GmbH...
- Página 107 GMC-I Messtechnik GmbH...
- Página 108 Rédigé en Allemagne • Sous réserve de modifications • Vous trouvez une version pdf dans l’internet Téléphone +49 911 8602-111 GMC-I Messtechnik GmbH Télécopie +49 911 8602-777 Südwestpark 15 E-Mail info@gossenmetrawatt.com 90449 Nürnberg • Allemagne www.gossenmetrawatt.com...
- Página 109 Istruzioni per l’uso ® GEOHM 3-349-089-10 Misuratore di terra 12/6.11...
- Página 110 ® ® Strumento di misura GEOHM Display e tastiera del GEOHM Adattatore di interfaccia Interfaccia IR (istruzioni per l’inserimento vedi pag. 3) Display e tastiera Spie >max Netz stör LIMIT Mains >max noise Stato di carica della batteria La barra di scorrimento evidenzia la posizione nel menu.
- Página 111 ® Programma WinProfi per la comunicazione con il GEOHM Il programma gratuito WinProfi per PC serve alla comunicazione con il ® GEOHM C. Il software si può scaricare dal nostro sito internet. Contenuti e funzionalità: • versione attuale del software –...
- Página 112 Indice Indice Pagina Pagina Impiego ................... 5 Banca dati ..................25 Creare il record – funzione Data ..............25 Caratteristiche di sicurezza e precauzioni ........6 Salvare i valori di misura – funzione STORE ............ 26 Terminologia ................... 7 Richiamare un record – funzione View ............27 6.3.1 Cancellare un record entro l’indirizzo memoria –...
-
Página 113: Impiego
Impiego Il presente strumento è conforme ai requisiti previsti dalle vigenti direttive Collocamento dei dispersori comunitarie e dalle relative norme nazionali. La conformità è attestata dal Al fine di garantire il funzionamento sicuro degli impianti elettrici in confor- marchio CE. La relativa dichiarazione di conformità può essere richiesta mità... -
Página 114: Caratteristiche Di Sicurezza E Precauzioni
Principio di misura e di funzionamento Prima di mettere in servizio lo strumento, leggere attentamente e integralmente le ® presenti istruzioni per l’uso. Osservarle e seguirle in tutti i punti. La misura della resistenza di terra con il GEOHM C si basa sul metodo voltamperometrico. -
Página 115: Terminologia
Terminologia Tensione di contatto U è quella parte della tensione di terra per la quale il corpo di una persona può formare un ponte umano (v. figura 1 pag. 7), Onde evitare degli equivoci riguardanti i termini tecnici utilizzati, abbiamo con il percorso della corrente passando dalla mano al piede (distanza oriz- incluso il seguente glossario che riporta le definizioni dei termini più... -
Página 116: Messa In Servizio
Messa in servizio E’ possibile impiegare anche accumulatori NiCd o NiMH. Per la ricarica e il caricabatterie vedi le istruzioni al cap. 8.2 pag. 31. Accendere/spegnere lo strumento Sostituire sempre l’intero set batterie. Smaltire le batterie esauste in osservanza dei regolamenti sulla tutela ambientale. -
Página 117: Selezione Del Menu, Impostazioni Base
Selezione del menu, impostazioni base Regolare l’ora START Ð Azionare il tasto Time. Ð Il cursore è posizionato sulla prima cifra della data. Introdurre il nuovo valore con uno dei tasti softkey. Alle cifre non visibili si accede con . Dopo aver selezionato una cifra, il cursore si sposta di una posizione verso destra. - Página 118 Impostazioni di fabbrica – impostazioni precedenti Spegnimento automatico/manuale Questa opzione permette di stabilire se vengono visualizzati i menu previ- sti nel setup di fabbrica o quelli richiamati per ultimi. Ð Azionare il tasto Setup. Ð Premere il tasto T e successivamente il tasto 10sec, 20sec, 30sec o Ð...
- Página 119 Retroilluminazione, contrasto Autotest Illuminazione LCD Contrasto meno più Ð Ð Azionare il tasto Display. L’autotest viene avviato con il tasto test nel menu principale e dura qualche minuto. Ð Per ridurre il consumo delle batterie, è possibile disattivare completa- mente l’illuminazione del display, premendo il relativo tasto softkey. Le due righe in alto del display forniscono le seguenti informazioni: Type/Cal: tipo dello strumento/data dell’ultima taratura (calibrazione)
-
Página 120: Aggiornamento Del Software E Gestione Dei Dati Di Documentazione
Ð Display: per verificare il buon funzionamento del display premere il A Installazione e lancio del programma WinProfi sul PC tasto test dopo ogni immagine test. Ð Scaricare il software WinProfi dal nostro sito internet: Ð http://www.gossenmetrawatt.com Keytest: premere una volta ciascun tasto softkey e tre volte (sinistro, (... - Página 121 B Premesse per l’aggiornamento del software o per lo scambio di dati C Aggiornamento del software dello strumento ® Ð Cercare l’interfaccia dove è collegato lo strumento GEOHM Ð PC: Nel menu Update selezionare la funzione Update all [Aggiorna tutto]. Seguire le istruzioni sullo schermo.
- Página 122 D Gestione dei dati di documentazione • Modificare o trasmettere dei modelli di verbale ® Ð Collegare lo strumento GEOHM C al PC, usando l’adattatore inter- faccia IrDa-USB Converter. Ð Avviare il programma WinProfi. Ð Accendere lo strumento. ® Ð Impostare il tempo di inserzione del GEOHM C a ">>>>>", in modo da avere abbastanza tempo per le impostazioni in WinProfi , prima...
-
Página 123: Uso
Significato delle spie Lampada Indicazioni accesa Funzione di Significato Rimedio con luce misura L’LCD visualizza: rossa • i valori di misura con abbreviazioni e unità, Tensione di Le tensioni di disturbo nel Attendere finché cessa il disturbo o Stör noise •... -
Página 124: Misura Di Tensione
Misura di tensione Misure di terra - generalità Dopo aver realizzato il circuito di misura come descritto ai paragrafi seguenti, procedere nel modo seguente: Ð Per selezionare la misura, premere il tasto R per il modo a 3 con- E3-P duttori oppure R per quello a 4 conduttori, a seconda del circuito E4-P... -
Página 125: Impostare Il Campo Di Misura - Funzione Range
5.4.1 Impostare il campo di misura – funzione RANGE Selezione manuale del campo Selezione automatica del campo (autorange) Nella maggior parte dei casi non sarà necessario ricorrere alla selezione Nella funzione autorange, lo strumento imposta la massima corrente che manuale del campo, a meno che la funzione autorange non fornisca nes- può... -
Página 126: Impostare Il Valore Limite - Funzione Limit
5.4.2 Impostare il valore limite – funzione LIMIT Misura della resistenza di terra Con il tasto LIMIT è possibile fissare un valore limite della resistenza di terra 5.5.1 Realizzazione del circuito di prova, avvertenze per la misura . Se il valore misurato supera tale limite, si accenderà il LED rosso LIMIT. Metodo a tre conduttori Selezionare il menu Limite Impostare il valore limite... - Página 127 Nota Nota Al fine di evitare dispersioni, i cavi di misura devono essere ben Al fine di evitare dispersioni, i cavi di misura devono essere ben isolati. Inoltre, per prevenire gli effetti di accoppiamento, essi non isolati. Inoltre, per prevenire gli effetti di accoppiamenti, essi non dovrebbero né...
- Página 128 Se le tre misure portano a risultati identici, il relativo valore rappresenta la In tali casi, per ottenere dei risultati resistenza di terra cercata. La sonda si trova nella zona neutra. corretti, sarà necessario aumen- tare la distanza tra dispersore ausi- Se invece i risultati delle tre misure non coincidono, la sonda non è...
- Página 129 Ð Le resistenze misurate vengono riportate in una tabella e quindi rap- presentate graficamente, come illustra la figura 6 pag. 21 (curva I). Curva I (CI) Curva II (CII) Facendo passare, attraverso il punto di flesso S1, una parallela all’ascissa, questa retta divide in due parti la curva della resistenza.
-
Página 130: Misura Della Resistività Del Terreno
Misura della resistività del terreno Il valore della resistenza di attraversamento di un dispersore dipende dalla resistività del terreno, la quale deve perciò essere nota per poter effettuare in sede di progetto i relativi calcoli per l’impianto di terra. La resistività del terreno (v. -
Página 131: Calcolo Delle Resistenze Di Attraversamento
5.6.2 Calcolo delle resistenze di attraversamento La seguente tabella riporta le formule di calcolo delle resistenza di attra- + versamento per i tipi più comuni di dispersori. Per pratica quotidiana, queste formule approssimative risultano normal- mente sufficienti. Numero Dispersore Formula approssimativa Grandezza ausiliaria ... -
Página 132: Misura Di Resistenze Ohmiche
Misura di resistenze ohmiche ® Nota Con il misuratore di terra GEOHM C è possibile misurare la resistenza di Con questo tipo di circuitazione, il risultato della misura com- conduttori liquidi e solidi a condizione che questi siano privi di capacità e prende anche la resistenza dei collegamenti. -
Página 133: Banca Dati
Banca dati I dati rilevati nelle misure possono essere salvati nella banca dati integrata TIPO M – Opzioni Significato dello strumento, anche con commenti. Per stabilire le relazioni tra valori di Continuità verso installazioni metalliche misura ed edifici, clienti, ecc., si deve prima creare un record con un indi- Continuità... -
Página 134: Salvare I Valori Di Misura - Funzione Store
Ð Usare i softkey per introdurre i dati per i campi LOCALE, TIPO-M e Salvare i valori di misura – funzione STORE Ð ID-CLIENTE nonché la denominazione dell’edificio. Avviare la misura. Al termine appare il tasto STORE invece del tasto INFO. -
Página 135: Richiamare Un Record - Funzione View
Richiamare un record – funzione View 6.3.1 Cancellare un record entro l’indirizzo memoria – funzione View Ð Ð Selezionare View. Azionare il tasto Del. Non viene richiesta alcuna conferma. La numerazione dei record viene aggiornata quando è stato cancel- Ð si percorrono i record salvati in avanti, con indietro. -
Página 136: Cancellare Tutti Gli Indirizzi Memoria - Funzione Data
6.3.3 Cancellare tutti gli indirizzi memoria – funzione Data Ð La memoria può contenere max. 250 record. La capacità di memoria è Azionando contemporaneamente O e K vengono cancellati tutti i dati esausta, quando il rettangolino a destra del parametro „MEMORIA:“ è pieno. memorizzati. -
Página 137: Dati Tecnici
Dati tecnici Imped. Gran- Campo Incertezza Campo di misura Corrente Incertezza di misura dezza d’indicazione intrinseca di prova 0,01 ... 20 1,0 ... 20 (10% d.v.m. + 6d) 10 mA 0,1 ... 200 5 ... 200 (10% d.v.m. - Página 138 Sicurezza elettrica Letture massime considerando l’errore dello strumento Classe di isolamento II sec. IEC 61010-1 Tabella per determinare le letture massime per basse resistenze di terra, tenendo conto dell’errore dello strumento: Tensione di lavoro 250 V Valore limite Lettura massima Valore limite Lettura massima Tensione di prova...
-
Página 139: Manutenzione
Manutenzione Funzionamento con batterie/accumulatori Quando il simbolo di carica presenta un solo segmento pieno è necessa- Involucro rio sostituire il set batterie o ricaricare gli accumulatori. L’involucro non richiede alcuna manutenzione particolare. Mantenere comunque pulite le superfici. Per la pulizia utilizzare un panno leggermente umido o un detergente per superfici in plastica. -
Página 140: Fusibile
Ð Tempi di immagazzinaggio del battery pack Con un attrezzo adatto s (p. es. cacciavite), aprire il tappo del fusibile, a –20 +35 C premendo e ruotando in senso antiorario. 1 anno a –20 +45 C 3 mesi a –20 ... -
Página 141: Servizio Riparazioni E Ricambi, Centro Di Taratura, Locazione Di Strumenti
Saremo lieti di eseguire per voi le tarature DKD o di fabbrica nel nostro Partner competente laboratorio di taratura. Per maggiori informazioni rinviamo al nostro sito La GMC-I Messtechnik GmbH è certificata secondo internet: DIN EN ISO 9001:2008. www.gossenmetrawatt.com ( Services DKD Calibration Center Il nostro laboratorio di taratura DKD è... - Página 142 GMC-I Messtechnik GmbH...
- Página 143 GMC-I Messtechnik GmbH...
- Página 144 Redatto in Germania Con riserva di modifiche Una versione pdf è disponibile via Internet Telefono +49 911 8602-111 GMC-I Messtechnik GmbH Telefax +49 911 8602-777 Südwestpark 15 E-Mail info@gossenmetrawatt.com 90449 Nürnberg • Germania www.gossenmetrawatt.com...
- Página 145 Gebruiksaanwijzing ® GEOHM C-NL 3-349-089-05 Aardingsmeter 3/8.08...
- Página 146 ® ® Meet- en testinstrument Bedieningspaneel en display GEOHM GEOHM Infrarood-interface Bedieningspaneel en display Signaallampen >max LCD-display Netz stör LIMIT Mains >max noise Weergave toestand batterijen De scroll-bar geeft aan, waar u zich in het menu bevindt. Toetsen voor het kiezen van hoofd- en submenu kunnen START...
- Página 147 Aardingsmeting algemeen ................12 5.4.1 Meetbereik instellen – functie RANGE ............13 5.4.2 Grenswaarde instellen – functie LIMIT ............14 Meten van aardingsweerstand ............... 14 5.5.1 Opbouw van de schakeling, aanwijzingen ............14 Meten van de bodemweerstand ..............18 5.6.1 Geologische bepaling ..................18 5.6.2 Berekenen van uitbreidingsweerstanden ............
-
Página 148: Gebruik
Gebruik Correct positioneren van de aardingselektrode ® De GEOHM C is een compact instrument voor het meten van aardings- Een aardingselektrode of een aardingssysteem dient altijd een zo klein weerstand in elektrische installaties volgens de volgende voorschriften: mogelijke totale weerstand ten opzichte van de referentieaarde te hebben, DIN VDE 0100 Installeren van sterkstroominstallaties met om het veilig gebruiken van de elektrische installaties te kunnen waarbor-... -
Página 149: Veiligheidsvoorschriften- En Richtlijnen
Meetmethode en functieprincipe Veiligheidsvoorschriften- en richtlijnen ® ® Het elektronische meet- en testinstrument GEOHM C is volgens de vei- Het meten van de aardingsweerstand met de GEOHM C gebeurt via de ligheidsvoorschriften IEC 61010-1/EN 61010-1/VDE 0411-1 en stroom-spanningmeting. EN 61557 gebouwd en getest. De door de batterij gevoede potentiaalvrije constante stroombron (kwarts- Wanneer het instrument op de voorgeschreven manier wordt gebruikt, is gestuurde vierkante golf-generator) levert voor de vier meetbereiken con-... -
Página 150: Terminologie
Terminologie menselijke lichaam van hand naar voet (horizontale afstand van het aan- geraakte deel ca. 1 m) of van hand naar hand loopt. Om te voorkomen dat de termen die in deze gebruiksaanwijzing worden gebruikt verkeerd worden begrepen, worden de belangrijkste termen hier- onder gedefinieerd. -
Página 151: Ingebruikname
Ingebruikname Oplaadbare NiCd- of NiMH-batterijen kunnen ook worden gebruikt. Lees vóór het opladen en de oplader hoofdstuk 8.2 op pagina 26. Instrument in-/ uitschakelen Vervang altijd alle batterijen tegelijk. Zorg ervoor dat de batterijen op een milieuvriendelijke manier worden ver- werkt. -
Página 152: Menu Kiezen, Basisinstellingen Invoeren
Menu kiezen, basisinstellingen invoeren Instellen van de tijd START ➭ Druk op de toets Time. ➭ De cursor springt op de eerste positie van de datum. Voer het ge- wenste cijfer met behulp van een van de softkeys in. Eventuele niet weergegeven cijfers worden met de toets zichtbaar. - Página 153 Standaardinstellingen – laatste instellingen Inschakelduur vastleggen, handmatig uitschakelen Hier kunt u aangeven, of u de menu’s van de standaardinstellingen wilt gebruiken, of het desbetreffende laatste menu moet worden opgeroepen. ➭ Druk op de toets Setup. ➭ Druk op de toets T , en vervolgens op de toets 10sec, 20sec, 30sec of ➭...
- Página 154 Achtergrondverlichting, contrast Zelftest LCD-Verlichting Contrast minder meer ➭ ➭ Druk op de toets Display. Start vanuit het hoofdmenu de zelftest via de toets test. De test duurt ➭ enkele minuten. Om de levensduur van de batterijen te verlengen, kan de displayver- lichting volledig worden uitgeschakeld.
-
Página 155: Algemeen Gebruik
Zodra de testen in de linkerkolom zijn uitgevoerd, moeten de volgende Functies van de lampen testen handmatig worden gestart. Lamp ➭ Positie Illum: druk tweemaal op de toets test, voor het uit- en inschake- licht rood Meetfunctie Betekenis Oplossing len van de verlichting. ➭... -
Página 156: Spanningsmeting
Spanningsmeting Aardingsmeting algemeen Na het opbouwen van de meetschakeling zoals in de volgende hoofd- stukken beschreven, wordt de meting als volgt uitgevoerd: ➭ Druk voor het kiezen van de meting op de toets R voor 3-polige of E3-P op R voor 4-polige aardingsmetingen in overeenstemming met de E4-P meetschakeling. -
Página 157: Meetbereik Instellen - Functie Range
5.4.1 Meetbereik instellen – functie RANGE Handmatige keuze van het meetbereik De handmatige keuze van het meetbereik gebruikt u in de regel alleen als Automatische keuze van het meetbereik u geen meetwaarde krijgt of zeer schommelende meetwaarden in de Bij de automatische keuze van het meetbereik stelt het instrument de automatische keuze van het meetbereik. -
Página 158: Grenswaarde Instellen - Functie Limit
5.4.2 Grenswaarde instellen – functie LIMIT Meten van aardingsweerstand Indien nodig kan er een grenswaarde voor de aardingsweerstand R wor- 5.5.1 Opbouw van de schakeling, aanwijzingen den ingesteld door middel van de toets LIMIT. Indien er meetwaarde boven deze grenswaarde optreden, dan licht het rode LED LIMIT op. Drieleidingenmeting Menu grenswaarde kiezen Grenswaarde instellen... - Página 159 Aanwijzing Aanwijzing Om shunts te vermijden moeten de meetleidingen goed geïso- Om shunts te vermijden moeten de meetleidingen goed geïso- leerd zijn. De meetleidingen moeten elkaar niet kruisen of in lange leerd zijn. De meetleidingen moeten elkaar niet kruisen of in lange banen parallel lopen, om koppelingsinvloeden zo klein mogelijk te banen parallel lopen, om koppelingsinvloeden zo klein mogelijk te houden.
- Página 160 Als de 3 metingen dezelfde meetwaarde aangeven, dan is dit de gezochte Juiste meetresultaten kunnen in aardingsweerstand. De sonde bevindt zich in de neutrale zone. dergelijke gevallen worden verkre- gen door het vergroten van de Wijken de drie meetwaarden voor de aardingsweerstand van elkaar af, afstand hulpaarding –...
- Página 161 ➭ Met de sonde meet u op een paar gelijke grote afstanden het bereik tussen de aardingselektrode en de hulpaarding (in stappen van ca. Curve I (KI) Curve II (KII) 5 m). ➭ De gemeten weerstanden worden in een tabel en vervolgens grafisch weergegeven, zoals in plaatje 6 op pagina 17 (curve I).
-
Página 162: Meten Van De Bodemweerstand
Meten van de bodemweerstand De grootte van de uitbreidingsweerstand van een aardingselektrode is afhankelijk van de bodemweerstand. De waarde van de bodemweerstand is noodzakelijk voor het berekenen van de uitbreidingsweerstand bij het plannen van aardingssystemen. De bodemweerstand ρ (zie hoofdstuk 3 op pagina 6) kan met de aar- ®... -
Página 163: Berekenen Van Uitbreidingsweerstanden
5.6.2 Berekenen van uitbreidingsweerstanden De volgende tabel bevat formules voor het berekenen van de uitbreidings- +ρ weerstanden voor de verschillende grondsoorten. Deze vuistformules voldoen voor het berekenen in de praktijk. Nummer Aardingselektrode Vuistformule Helpinformatie ⋅ 2 ρ E ------------ Aardingsstrip —... -
Página 164: Meten Van Ohmse Weerstanden
Meten van ohmse weerstanden ® Aanwijzing Met de aardingsmeter GEOHM C kan de weerstand van vloeibare en De weerstanden van de toeleidingen worden in deze schakeling vaste leidingen worden gemeten, voor zover deze capaciteitsloos en meegemeten. inductievrij zijn. 5.7.1 tweeleidingenmeting 5.7.2 Vierleidingenmeting ➭... -
Página 165: Gegevensbestand
Gegevensbestand Bij iedere meting kunnen de weergegeven meetgegevens met of zonder MTYPE – Betekenis instellingen begeleidende tekst in een intern gegevensbestand worden opgeslagen. Geleiding bij metalen installaties Om de afzonderlijke meetwaarden van gebouwen en klanten te kunnen ordenen, moeten eerst de desbetreffende gegevens onder een individueel Geleiding bij metalen gasinstallaties geheugenadres worden ingevoerd. -
Página 166: Meetwaarden Opslaan - Functie Store
➭ Met behulp van de softkeys kunnen nu achtereenvolgend de velden Meetwaarden opslaan – functie STORE ➭ GEBOUW, MTYPE en KLANT-ID, en de beschrijving van het gebouw wor- Start de desbetreffende meting. De toets STORE licht op na de meting, den ingevoerd. -
Página 167: Gegevens Oproepen - Functie View
Gegevens oproepen – functie View 6.3.1 Een gegeven binnen een geheugenadres wissen – Funktion View ➭ ➭ Kies de functie View. Druk op de toets Del. Er wordt niet om een bevestiging gevraagd. De ➭ nummering van de gegevens verandert zodra er een gegeven wordt kunt u voorwaarts bladeren tussen de geheugenadressen, gewist. -
Página 168: Alle Geheugenadressen Wissen - Functie Data
➭ 6.3.3 Alle geheugenadressen wissen – functie Data Bij het gelijktijdig drukken van O en K worden alle opgeslagen gege- vens gewist. De balk rechts van de parameter ”GEHEUGEN:” is leeg. Het geheugen kan maximaal 250 gegevens opnemen. Het geheugen is Links wordt het geheugenadres “001”... -
Página 169: Technische Specificaties
Technische specificaties Relatieve luchtvochtigheid Max. 75%, bedauwing is uit te sluiten Hoogte boven NAP Max. 2000 m Meet- Impedantie Nominaal groot- Meetbereik meet- Basisfout Meetafwijking gebruiksbereik Voeding heid stroom 0,5 ... 20 Ω Batterijen 4 stuks 1,5 V-penlite (4 x C-size) 0,01 ... -
Página 170: Onderhoud
Mechanische opbouw Oplaadproces Display Puntmatrix 64 x 128 punten, verlicht Bescherming Behuizing IP 54 volgens EN 60529 Afmetingen 275 mm x 140 mm x 65 mm Let op! (zonder meetleidingen) Gebruik voor het opladen van de accu’s alleen de oplader Z501D Gewicht Ca. -
Página 171: Zekeringen
Reparatie- en onderdelenservice DKD-kalibratielaboratorium en huurservice Voor reparatie, onderdelen en kalibratie kunt u zich wenden tot: Let op! Het instrument mag zonder vastgeschroefd deksel van de GMC-Instruments Nederland B.V. batterijhouder niet worden gebruikt! Afd. Service en kalibratie Postbus 323, 3440 AH Woerden Inleveren van batterijen en accu’s Daggeldersweg 18, 3449 JD Woerden Lever batterijen en accu’s die leeg zijn en niet meer gebruikt kunnen wor-... - Página 172 Gedrukt in Duitsland • Wijzigingen voorbehouden GMC-Instruments Nederland B.V. Daggeldersweg 18 NL-3449 JD Woerden Tel.: +31 348 42 11 55 Fax: +31 348 42 25 28 E-mail: info@gmc-instruments.nl www.gmc-instruments.nl...
- Página 173 Manual de instrucciones ® GEOHM 3-349-089-07 Medidor de resistencia contra a tierra 12/4.11...
- Página 174 ® ® Medidor y comprobador GEOHM Unidad de manejo y visualización GEOHM Adaptador de interfaz Interface infrarojo (instrucciones de montaje ver página 3) Unidad de manejo y visualización Lámpara de señalización >max Pantalla LCD Netz stör LIMIT Mains >max noise Indicación del estado de las pilas La barra desplazable (scroll bar) indica la posición en el...
- Página 175 ® Programa de PC WinProfi para la comunicación con el GEOHM El programa WinProfi permite establecer la comunicación con el ® GEOHM C. Visite nuestro sitio web para descargar la versión base gratuita del programa con las siguientes funciones: • software actualizada para comprobadores –...
- Página 176 Índice Página Índice Página Aplicación ..................5 Funciones del banco de datos ............25 Generar un juego de datos – Función Data ............ 25 Características y precauciones de seguridad .........6 Almacenar valores de medida – Función STORE ..........26 Conceptos ..................7 Llamar juegos de datos – Función View ............27 6.3.1 Borrar un juego de datos dentro de una dirección de Puesta en marcha ................8 almacenamiento –...
-
Página 177: Aplicación
Aplicación El comprobador cumple con los requerimientos nacionales y de la UE Ubicación de los conductores de tierra aplicables y lleva la marca CE. La correspondiente declaración de confor- Un conductor de tierra o una instalación de puesta a tierra debe tener una midad CE se puede pedir en GMC-I Messtechnik GmbH. -
Página 178: Características Y Precauciones De Seguridad
Principio de medida y de función Lea atentamente todo el manual de instrucciones antes de usar el aparato. Siga ® estas instrucciones en todos los puntos. La medida de la resistencia de puesta a tierra con el GEOHM C se realiza según el proceso de medida de corriente y tensión. -
Página 179: Conceptos
Conceptos A fin de que no haya ningún tipo de confusión con las expresiones corre por el cuerpo humano de mano a pie (distancia horizontal de 1 m de técnicas, a continuación se definen los términos más importantes. la parte de contacto) o de mano a mano. Tierra es el concepto tanto para tierra como lugar, así... -
Página 180: Puesta En Marcha
Puesta en marcha Conectar y desconectar el aparato También se pueden utilizar las pilas de NiCd o NiMH. Para el proceso de carga y para la fuente de alimentación de carga observe sobre todo el capítulo 8.2 página 31. Cambie siempre el juego de pilas entero. Elimine las pilas debidamente. -
Página 181: Seleccionar Menú, Proceder A Los Ajustes Básicos
Seleccionar menú, proceder a los ajustes básicos Ajustar la hora START Ð Accione la tecla Time. Ð Aparecerá el cursor de entrada en la primera posición de la fecha. Introducza la cifra deseada mediante las teclas soft. Las cifras no visualizadas se mostrarán mediante el botón basculante con las flechas o bien . - Página 182 Ajustes de fábrica – últimos ajustes Determinar la duración de conexión, desconexión manual Aquí se selecciona la visualización de los menús preajustados en estado de suministro o bien la de los menús utilizados por el usuario. Ð Accione la tecla Setup. Ð...
- Página 183 Iluminación de fondo, contraste Autotest Iluminación LCD Contraste menos más Ð Inicie el autotest desde el menú principal mediante la tecla Test. El Ð Accione la tecla Display. test dura unos cuantos segundos. Ð A fin de prolongar al máximo la capacidad de los acumuladores existe En ambos cabezales aparecerán las informaciones siguientes: la posibilidad de desconectar la iluminación de la pantalla.
-
Página 184: Cargar Software Actualizada, Gestionar Datos De Protocolos
Ð Position Display: Para controlar los elementos de visualización, pulse la A Instalar e arrancar el programa WinProfi en PC tecla test después de cada imagen de test. Ð Descargue el programa WinProfi en nuestro sitio web: http:// Ð www.gossenmetrawatt.com Keytest: Realice un test de tecla pulsando una vez la tecla soft, así... - Página 185 B Requerimientos para la actualización de software y la transmisión de datos C Transmisión de software actualizada al comprobador ® Ð Buscar interface de conexión del comprobador GEOHM Ð PC: Seleccione la función Update all del menú Update. Siga las instruc- ciones en pantalla.
- Página 186 D Gestionar datos de protocolos • Modificar o enviar formularios de protocolos ® Ð Establezca la comunicación entre el PC y el GEOHM C con ayuda del adaptador de interfaz IrDa USB Converter. Ð Arranque el programa WinProfi. Ð Arranque el comprobador. ®...
-
Página 187: Manejo
Manejo Funciones de las lámparas Lámpara Función de Funciones de visualización de color Significado Solución medida rojo En la pantalla LCD se visualizarán: • valores de medida con su designación breve y unidad, Tensión La tensión parásita en la tie- Espere hasta que pase la interferencia Stör noise... -
Página 188: Medida De Tensión
Medida de tensión Medida general de puesta a tierra Después del montaje de la conmutación de medida, como se ha descrito anteriormente, siga los pasos siguientes para la medida: Ð Pulse la tecla R para seleccionar el tipo de medida de E3-P E4-P puesta a tierra de 3 ó... -
Página 189: Ajustar El Rango De Medida - Función Range
5.4.1 Ajustar el rango de medida – Función RANGE Selección manual del rango de medida Selección automática del rango de medida Generalmente, no necesitará la función de selección manual del rango de Para la selección automática del rango de medida, el aparato ajusta el medida, excepto en caso de que en la selección automática del rango de valor mayor de corriente posible que se puede conducir por el recorrido medida no obtenga ningún valor de medida o valores de medida muy... -
Página 190: Ajustar El Valor Límite - Función Limit
5.4.2 Ajustar el valor límite – Función LIMIT Medida de la resistencia de tierra Dado el caso, el valor límite de la resistencia R se puede ajustar 5.5.1 Realización del circuito de medida, indicaciones mediante la tecla LIMIT. Si aparecen valores de medida fuera de este valor límite, se iluminará... - Página 191 Nota Nota A fin de evitar derivaciones, los conductores de medida deben A fin de evitar derivaciones, los conductores de medida deben estar bien aislados y no se deberían cruzar ni estar en paralelo en estar bien aislados, y no se deberían cruzar ni estar en paralelo en largos recorridos para limitar la influencia de los acoplamientos a largos recorridos para limitar la influencia de los acoplamientos a una medida mínima.
- Página 192 Si las tres medidas dan el mismo resultado, se ha obtenido el valor En estos casos, se pueden correcto de la resistencia de puesta a tierra. La sonda se encuentra en la obtener resultados de medida zona neutra. correctos aumentando la distancia entre el conductor Si los tres valores de medida para la resistencia de puesta a tierra son auxiliar y el conductor o colocando...
- Página 193 Ð Las resistencias medidas se representan en forma de tabla y después gráficamente, como en la imag.6 página 21 (curva I). Colocando una paralela con la abscisa mediante el punto de inflexión S1, Curva I (CI) Curva II (CII) esta línea parte la curva de resistencia en dos. La parte inferior da, en las ordenadas, la resistencia de propagación deseada del conductor de tierra R ;...
-
Página 194: Medida De La Resistencia Específica De Tierra
Medida de la resistencia específica de tierra Para la magnitud de la resistencia de propagación de un conductor de tie- rra es determinante la resistencia específica del conductor. Este valor es necesario para el cálculo previo de la resistencia de propagación para la planificación de instalaciones de puesta a tierra. -
Página 195: Cálculo De Resistencias De Propagación
5.6.2 Cálculo de resistencias de propagación En la tabla siguiente se encuentran las fórmulas de cálculo de las +ρ resistencias de propagación para los tipos de conductores más usuales. En la práctica son suficientes estas reglas generales. Número Conductor de tierra Reglas generales Magnitudes auxiliares ⋅... -
Página 196: Medida De Resistencias Óhmicas
Medida de resistencias óhmicas ® Nota Con el medidor de resistencia contra tierra GEOHM C se puede medir la En este circuito también se medirán las resistencias del conductor resistencia de conductores líquidos y sólidos, siempre y cuando éstos de conexión. -
Página 197: Funciones Del Banco De Datos
Funciones del banco de datos Los datos de medida indicados se pueden almacenar con o sin comentario en un banco de datos interno. A fin de asignar los valores de Ajustes M-ART Significado medida individuales de distintos edificios, clientes, etc. primero se debe Paso a instalaciones metálicas generar un juego de datos bajo una dirección de memoria individual. -
Página 198: Almacenar Valores De Medida - Función Store
Ð Con ayuda de las teclas soft puede rellenar los campos de datos Almacenar valores de medida – Función STORE Ð consecutivamente EDIFICIO, TIPO-M y ID-CLIENTE, así como la Inicie la medida correspondiente. La tecla STORE se visualizará designación del edificio. después de la medida, en lugar de la tecla INFO. -
Página 199: Llamar Juegos De Datos - Función View
Llamar juegos de datos – Función View 6.3.1 Borrar un juego de datos dentro de una dirección de almacenamiento – Ð Seleccione View. Función View Ð Active la tecla Del. No se solicita ninguna confirmación. Ð Mediante la tecla se puede paginar entre las direcciones de La numeración de los juegos de datos se cambia en cuanto se borre memoria hacia adelante y con hacia atrás. -
Página 200: Borrar Todas Las Direcciones De Memoria - Función Data
6.3.3 Borrar todas las direcciones de memoria – Función Data Ð La memoria acepta 250 juegos de datos, como máximo. Cuando la Al activar O y K simultáneamente, se borrarán todos los datos memoria está llena el rectángulo a la derecha del parámetro “MEMORIA:“ almacenados. -
Página 201: Características Técnicas
Características técnicas Impedan- Mag- Rango de me- Rango de uso Variació del nitu- Error intrínseco dida (indicación) nominal corriente sistema prueba 0,01 ... 20 Ω 0,5 ... 20 Ω ±(10% v.m. + 6D) 10 mA 0,1 ... 200 Ω 5 ... 200 Ω ±(10% v.m. - Página 202 Seguridad eléctrica Máximos valores indicados, incluyendo variaciones de medida Clase de protección II según IEC 61010-1 A partir de la siguiente tabla, se pueden determinar los máximos valores de resistencia a tierra que se indican en el comprobador, incluyendo las Tensión de trabajo 250 V variaciones que se producen en las medidas:...
-
Página 203: Mantenimiento
Mantenimiento Funcionamiento de la pila y el acumulador Cuando el símbolo del acumulador solamente visualiza un segmento Caja lleno, deberá cambiar el juego de pilas por uno de nuevo o cargar los acu- La caja no requiere ningún tipo de mantenimiento especial. Observe que muladores. -
Página 204: Fusible
Ð Almacenar un paquete de pilas Abra la tapa de cierre del fusible con la ayuda de una herramienta adecuada (p. ej. un destornillador) pulsando y girando hacia la 1 año a –20 … +35 °C 3 meses a –20 … +45 °C izquierda. -
Página 205: Servicio De Reparaciones Y Repuestos Centro De Calibración
En GMC ofrecemos un servicio de calibración acreditado para elaborar Socio competente certificados DKD o de fábrica. Para más información, visite nuestro sitio La empresa GMC-I Messtechnik GmbH está certificada según la norma web: DIN EN ISO 9001:2008. www.gossenmetrawatt.com → Services → DKD Calibration Center así Nuestro laboratorio de calibración DKD está... - Página 206 GMC-I Messtechnik GmbH...
- Página 207 GMC-I Messtechnik GmbH...
- Página 208 Impreso en Alemania • Reservado el derecho a modificaciones • Este documento está disponible en formato PDF en Internet Telefono +49 911 8602-111 GMC-I Messtechnik GmbH Telefax +49 911 8602-777 Südwestpark 15 E-Mail info@gossenmetrawatt.com 90449 Nürnberg • Alemania www.gossenmetrawatt.com...
- Página 209 N‰vod k obsluze â GEOHM 3-349-089-14 P˚stroj pro mÔ˚en zemnch odpor¸ a specifickÏho odporu zemÔ 3/7.02...
- Página 210 â â MÔ˚ic a zkuöebn p˚stroj GEOHM Obsluha a zobrazov‰n p˚stroje GEOHM InfraÎervenÏ rozhran obsluha a zobrazov‰n sign‰lky >max LCD-displej Netz st˘r LIMIT Mains >max noise zobrazen napÔt bateri (trvale) p˚ehledov‰ ˚‰dka (scroll bar) zobrazuje, kde se nalÏz‰te v nabdce (menu). tlaÎtka pro volbu z‰kladnch a vedlejöch funkc...
- Página 211 PomocnÏ funkce ................... 11 MÔ˚en napÔt ....................12 Postup p˚i mÔ˚en ..................12 5.4.1 Nastaven mÔ˚icho rozsahu - funkce RANGE ..........13 5.4.2 Nastaven meznch hodnot ñ funkce LIMIT ............14 MÔ˚en zemnho odporu ................14 5.5.1 MÔ˚ic zapojen, pokyny pro mÔ˚en ..............14 MÔ˚en...
-
Página 212: Pouûit
Pouûit â P˚stroj GEOHM C je kompaktn p˚stroj urÎený k mÔ˚en zemnch odpor¸ UmstÔn zemnch sond a specifickÏho odporu zemÔ v elektrických za˚zench, podle n‰sledujcch ZemniÎe nebo uzemıovac za˚zen mus mt vûdy pokud moûno co p˚edpis¸: nejniûö celkový odpor proti referenÎn zemi, aby byl zajiötÔn bezpeÎný DIN VDE 0100 P˚edpisy pro z˚izov‰n... -
Página 213: Bezpeînostn Oznaîen A Opat˚eN
Princip mÔ˚en a funkce BezpeÎnostn oznaÎen a opat˚en â Elektronický mÔ˚ic a zkuöebn p˚stroj GEOHM C je navrûen, vyroben a P˚stroj GEOHMÇC mÔ˚ odpor uzemnÔn metodou mÔ˚en napÔt a zkouöen tak, aby vyhovoval bezpeÎnostnm p˚edpis¸m IEC 61010-1/ proudu. EN 61010-1/VDE 0411-1 a EN 61557 . Bateriemi nap‰jený, neuzemnÔný... -
Página 214: Vysvôtlen Pojm¸- N‰Zvoslov
VysvÔtlen pojm¸- n‰zvoslov Aby nedoölo k nedorozumÔn u pouûitých odborných výraz¸, vysvÔtluj se v dalöch odstavcch nejd¸leûitÔjö pojmy. ZemÔ je oznaÎen jak pro zem jako msto, tak pro zeminu jako l‰tku, nap˚. druh p¸dy jako humus, hlna, hrubý psek, hornina. ReferenÎn... -
Página 215: Uveden Do Provozu
Uveden do provozu Je rovnÔû moûnÏ pouût NiCd- nebo NiMH-akumul‰tory. Respektujte poûadavky uvedenÏ k nabjen a nabjeÎce uvedenÏ v Ήsti 8.2 na str. 26. Zapnut a vypnut p˚stroje VymÔıujte vûdy kompletn sadu bateri!! Likvidujte vûdy baterie zp¸sobem odpovdajcm ûivotnmu prost˚ed. UvolnÔte na zadn... -
Página 216: Vyvol‰N Menu, Z‰Kladn Nastaven
Vyvol‰n menu, z‰kladn nastaven Nastaven datumu a Îasu START StisknÔte tlaÎtko Time (èas). Kurzor stoj na prvnm mstÔ datumu. Vloûte poûadovanou Îslici pro- st˚ednictvm tlaÎtek. NezobrazenÏ Îslice vyvol‰te stiskem tlaÎtek vlevo nebo (poûadovanÏ Îslice se z˚etelnÔ zobraz). Po zvolen poûadovanÏ Îslice se kurzor posune vûdy o jedno msto doprava. - Página 217 Nastaven p˚stroje ñ posledn nastaven Stanovit dobu zapnut p˚stroje, manu‰ln vypnut Zde m¸ûete p˚edpokl‰dat, ûe se v‰m zobraz menu odpovdajc nastaven p˚stroje nebo menu naposled vyvolan‰ StisknÔte tlaÎtko Setup. StisknÔte tlaÎtko T , a v souvislosti s tm tlaÎtko 10sec, 20sec, 30sec StisknÔte tlaÎtko Setup nebo 60sec, podle toho, jakou si p˚ejete nastavit dobu vypnut...
- Página 218 Nastaven osvÔtlen displeje, kontrast Autotest LCD-osvÔtlen Kontrast ménì více StisknÔte tlaÎtko Display. Autotest nastartujte z hlavnho menu stiskem tlaÎtka Test. Vlastn test trv‰ nÔkolik minut. Aby se podstatnÔ prodlouûila ûivotnost bateri, m¸ûete osvÔtlen displeje LCD ˝plnÔ vypnout. V obou ˚‰dk‰ch z‰hlav se objev n‰sledujc informace: To zajistte stiskem odpovdajcho tlaÎtka.
-
Página 219: Vöeobecnï Poûadavky Na Obsluhu
Jakmile byly provedeny testy levÏho sloupce, muste dalö testy manu‰lnÔ Funkce sign‰lek odstartovat. sign‰lka Pozice Illum: stisknÔte tlaÎtko test dvakr‰t k vypnut a zapnut svt mÔ˚ic funkce význam zjedn‰n n‰pravy osvÔtlen. ÎervenÔ ruöivÏ napÔt ruöivÏ napÔt v mstÔ mÔ˚en poÎkejte aû ruöen p˚estane nebo Pozice Display: ke kontrole zobrazovacch prvk¸... -
Página 220: Mô˚eN Napôt
MÔ˚en napÔt Postup p˚i mÔ˚en Po p˚sluönÏm zapojen a propojen mÔ˚icch sond k p˚stroji, jak je pops‰no v n‰sledujcch odstavcch, prov‰dÔjte mÔ˚en n‰sledovnÔ: stiskem tlaÎtka R pro 3-pˆlovÏ nebo R pro 4-pˆlovÏ se zvol E3-P E4-P poûadovanÏ nastaven pro mÔ˚en zemnch odpor¸. P2 C2 Pozor! Na svorky E a H (resp. -
Página 221: Nastaven Mô˚iCHo Rozsahu - Funkce Range
5.4.1 Nastaven mÔ˚icho rozsahu - funkce RANGE Manu‰ln nastaven mÔ˚icho rozsahu AutomatickÏ nastaven mÔ˚icho rozsahu Manu‰ln nastaven mÔ˚icho rozsahu nen pot˚ebnÏ, ledaûe nezsk‰te P˚i automatickÏm nastavov‰n mÔ˚icho rozsahu nastav mÔ˚ic p˚stroj û‰dnÏ hodnoty nebo kolsavÏ hodnoty p˚i mÔ˚en s automatickým vûdy nejvyöö... -
Página 222: Nastaven MeznCh Hodnot Ñ Funkce Limit
5.4.2 Nastaven meznch hodnot ñ funkce LIMIT MÔ˚en zemnho odporu V p˚padÔ pot˚eby kontroly mezn hodnoty zemnho odporu R je moûnÏ 5.5.1 MÔ˚ic zapojen, pokyny pro mÔ˚en pro-st˚ednictvm tlaÎtka LIMIT nastavit mezn hodnotu. Pokud je zmÔ˚en‰ hodnota vyöö neû nastaven‰ mezn hodnota, tak svt Îerven‰ LED LIMIT. T˚vodiÎov‰... - Página 223 UpozornÔn! UpozornÔn! Abychom se vyhnuli p˚padným spojenm mÔ˚icch veden mezi Abychom se vyhnuli p˚padným spojenm mÔ˚icch veden mezi sebou, mus být tato s dobrou, neporuöenou izolac. Veden by se sebou, mus být tato s dobrou, ne-poruöenou izolac. Veden by se nemÔla vz‰jemnÔ...
- Página 224 V p˚padÔ, ûe vöechna t˚i mÔ˚en vykazuj stejný výsledek, je pak tento Spr‰vných výsledk¸ mÔ˚en je výsledek mÔ˚en hledaný odpor uzemnÔn. Sonda se nach‰z v tomto moûno v takových p˚padech p˚padÔ v neutr‰lnm p‰smu. V p˚padÔ, ûe se t˚i zjiötÔnÏ hodnoty liö, dos‰hnout buÚ...
- Página 225 Do grafu zakreslme paraleln p˚mku k ose x, p˚iÎemû p˚mka protn‰ bod I (KI) II (KII) obratu S1, tedy p˚mka dÔl k˚ivku odporu na dvÔ Î‰st. K˚ivka K˚ivka Doln Ήst ukazuje ve smÔru osy y velikost odporu ö˚en zemniÎe R (v z‰vislosti na vzd‰lenosti);...
-
Página 226: Mô˚eN Specifickïho Odporu Zemô
MÔ˚en specifickÏho odporu zemÔ Rozhodujc pro velikost odporu ö˚en je specifický odpor zemÔ. P˚i projektov‰n uzemnÔn musme zn‰t specifický odpor zemÔ, abychom mohli p˚edbÔûnÔ vypoÎtat odpor ö˚en. Specifický odpor zemÔ r , viz â Ήst 3 na str. 6 lze pomoc p˚stroje GEOHM C zmÔ˚it pomoc... -
Página 227: P˚eDbôûnï VypoîT‰N Odpor¸ Ö˚eN
5.6.2 P˚edbÔûnÏ vypoÎt‰n odpor¸ ö˚en ro obvyklÏ tvary zemniθ se uv‰dÔj v n‰sledujc tabulce vzorce pro výpoÎet odpor¸ ö˚en. Tyto zjednoduöenÏ vzorce plnÔ pro praxi postaÎuj. Îslo zemniÎ vzorec pomocn‰ veliÎina p‰sový × zemniÎ, ó --- -- -- -- - paprskový... -
Página 228: Mô˚eN Ohmických Odpor
MÔ˚en ohmických odpor¸ â UpozornÔn! P˚strojem pro mÔ˚en zemnch odpor¸ GEOHM C je moûnÏ zmÔ˚it takÏ P˚i tomto zapojen se souÎasnÔ mÔ˚ i odpor p˚vodnch veden k odpor kapalných a pevných vodiθ, pokud nemaj (p˚ibliûnÔ) kapacitu a mÔ˚enÏmu objektu. indukÎnost. 5.7.1 DvojvodiÎov‰... -
Página 229: Funkce Databanka
Funkce databanka KaûdÏ mÔ˚en (vyk‰zanÏ zmÔ˚enÏ hodnoty) m¸ûe být uloûeno v intern M-TYP ñ nastaven význam pamÔti a to s koment‰˚em nebo bez koment‰˚e. Abychom mohli zmÔ˚enÏ nzkoohmovÏ spojen s kovovými konstrukcemi hodnoty p˚i˚adit ke konkrÏtnmu mstu mÔ˚en, t.j. objekt, z‰kaznk atd., nzkoohmovÏ... -
Página 230: Ukl‰D‰N Zmô˚eNých Hodnot Ñ Funkce Store
pomoc tlaÎtek m¸ûete postupnÔ v datovÏm poli vloûit pot˚ebnÏ Ukl‰d‰n zmÔ˚ených hodnot ñ Funkce STORE ˝daje OBJEKT, M-TYP a z‰kaznk -ID jakoû i dalö ˝daje. Nastartujte aktu‰ln mÔ˚en. TlaÎtko STORE bude po mÔ˚en zvýraznÔno msto tlaÎtka INFO P˚i mÔ˚ench, kter‰ se prov‰dÔj bez tlaÎtka START nap˚. p˚i mÔ˚en napÔt... -
Página 231: Vyvol‰N Vloûených Dat Ñ Funkce View
Vyvol‰n vloûených dat ñ Funkce View 6.3.1 Data uloûen‰ v pamÔti pod ˝loûnou adresou vymazat ñ Funkce View Nastavte v menu funkci View a stisknÔte p˚sluönÏ tlaÎtko. Stiskem tlaÎtka Del se zobrazené údaje vymažou, pøièemž se neobjev û‰dný bezpeÎnostn dotaz. »slov‰n dat se zmÔn . Stiskem tlaÎtka m¸ûete listovat ˝loûnými adresami dop˚edu, p˚p. -
Página 232: Vymaz‰N Vöech Uloûených Dat Ñ Funkce Data
6.3.3 Vymaz‰n vöech uloûených dat ñ Funkce Data Do pamÔti se m¸ûe uloûit maxim‰lnÔ 250 sad dat. PamÔt¥ je zaplnÔna, Po stisku tlaÎtka START (stisk uprost˚ed) n‰sleduje znovu tento kdyû je obdÏlnk vpravo od parametru ìUKLADA»î zaplnÔn. M¸ûete bezpeÎnostn dotaz vöechna data uloûen‰... -
Página 233: Technickï Parametry
TechnickÏ parametry Nap‰jen baterie 4 ks 1,5 V-Baby Îl‰nky (4 x C - velikost) mÔ˚en‰ mÔ˚ic rozsah impedance jmenovitý rozssah z‰kladn chyba chyba mÔ˚en veliÎina (rozsash zobrazen) zkuö. proud (Alkali-Mangan podle IEC LR14) 0,01 ... 20 W 0,5 ... 20 W ±... -
Página 234: Obsluha A ˝dRûba
Obsluha a ˝drûba Postup nabjen Pouzdro Pouzdro p˚stroje nevyûaduje û‰dnÏ zvl‰ötn oöet˚ov‰n. VÔnujte Pozor! pozornost ÎistÏmu povrchu. K ÎiötÔn pouûvejte lehce navlhÎený had˚k K nabjen akumul‰tor¸ pouûvejte pouze nabjeÎku NA 0100S pop˚. speci‰ln ÎistiÎ urÎený pouze pro plastickÏ hmoty. Nepouûvejte (obj. -
Página 235: Pojistky
Prodej - opravy - servis a n‰hradn dly Dovoz a prodej p˚stroj¸, z‰ruÎn a poz‰ruÎn servis a n‰slednÏ metrologickÏ ovÔ˚ov‰n p˚stroj¸ je zajiötÔno firmou Pozor! P˚stroj bez krytu prostoru pro baterie a pevnÔ p˚ipevnÔných JHS ELEKTRO öroub¸ nesm být pouûv‰n! Ing. - Página 236 P˚eklad JHS ELEKTRO · ZmÔny vyhrazeny GOSSEN-METRAWATT GMBH Thomas-Mann-Str. 16-20 Dñ90471 Nˇrnberg Telefon +49 911 8602-0 Telefax +49 911 8602-669 e-mail: info@gmc-instruments.com http://www.gmc-instruments.com...