Tabla de contenido
Publicidad
Enlaces rápidos
Please read the instruction handbook before using the copier. Keep it close to the copier for easy
reference.
Veuillez lire la présente notice d'utilisation avant d'employer le copieur. Conservez-la à proximité de
celui-ci de façon à pouvoir vous y référer facilement.
Le rogamos lea el manual de instrucciones antes de utilizar la copiadora. Guárdelo cerca de la misma
para facilitar su utilización como material de referencia.
INSTRUCTION HANDBOOK
MANUEL D'INSTRUCTIONS
MANUAL DE INSTRUCCIONES
Publicidad
Tabla de contenido

Manuales relacionados para Kyocera KM-4230


Resumen de contenidos para Kyocera KM-4230
- Página 1 INSTRUCTION HANDBOOK MANUEL D'INSTRUCTIONS MANUAL DE INSTRUCCIONES Please read the instruction handbook before using the copier. Keep it close to the copier for easy reference. Veuillez lire la présente notice d'utilisation avant d'employer le copieur. Conservez-la à proximité de celui-ci de façon à pouvoir vous y référer facilement. Le rogamos lea el manual de instrucciones antes de utilizar la copiadora.
- Página 2 As an ENERGY STAR Partner, KYOCERA MITA AMERICA, INC. has determined that this product meets the ENERGY STAR guidelines for energy efficiency. * ENERGY STAR is a U.S. registered mark. En tant que partenaire du programme ENERGY STAR Partner, KYOCERA MITA AMERICA, INC. a déterminé...
- Página 3 Please read the instruction handbook before using Veuillez lire la présente notice d'utilisation avant the copier. d'employer le copieur. Conservez-la à proximité de Keep it close to the copier for easy reference. celui-ci de façon à pouvoir vous y référer facilement. The sections of this handbook and parts of the copier marked Les sections de la présente notice ainsi que les éléments du with symbols are safety warnings meant to protect the user,...
- Página 4 Le rogamos lea el manual de instrucciones antes de utilizar la copiadora. Guárdelo cerca de la misma para facilitar su utilización como material de referencia. Las secciones de este manual y las partes de la copiadora marcadas con símbolos representan advertencias de seguridad destinadas a proteger al usuario, otros individuos y los objetos circundantes , y a garantizar una utilización correcta y segura de esta copiadora.
-
Página 6: Tabla De Contenido
CONTENTS Sheet & book originals ............116 CAUTION LABELS..............4 COPIER MANAGEMENT ...............120 (1) Copy management..............120 INSTALLATION PRECAUTIONS ..........7 1 About the copy management mode ........120 2 How to make settings in the copy management mode ..122 PRECAUTIONS FOR USE ............10 3 How to make the various settings .........122 MAKING FULL USE OF THE MACHINE’S ADVANCED Registering new Dept. - Página 7 TABLE DES MATIERES Copie d'une page voulue sur le recto [Mise en chapitre] ..112 ETIQUETTES "ATTENTION"............5 3 Copie en lot à partir de la vitre d'exposition ......116 Originaux-feuilles seulement..........116 PRECAUTIONS D'INSTALLATION ..........8 Originaux-livres seulement.............116 Originaux-feuilles et originaux-livres ........116 PRECAUTIONS D'UTILISATION ..........11 CONTROLE DE COPIE ..............120 UTILISATION DES FONCTIONS AVANCEES DU COPIEUR..15 (1) Contrôle de copie...............120...
- Página 8 CONTENIDO Copias de dos lados de todos los originales ETIQUETAS DE PRECAUCION..........6 [Duplex de todos los originales]..........112 Copie la página deseada en el lado frontal [Capitulación] ..112 PRECAUCIONES DE INSTALACION .........9 3 Lote copia de vidrio contacto ..........116 Sólo originales como hojas ............116 PRECAUCIONES PARA EL USO ..........12 Sólo originales como libros ............116 UTILIZACION DE TODAS LAS FUNCIONES DE...
-
Página 9: Caution Labels
CAUTION LABELS Caution labels have been attached to the copier at the following locations for safety purposes. BE SUFFICIENTLY CAREFUL to avoid fire or electric shock when removing a paper jam or when replacing toner. Label 1 High voltage inside. NEVER touch parts in this area, because there is a danger of electric shock. - Página 10 ETIQUETTES "ATTENTION" Par mesure de sécurité, des étiquettes "Attention" ont été apposées sur le copieur aux endroits suivants. SOYEZ EXTREMEMENT PRUDENT pour éviter brûlures ou décharges électriques lorsque vous procédez à l'élimination d'un bourrage papier ou que vous remplacez la cartouche de tonner. Etiquette 1 Haute tension à...
-
Página 11: Etiquetas De Precaucion
ETIQUETAS DE PRECAUCION Por motivos de seguridad, se han colocado en la copiadora etiquetas de precaución en las siguientes ubicaciones. TENGA EL CUIDADO NECESARIO para evitar fuego o descargas eléctricas cuando retire papeles atascados o cuando cambie el toner. Etiqueta 1 Alta tensión en el interior. -
Página 12: Installation Precautions
INSTALLATION PRECAUTIONS Environment Power supply/Grounding the copier CAUTION WARNING • Avoid placing the copier on or in locations which are • DO NOT use a power supply with a voltage other than unstable or not level. Such locations may cause the that specified. -
Página 13: Precautions D'INstallation
PRECAUTIONS D'INSTALLATION Environnement Alimentation électrique/Mise à la terre du copieur ATTENTION • Evitez de placer le copieur à des endroits instables ou ATTENTION qui ne sont pas de niveau. De tels emplacements • NE PAS utiliser d'alimentation électrique présentant risquent de faire basculer ou tomber le copieur. Ce une tension différente de la tension spécifiée. -
Página 14: Precauciones De Instalacion
PRECAUCIONES DE INSTALACION Condiciones del lugar de instalación Fuente de alimentación/Toma a tierra de la copiadora PRECAUCION • Evite colocar la copiadora en lugares inestables o PRECAUCION superficies desniveladas ya que la copiadora puede • NO utilice una fuente de alimentación con un voltaje volcarse o caerse de dichos lugares. -
Página 15: Precautions For Use
PRECAUTIONS FOR USE Cautions when using the copier • DO NOT leave the document feeder open as there is a danger of personal injury..........WARNING Other precautions • DO NOT place metallic objects or containers with • DO NOT place heavy objects on the copier or cause water (flower vases, flower pots, cups, etc.) on or near other damage to the copier. -
Página 16: Precautions D'UTilisation
PRECAUTIONS D'UTILISATION Mises en garde pour l'utilisation du • NE PAS laisser le chargeur de document ouvert car il y a un risque de blessures..........copieur Autres précautions • NE PAS poser d'objet lourd (plus de ##lbs.) sur le ATTENTION copieur ou évitez tout autre dommage au copieur. -
Página 17: Precauciones Para El Uso
PRECAUCIONES PARA EL USO Precauciones en el uso de la • Si se acumula el polvo dentro de la copiadora, existe el riesgo de que se produzca un incendio o algún otro copiadora problema. Por lo tanto, recomendamos consultar con su representante del servicio sobre la limpieza de las PRECAUCION piezas en el interior. -
Página 18: Making Full Use Of The Machine'S Advanced Functions
MAKING FULL USE OF THE MACHINE'S ADVANCED FUNCTIONS Making the machine automatically Various functions for making Enlarging/reducing copies to any desired select paper of the same size as the enlarged and reduced copies size in the range 25-400% original Enlarging/reducing copies to a <Zoom copy mode >... - Página 19 Making image overlay Making one copy from two or four Making booklet from book originals <Form overlay> (page 81) originals <Combine copy> <Booklet + cover copy mode> (page 83) (page 86) <Stitching mode> (page 91) Sorting automatically <Sort copy> Changing the direction of the sheets Inverting black and white (page 96) for easy sorting...
-
Página 20: Utilisation Des Fonctions Avancees Du Copieur
UTILISATION DES FONCTIONS AVANCEES DU COPIEUR Pour sélectionner automatiquement Plusieurs fonctions sont disponibles Pour agrandir/réduire des copies à un pour produire des copies agrandies du papier de même format que format quelconque compris entre 25 et 400% ou réduites. l’original <Mode de sélection <Mode de copie zoom>... - Página 21 Pour créer une image superposée Pour produire une copie à partir de Pour produire une brochure à partir <Superposition formulaire> deux ou quatre originaux d’un original-livre (page 81) <Copie combinée> (page 83) <Mode de copie brochure + couverture> (page 86) <Mode de reliure brochure>...
-
Página 22: Utilizacion De Todas Las Funciones De Avanzada De Esta Copiadora
UTILIZACION DE TODAS LAS FUNCIONES DE AVANZADA DE ESTA COPIADORA Selección automática del papel del Variedad de funciones para hacer Ampliación/reducción de copias a cualquier mismo tamaño que el original copias ampliadas o reducidas tamaño deseado entre 25-400% <Modo de selección automática de Ampliación/reducción de copias a <Modo de zoom manual>... - Página 23 Superposición de imágenes Creación de una copia a partir de dos Creación de un panfleto usando un <Superposición de una forma> o cuatro originales libro como original (página 81) <Copia combinada> <Modo de copia da panfleto + (página 83) tapas> (página 86) <Modo de cosido>(página 91) Compaginación automática Cambio del sentido de las hojas para...
-
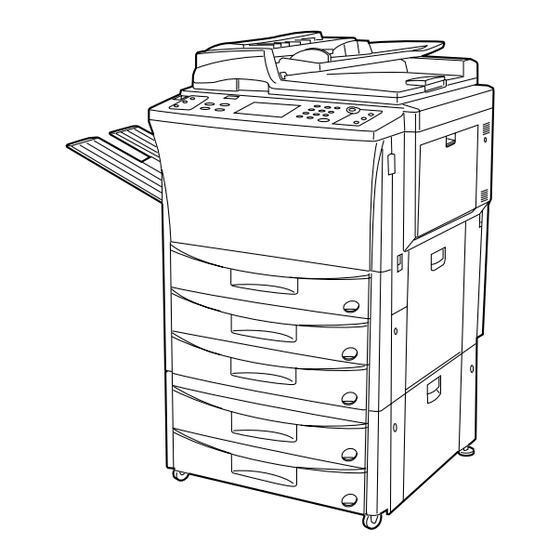
Página 24: Names Of Parts
NAMES OF PARTS... -
Página 25: Main Body
(1) Main body ‚ Paper transfer section release lever 1 Platen (Operate when paper misfeed occurs in the paper transfer (Set a book original or the like that cannot be set in the DF section.) on this.) Œ Paper feed section knob 2 Original size indicator lines (Operate to remove paper misfed in paper feed section.) (Be sure to align the original with these when setting the... - Página 26 NOMENCLATURE...
- Página 27 (1) Corps principal fl Cartouche de toner 1 Vitre d'exposition ‡ Levier de libération de la cartouche de toner (Placer sur cette vitre un livre original ou un document du (Actionner ce levier pour remplacer la cartouche de toner.) même type qui ne peut pas être placé dans le DF.) °...
-
Página 28: Nombres De Las Partes
NOMBRES DE LAS PARTES... -
Página 29: Cuerpo Principal
(1) Cuerpo principal ° Botón de liberación de la sección de transferencia de papel 1 Pantalla · Mango de la sección de transferencia de papel (Coloque aquí originales tales como libros, etc. que no ‚ Palanca de liberación de la sección de transferencia de puedan colocarse en el DF.) 2 Líneas indicadoras de tamaño del original papel... -
Página 30: Operation Panel
(2) Operation panel & Start key 1 Punch mode key (page 158) * Start indicator (Press to punch with the optional finisher.) (When this lights green, the copier is in ready to copy.) 2 Punch mode indicators ( Reset key (See “ Initial mode”) 3 Staple sort mode key (page 158) ) Auto selection key (page 39) -
Página 31: Basic Screen On The Touch Panel
(3) Basic screen on the touch panel 8 Paper size keys/indicators (The paper size set in each of the drawers will appear. Also, touch this key to select the paper feed drawer. The selected drawer will be highlighted). 9 “2-sided” key (Touch to set the two-sided copying. - Página 32 (2) Panneau de commande * Indicateur de départ 1 Touche de mode de perforation (page 158) (Lorsque cet indicateur s'allume au vert, le copieur est prêt à (Appuyer sur cette touche pour effectuer la perforation avec le copier.) finisseur en option.) ( Touche de remise à...
- Página 33 (3) Ecran de base sur le panneau de touches à effleurement 7 Affichage du mode de copie/taux de zoom (Le mode de copie et le taux de zoom de copie sélectionnés y apparaissent.) 8 Touches/indicateurs de format de papier (Le format du papier mis en place dans chaque tiroir apparaît. Effleurer aussi cette touche pour sélectionner le tiroir d'alimentation papier.
-
Página 34: Tablero De Controles
(2) Tablero de controles & Tecla de Inicio 1 Tecla de modo de perforación (página 158) * Indicador de Inicio (Presione para perforar con el terminador opcional.) (Cuando se enciende en verde la copiadora está lista para copiar.) 2 Indicadores de modo de perforación ( Tecla de Reinicialización (Vea "... -
Página 35: Menú Básico En La Pantalla De Toque
(3) Menú básico en la pantalla de toque 7 Indicación de modo de copia/porcentaje de zoom (Aparecen el modo de copia y el porcentaje de zoom de copia seleccionados.) 8 Teclas/indicadores de tamaño de papel (Aparecerá el tamaño de papel colocado en cada una de las gavetas. -
Página 36: Preparations
PREPARATIONS PREPARATIFS PREPARATIVOS (1) How to load paper In the drawer-type paper feed desk, paper can be loaded at a total 5 points— the 4 drawers and the stack bypass tray. In the deck-type paper feed desk, paper can be loaded at a total 4 points— the 2 drawers, the deck and stack bypass tray. - Página 37 2. Turn the width adjustment lever to align the width guide with the paper’s width. 2. Tourner le levier de réglage de largeur pour aligner le guide de largeur sur la largeur du papier. 2. Gire la palanca de ajuste de ancho para alinear la guía de ancho con el ancho del papel.
-
Página 38: Loading Paper Into The Deck
5. Gently push the drawer back in. * The paper size that has been set is displayed on the touch panel. 5. Repousser doucement le tiroir dans le copieur. * Le format de papier choisi est affiché sur le panneau de touches à effleurement. -
Página 39: Loading Paper Into The Stack Bypass Tray
3. Gently push the deck back in. 3. Repousser doucement le tiroir dans le copieur. 3. Vuelva a cerrar la plataforma. 3 Loading paper into the stack bypass tray The stack bypass can hold up to 100 sheets of standard paper (75 g/m ) at a time. - Página 40 * To load 8 ” x 11” or larger size paper, pull out the support guide. * Pour mettre en place du papier de formats 8 po. x 11 po. ou plus grands, tirer le guide de support vers l'extérieur. * Para colocar papel de tamaño 8 "...
- Página 41 1. Open the stack bypass tray. 1. Ouvrir le plateau d'alimentation manuelle. 1. Abra la bandeja de alimentación multi-hojas. 2. Align the insert guides with the envelop size. 2. Aligner les guides d'insertion sur le format d'enveloppe. 2. Alinee las guías de inserción con el tamaño del sobre. 3.
-
Página 42: Setting Originals
SETTING ORIGINALS MISE EN PLACE DES ORIGINAUX COLOCACION DE ORIGINALES 1 Setting original(s) in the DF The copier is equipped with the DF (document feeder). Multiple sheet originals loaded into the DF automatically fed one by one. The DF automatically turns over two-sided originals for copying on the reverse side. - Página 43 Originales que pueden colocarse en el DF Notas • Originales como hojas No utilice los siguientes tipos de originales. • Espesor: Cuando utilice hojas perforadas u hojas con orificios, no coloque por el Originales de un lado: entre 35 g/m - 160 g/m extremo con las perforaciones u orificios.
-
Página 44: Auto Selection Mode
* When copying two-sided originals, originals will be ejected temporarily from the DF original reversing cover for reversing. Do not touch the originals at this time. If the originals are pulled out by force, the original misfeeds may occur. * Lorsqu'on copie des originaux recto/verso, ceux-ci seront éjectés momentanément du couvercle de retournement d'original du DF pour être retournés. - Página 45 1. Hold the DF opening/closing lever to open the DF. * When opening the DF, check if no original is on the original table and original ejection cover. Otherwise, it may fall down when the DF is opened. 1. Saisir le levier d'ouverture/fermeture du DF pour ouvrir le DF. * Lorsqu'on ouvre le DF, vérifier qu'il n'y ait aucun original sur la table d'original et le couvercle d'éjection d'original.
-
Página 46: Basic Operation
BASIC OPERATION Basic copying procedure 1. Turn the main switch ON ( ). 2. Warm-up At the end of warm-up, “Ready to copy.” will be displayed. * Set originals and press the Start key while the copier is still warming up. -
Página 47: Various Functions
3. Setting originals. 4. Setting of functions Set originals in the DF or on the Platen. (page 37, page 39) Set use of the copier’s various functions. * The function frequently used can be displayed on the basic screen as a shortcut key (page 147, “* Create shortcut (#1, #2)”), and also, it can be displayed on the initial screen by touching the “Added”... -
Página 48: Procédure D'uTilisation De Base
UTILISATION DE BASE Procédure d'utilisation de base 1. Mettre l'interrupteur principal sur marche ( ). 2. Chauffage A la fin du chauffage, le message "Prêt à copier." s'affiche. * Mettre les originaux en place et appuyer sur la touche de départ pendant que le chauffage du copieur est en cours. -
Página 49: Fonctions Diverses
3. Mise en place des originaux 4. Réglage des fonctions Placer les originaux dans le DF ou sur la vitre d'exposition. Réglage de l'utilisation des diverses fonctions du copieur. (Page 37, page 39) * La fonction fréquemment utilisée peut être affichée sur l'écran de base sous forme de touche de commande abrégée (Page 147, "* Créez raccourci (1, 2)", et peut aussi être affichée sur l'écran initial si l'on appuie sur la touche "Ajout". -
Página 50: Funcionamiento Basico
FUNCIONAMIENTO BASICO Procedimiento de copiado básico 1. Conecte ( ) el interruptor principal. 2. Calentamiento Al terminar el calentamiento aparece "Lista para copiar.". * Coloque los originales y presione la tecla de Inicio cuando la copiadora todavía se está calentando. Empezará a copiar al terminar de calentarse. -
Página 51: Distintas Funciones
3. Colocación de originales. 4. Ajuste de funciones Coloque los originales en el DF o en la pantalla. Ajuste para utilizar las distintas funciones de la copiadora. (página 37, página 39) * Una función utilizada con frecuencia puede hacer que aparezca en el menú... -
Página 52: Functions
FUNCTIONS FONCTIONS FUNCIONES (1) Enlargement/reduction 1 Auto magnification selection mode Enlargement/reduction is executed automatically according to the paper size set. (1) Agrandissement/réduction 1 Mode de sélection automatique de l'agrandissement Il est possible d'effectuer automatiquement l'agrandissement/réduction en fonction du format de papier réglé. (1) Ampliación/reducción 1 Modo de zoom automático La ampliación/reducción se hace automáticamente de acuerdo al tamaño... -
Página 53: Zoom Copy Mode
2 Zoom copy mode The zoom ratio can be set to any value from 25 to 400% in 1% increments. * If original(s) are set in the DF, the zoom ratio can be set to any value from 25 to 200%. * The left illustration displays the finishing of the copies when originals are set in the DF. -
Página 54: Size Zoom Mode
2. Touch the “Zoom” key. The zoom mode setting screen will appear. 3. Set the size of original. If the original size is not displayed, touch the “ ” key to display. 2. Effleurer la touche "Zoom". L'écran de réglage de mode de zoom apparaît. 3. -
Página 55: Xy Zoom Mode
1. Set the original(s). 2. Touch the “Zoom” key. The zoom mode setting screen will appear. 3. Touch the key for the desired ratio. The ratio selected will be highlighted. 1. Mettre l'original (les originaux) en place. 2. Effleurer la touche "Zoom". L'écran de réglage de mode de zoom apparaît. -
Página 56: Copy Quality Selection
4. Set the zoom ratio of the length (X) by touching the upper “+” key or “-” key. After highlighting, the zoom ratio can also be entered using the numeric keys. * The zoom ratio returns to 100% by touching the “100%” key. 4. -
Página 57: Interrupt Copying
* The initial value of copy quality mode can be selected. (See page 142, "6 Quality") * La valeur initiale du mode de qualité de copie peut être sélectionnée. (Page 142, "6 Qualité") * Puede seleccionar el valor inicial del modo de calidad de copia. (Vea la página 142, "6 Calidad") 1. -
Página 58: Two-Sided Copying From Various Originals [Two-Sided Copy]
2. Remove the present original(s), and put it/them aside. 3. Set the new original(s) and execute copying. 2. Retirer l'original actuellement utilisé, et le mettre sur le côté. 3. Mettre en place le nouvel original (les nouveaux originaux) et le copier. 2. - Página 59 Two-sided copying from a book original Two-page originals of a magazine or a book are copied on both sides of paper by a single Start key operation. The binding direction of the originals can also be selected. 1 “Left”: Two-page originals are copied from the right side. 2 “Right”: Two-page originals are copied from the left side.
- Página 60 1. Set the original(s). 2. Touch the “2-sided” key. The two-sided copy setting screen will appear. * Also, same screen will appear by touching “2 sided” key on the function selection screen. 1. Mettre l'original (les originaux) en place. 2. Effleurer la touche "Rec/Ver". L'écran de réglage de copie recto/verso apparaît.
-
Página 61: Making A Margin Space For Binding [Margin Mode]
(5) Making a margin space for binding [Margin mode] Left margin The image of the original is shifted rightward to make a margin for binding on the left side of the paper at the width of 1/4”, 3/8”, 1/2”, 5/8” and 3/4”. * If the left margin is set for the two-sided copy setting, the right margin of the same width as on the front side is set automatically on the back side. - Página 62 * La position de marge réglée sur le verso sera changée, en fonction de la position de la marge réglée sur le verso. Un cercle (" ") indique que le réglage est utilisable. Recto "Marge G" "Droit" "Marge H" "Bas" "Non"...
- Página 63 3. Touch the “Margin” key. If it is not displayed, touch the “ ” key or “ ” key to be displayed. The margin copy setting screen will appear. When setting “Left margn” or “Top margin”, go to next step. To set “F&B Margin”, go to step 6.
- Página 64 6. To change the contents in which the F&B margin is set, touch the “Change #” key and go to next step. Otherwise, touch the “F&B Margin” key. The touch panel will return to the basic screen. * The previous figure is set as initial value for the F&B margin. Change it as needed.
-
Página 65: Printing Page Numbers To Copy [Print Page Numbers]
10. Select the margin position on the back side. If no margin is made on the back side, touch the “No” key. The back side margin position will be changed, depending on the front side margin position. When the setting is completed, the touch panel will return to the basic screen, and copying will be possible. - Página 66 4. Change the page from which the print is started by touching the “+” key or the “-” key. The page to be started to print can be set between pages “-10” and “999”. * “0” cannot be set. 4. Pour changer la page à partir de laquelle l'impresion doit être commencée, effleurer la touche "+"...
-
Página 67: Copying Two-Page Originals As Separate Pages [Page Separation Copy Mode]
(7) Copying two-page originals as separate pages [Page separation copy mode] Page separation copies from book originals Two-page originals of a magazine and book or the like are copied onto two separate sheets of paper. (7) Copie d'originaux à deux pages sur des feuilles séparées [Mode de copie avec séparation de pages] Copie avec séparation de pages à... -
Página 68: Making Copies With Clean Edges [Border Erase Mode]
2. Touch the “Added” key. The function selection screen will appear. 3. Touch the “2 pages” key. If it is not displayed, touch the “ ” key or “ ” key to be displayed. The page separation copy setting screen will appear. 2. - Página 69 Erasing blemishes from edges and middle of copies made from books (Book) Use for making neat copies from thick books. (a is the width of erasing border) Effacement des taches sur les bords et le centre des copies produites à partir de livres (Livre) Pour produire des copies nettes à...
-
Página 70: Making Covers Or Insert Sheets Among The Copies [Sheet Copy]
4. When changing the border erasing width with “Sht. erase” or “Book erase”, touch the “+” key or “-” key. The width can be selected from among 1/4”, 1/2” and 3/4”. * The custom border erasing size of an original must be registered in advance. - Página 72 Insert mode Insert sheets can be inserted at specified place(s) among the copies of multiple sheet originals. The insert sheets themselves can also be copied onto. * Insert sheets must be set beforehand which of these is to be used. (page 145, “% Drawer for insert sheet”) Mode d'intercalaire Les feuilles intercalaires peuvent être insérées à...
- Página 73 * Les réglages que l'on peut sélectionner varient selon les réglages de l'original et la finition du papier copie. Un cercle (" ") indique que le réglage est utilisable. "R/V Copie" "Recto Copie" "R/V Vierge" Copie Original "Recto" "Recto" Original "Rect/verso"...
-
Página 74: Combination Of Modes
• When not copying on the front/back side of the insert sheets * An example of two-sided copying is illustrated. • Lorsqu'aucune copie n'est effectuée sur le recto/verso des feuilles intercalaires * Un exemple de copie recto/verso est indiqué sur l'illustration. •... -
Página 75: Combinación De Modos
2 Combinaison de modes La combinaison des modes peut être différenciée, selon le type des originaux; copie recto simple, recto/verso ou divisée. Se reporter au tableau suivant. Un cercle (" ") indique que la combinaison est possible. "Couvert. + "Couvert. + "Couvert. -
Página 76: How To Make Copies In The Sheet Mode
3 How to make copies in the sheet mode 1. Touch the “Added” key. The function selection screen will appear. 2. Touch the “Inserts” key. If it is not displayed, touch “ ” or “ ” key to be displayed. The copy mode setting screen will appear. - Página 77 6. Specify the type of original, by touching the “2 sided” or “Book” key. * If “2 sided” is selected, go to step 8. If “Book” is selected, go to next step. 6. Indiquer le type d'original en effleurant la touche "Rect/verso" ou "Livre". * Si "Rect/verso"...
- Página 78 9. Select the cover setting by touching the “2sided” key , the “Front” key (copy only on the front side) or the “Blank” key. * If “2 pages” or “1 sided” was selected for finishing of copying in step 3, “2 sided”...
- Página 79 Insert sheets / Chapter page specification * Check each of settings. The page specification may be cancelled if the setting is changed after the page was specified. 15. Touch the “Enter” key. The screen for specifying the pages will appear. Spécification des feuilles intercalaires / Page de chapitre * Vérifier chacun des réglages.
-
Página 80: Making Copies Onto Transparencies [Presentation Mode]
18. Touch the “Enter” key after entering page number. * Re-enter the page by touching the “Page reenter” key. Follow the procedure in steps 16 and 17 to change the page. 18. Effleurer la touche "Entrez" après avoir entré le numéro de page. * Entrez à... - Página 81 Presentation mode (leaving the backing sheet blank) After copying onto transparencies (with backing sheets left blank, page 79), the same original is copied onto a specified number of sheets of standard paper. Two-pages copy of book original can be used in combination. (* indicates transparency.) Mode de présentation (avec feuille dorsale vierge) Après avoir été...
- Página 82 4. Touch the “Presentatn” key. If it is not displayed, touch “ ” or “ ” key to be displayed. The presentation mode setting screen will appear. 4. Effleurer la touche "Présent.". Si la touche n'est pas affichée, effleurer la touche "...
-
Página 83: Feeding A Paper As A Transparency + Backing Sheet Mount [Transparency + Backing Sheet Modes]
* If “2 pages” is selected in step 6, “1 sided” key will not appear. * Si "2 pages" a été sélectionné à l'étape 6, la touche "Recto" n'apparaîtra pas. * Si se ha seleccionado "2 Páginas" en el paso 6, no aparecerá la tecla "1 Lado". - Página 84 * Transparencies must be fed in via the stack bypass tray. * When the transparency + backing sheet mode is used, the copies are ejected faced up. If originals are set in the DF, copying will be performed from the last page after they have been stored in memory once. * If an optional finisher is equipped, the copies will be ejected faced up into the sub tray.
- Página 85 * Fan the transparencies before setting them. * Up to 25 transparencies can be loaded into the tray at one time. * Make sure that paper of the same size as the transparencies has been set. * Aérer les films transparents avant de les mettre en place. * Il est possible de placer jusqu'à...
-
Página 86: Making Image Overlay [Form Overlay]
6. Specify the type of original, by touching “2 sided” or “1 sided” key. The touch panel will return to the basic screen. 6. Spécifier le type d'original en effleurant la touche "Rect/verso" ou "Recto". Le panneau de touches à effleurement retourne à l'écran de base. 6. - Página 87 4. Set the original(s). * If originals are set in the DF, set the image overlay original as 1st sheet. * If originals are set on the platen, set the image overlay original. 4. Mettre l'original (les originaux) en place. * Si les originaux sont mis en place dans le DF, placer l'original pour superposition d'image comme 1ère feuille.
-
Página 88: One Copy From Two Or Four Originals [Combine Copy]
(13) One copy from two or four originals [Combine copy] 2 or 4 originals can be combined into a single copy. The borderline of each original can also be delimited with a solid line, dotted line and register mark. * Original size and paper size must be the standard size. (13) Une seule copie produite à... - Página 89 1. Touch the “Added” key. The function selection screen will appear. 2. Touch the “Combine” key. If it is not displayed, touch “ ” or “ ” key to be displayed. The combine copy mode setting screen will appear. 1. Effleurer la touche "Ajout". L'écran de sélection des fonctions apparaît.
- Página 90 6. Specify the finishing of copy, by touching “2 sided” or “1 sided” key. When setting two-sided copy mode, normal copy (left “2 sided” key) or rotate copy (right “2 sided” key) can be selected for copying direction on the back side.
-
Página 91: Booklet From Book Originals [Booklet + Cover Copy Mode]
10. When all originals are read completely, touch the “To print” key. Copying will begin. When the copying is completed, the touch panel will return to the basic screen. 10. Une fois que tous les originaux ont été lus complètement, effleurer la touche "Pour imprimer". - Página 92 1. Touch the “Added” key. The function selection screen will appear. 2. Touch the “Book-Book” key. If it is not displayed, touch “ ” or “ ” key to be displayed. The Book-Book mode setting screen will appear. 1. Effleurer la touche "Ajout". L'écran de sélection des fonctions apparaît.
-
Página 93: Weekly Magazine From Two-Sided/One-Sided Originals [Booklet Copy]
6. Press the Start key. The original will be read. * If setting originals on the platen, go to next step. * When using the DF, have all originals read and copied. 6. Appuyer sur la touche de départ. L'original pour sera lu. * Si l'on met les originaux en place sur la vitre d'exposition, passer à... - Página 94 * The available size of originals is limited to 11” x 8 ” and paper size is limited to 11” x 17” or 8 ” x 11”. * The number of originals should be a multiple of four, otherwise the last page(s) of the copies will come out blank.
- Página 95 3. Select the type of originals. “2 sided” or “1 sided” can be selected. 3. Sélectionner le type des originaux. Il est possible de sélectionner "Rect/verso" ou "Recto". 3. Seleccione el tipo de originales. Puede seleccionar "2 Lados" o "1 Lado". 4.
-
Página 96: Copying And Stitching Into Booklet (Sheet Originals) [Stitching Mode]
7. Set the original and touch the “Continue” key after it has been read. * Repeat this operation for all the originals. 8. After all originals have been read, touch the “To print” key. Copying will begin. After finishing copying, the touch panel will return to the basic screen. - Página 97 • When copying an original only onto the front of the cover: The first page of the originals is copied onto the front of the front cover and the second page is copied onto the page that follows the cover. Then copies are made so that the copies can be read sequentially with the pages spread.
- Página 98 1. Touch the "Added" key. The function selection screen will appear. 2. Touch the "Stitching" key. If the "Stitching" key is not displayed, touch the " " key or the " " key to display it. The stitching mode setting screen will appear. 1.
- Página 99 6. Set the number of copies by touching the "+" key or the "-" key. 7. To staple (booklet stitching), touch the "Staple Sort" key. 8. When settings of the number of copies and stapling (booklet stitching) are complete, touch the "End" key. 6.
-
Página 100: Inverting Black And White [Invert Copy]
11. When scanning of the original is complete, set the next original and touch the "Continue" key. * Repeat this step until all originals have been scanned. 12. After all originals have been scanned, touch the "To print" key. Copying will begin. -
Página 101: Sorting Automatically [Sort Copy]
2. Touch the “Added” key. The function selection screen will appear. 3. Touch the “Mirror” key. If it is not displayed, touch “ ” or “ ” key to be displayed. The touch panel will return to the basic screen. 2. -
Página 102: Memorizing Frequency Used Settings [Program Mode]
3. Press the Start key. * When setting the original in the DF, read-in will be started, and copying will be performed. * When setting the original on the platen, "Continue scanning originals?" will be displayed. Go to next step. 3. -
Página 103: Calling Up A Program
3. Touch the "Register" key for the program. 3. Effleurer la touche "Enregist" pour le programme. 3. Toque la tecla "Regist." para el programa. 4. Touch the number (“1” to “7”) to be registered. The preset function will appear. * The detailed setting will be displayed by touching each keys. Touch the “Check”... -
Página 104: Recall Mode
* If “Off the platen” is selected for the “9 Job programming” on page 143, function registered in “1” will be automatically called in the basic screen by pressing the program key. Copying can be performed in the function registered in "1". * When using the function of other than program number "1"... -
Página 105: Setting Change Function
* After checking, touch the “Check” key, the touch panel will return to the basic screen. * When the setting contents are changed, touch the “Change” key after pressing any one of the function keys. The function selection screen will appear. -
Página 106: Rotate Copy
3. Touch the “End” key. Copy will be restarted. * Copying operation is carried out in the setting changed from resuming point. 3. Effleurer la touche "Fin". La copie reprend alors. * La copie est effectuée en utilisant le réglage changé à partir du point de reprise de la copie. -
Página 107: Auto Shut-Off Function
* To resume copying after the energy saver function has been activated, press the energy saver key again. The time for recovery from the energy saver function is about 30 seconds. * An auto energy saver function which actuates the energy saver function automatically, can be set to trigger after no copying has been done for a certain period (page 154, “7 Auto preheat time”). -
Página 108: Applicable Copy Modes
APPLICABLE COPY MODES MODES DE COPIE APPLICABLES MODOS DE COPIA APLICABLES (1) Reserving another copy while copying is performed [Job reservation] While copying is performed, another copying can be reserved. Up to 4 jobs can be reserved at a time. Also, the reserved jobs and the order of the copying can be changed. -
Página 109: Reserve Job
Introducción del menú de reservación de trabajo 1 Tecla de número de trabajo: El número de serie se asigna en el orden de los registros hasta el 99. Aunque cambie el orden y se borre el trabajo, no cambia el número. El copiado se hace a partir del trabajo que aparece en la parte superior. -
Página 110: Changing The Setting Contents Of The Reserved Job
2 Changing the setting contents of the reserved job The setting of finishing for the reserved job (number of copies and sorter mode) can be changed. 1. Press the add job key. The reserved job will appear. 2 Changement du contenu du réglage de travail réservé Il est possible de changer le réglage de finition pour le travail réservé... -
Página 111: Clearing The Reserved Job
* Change the setting of finishing. Press the "Sort" key to select the mode. * If an optional finisher has been installed, the staple sort mode and the punch mode can also be adjusted. When using a booklet stitcher, the staple sort mode can be adjusted. -
Página 112: Changing The Order Of Reserved Job
4. Touch the “Delete” key. 5. Touch the “Delete” key. The display will return to the screen in step 2. * To cancel “Delete”, touch the “Cancel” key. 6. Touch the “End” key. The touch panel will return to the basic screen. 4. -
Página 113: Copying Various Originals At A Time [Job Build Function]
(2) Copying various originals at a time [Job build function] The job build function enable to read the originals separately in several times and copy them at a time. The originals of the large number or different types can be copied at a time by reading those of the same size or the same type as one job and storing each job. - Página 114 2. Check if the “Memory copy from DF and Platen” key is highlighted. If not, touch it to highlight. 3. Select the function by touching the “Large # of originals” key, “Auto size” key or “Choose size” key. 2. Vérifier si la touche "Copie mémoire du charg. et vitre" est bien mise en valeur.
- Página 115 * The auto magnification selection mode has been set for the initial mode. When setting the custom paper size or the custom zoom ratio, touch the Manual key until “1:1” is displayed on the zoom ratio display. * Le mode de sélection d'agrandissement automatique est établi comme mode initial.
- Página 116 7. Set the original(s). 7. Mettre les originaux en place. 7. Coloque el/los original(es). 8. Press the Start key. 8. Appuyer sur la touche de départ. 8. Presione la tecla de Inicio. 9. When continuing to read originals, touch the “Continue” key to repeat from step 6.
-
Página 117: Two-Sided Copies From One-Sided And Two-Sided Mixed Originals
11. Set the setting of the finishing. * Changing the sorter mode by touching the “Sort” key to highlight the mode. * If an optional finisher is equipped, the setting of staple sort mode and punch mode can be changed in the same manner as with sorter mode setting. - Página 118 1. Touch the “Job Build” key. The job build function selection screen will appear. 1. Effleurer la touche "Travail Construc". L'écran de sélection de fonction de construction de travail apparaît alors. 1. Toque la tecla "Trabajo Constr.". Aparecerá el menú de selección de función de construcción de trabajo. 2.
- Página 119 * When changing the zoom ratio, touch the “+” key or “-” key on the right side of the zoom ratio display. When setting the zoom mode, such as standard zoom or XY zoom, touch the “Zoom” key and follow the instruction on page 48 and after.
- Página 120 8. Continue reading originals by touching the “Continue” key to repeat key operation from step 4. * When all originals has been read completely, go to step 9. * Touch the “Clear Last Job” key to clear the last page of read originals. * Print the test print by touching the “Test print”...
-
Página 121: Batch Copy From Platen
3 Batch copy from platen Only sheet originals Sheet originals or the like that cannot be set in the DF are stored in memory once to copy at a time. This mode is convenient for sort-copying of originals in large quantity. Only book originals When copying book originals continuously, these originals are stored in memory once for batch copying. - Página 122 4. Select the finishing of copies by touching the “2 sided copy” key or “1 sided copy” key. * If the “Sheet and Book Originals” key has been touched in step 3, go to next step. If the “Book originals” key has been touched, go to step 6. If the “Sheet Originals”...
- Página 123 * When changing the zoom ratio, touch the “+” key or “-” key on the right side of the zoom ratio display. When setting the zoom mode, such as standard zoom or XY zoom, touch the “Zoom” key and follow the instruction on page 48 and after.
- Página 124 10. When continuing to read originals, touch the “Continue” key. * If “Sheet and Book Originals” is selected in step 3 to continue reading, repeat from step 5. If “Book originals” is selected to continue reading, repeat from step 6. If “Sheet originals”...
-
Página 125: About The Copy Management Mode
COPIER MANAGEMENT CONTROLE DE COPIE ADMINISTRACION DE LA COPIADORA (1) Copy management Set 7-digit Dept. code numbers for up to 1000 departments, and manage the total number of copies made by each department. Limits for the number of copies to be made by each department can be set. (1) Contrôle de copie Pour régler les numéros de code dépt à... -
Página 126: Sobre El Modo De Administración De Copias
1 Mode de contrôle de copie Mode de contrôle de copie Contenu du mode de contrôle de copie Page Pour contrôler l'utilisation du copieur en attribuant des codes dépt sept chiffres aux services de la société, et en réglant les limites du nombre de copies pouvant être produites par Enregistrement de chaque service. -
Página 127: How To Make Settings In The Copy Management Mode
2 How to make settings in the copy management mode 1. Touch the “Default” key. The management mode selection screen will appear. 2 Comment effectuer des réglages dans le mode de contrôle de copie 1. Effleurer la touche "Par df". L'écran de sélection du mode de contrôle apparaît. - Página 128 3. Touch the “Register” key. 4. Enter the Dept. code (7-digit) with the numeric keys. 3. Effleurer la touche "Enregist". 4. Entrer le code dépt à 7 chiffres à l'aide des touches numériques. 3. Toque la tecla "Regist.". 4. Entre el código depart. (7 cifras) con las teclas numéricas. 5.
-
Página 129: Deleting Dept. Codes
9. Touch the “End” key. The display will return to the copy management mode setting screen. 10. Touch the “End” key. The touch panel will return to the basic screen. 9. Effleurer la touche "Fin". L'affichage retourne à l'écran de réglage du mode de contrôle de copie. 10. -
Página 130: Altering Limits
Altering limits 1. Set the copy management mode. (page 122) 2. Touch the “Set code” key. 3. Touch the “Correction” key. Modification des limites 1. Passer en mode de contrôle de copie. (page 122) 2. Effleurer la touche "Réglez code". 3. -
Página 131: Clearing Copy Counts
8. Touch the “End” key. The display will return to the copy management mode setting screen. 9. Touch the “End” key. The touch panel will return to the basic screen. 8. Effleurer la touche "Fin". L'affichage retourne à l'écran de réglage de mode de contrôle de copie. 9. -
Página 132: Viewing Copy Counts
Viewing copy counts 1. Set the copy management mode. (page 122) 2. Touch the “Reference” key. Total number of copies, and total number of copies of each paper size, will be displayed. Visualisation des comptes de copies 1. Passer en mode de contrôle de copie. (page 122) 2. -
Página 133: Turning Copy Management On/Off
3. Touch the “Print management list” key. Printing will begin. 4. After finishing printing, the touch panel will return to the screen in step 3. 5. Touch the "End" key. The touch panel will return to the basic screen. 3. Effleurer la touche "Liste gestion impress.". La copie s'enclenche alors. -
Página 134: Week Timer
1. Enter the Dept. code for your department. 1. Entrer le code dépt de votre service. 1. Entre el código depart. para su departamento. 2. If "Ready to copy." will appear, carry out copying with the usual procedure. * When copying is finished, press the energy saver key. If the auto clear function operates, the display will return to the previous screen. -
Página 135: About The Timer Function
1 About the timer function Timer mode Timer mode content Page Set the day of the week and the present time. Unless set correctly, the timer will not Setting the time triggered operations at the expected time. Set the times at which the copier is to switch ON and OFF on each day of the week. Then Programming the week leave the main switch ON ( ). -
Página 136: How To Make Settings In The Timer Mode
1 Sobre la función del temporizador Modo del temporizador Contenido del modo del temporizador Página Ajuste del Ajuste el día de la semana y la hora real. A menos que ajuste correctamente el temporizador temporizador se funcionará a la hora esperadas. Ajuste las horas a la que se va a encender y apagar la copiadora cada día de la semana. -
Página 137: How To Make Settings For The Various Functions
3 How to make settings for the various functions Setting the time 1. Set the timer mode. (page 131) 2. Touch the "Timer set" key. 3 Comment régler les diverses fonctions Réglage de l'heure 1. Passer en mode de semainier. (Page 131) 2. - Página 138 3. Touch the desired day of the week to be set. 3. Spécifier le jour désiré de la semaine pour lequel on veut effectuer le réglage. 3. Toque el día de la semana que desea ajustar 4. Set the starting time, hour and minutes by touching the "+" key or "-" key. 5.
-
Página 139: Cancelling The Timer Function
Cancelling the timer function 1. Set the timer mode. (page 131) 2. Touch the "Cancel" key. Annulation de la fonction de semainier 1. Passer en mode de semainier. (Page 131) 2. Effleurer la touche "Annuler". Cancelación de la función del temporizador 1. -
Página 140: Making Copies After Copier Has Been Stopped By Timer
4 Making copies after copier has been stopped by timer When the energy saver indicator lights up and all the other displays on the operation panel go out, the week timer has operated. When this happens, carry out the following procedure in order to make copies. 4 Pour effectuer des copies après que le semainier ait mis le copieur hors tension Le semainier s'est enclenché... -
Página 141: Copy Default Setting
Copy default setting Copy default setting Content of copy default setting Page This is the copy exposure selection mode. Auto (automatic exposure mode) or manual 1 Exposure mode (manual exposure mode) can be selected. 2 Exposure steps 7 or 13 exposure levels can be set for the manual exposure mode. Select the initial toner economy mode which will be set when power is turned on. - Página 142 Copy default setting Content of copy default setting Page The frequently-used function will be displayed soon after touching the "Added" key if it is ( Customize GUI #1 - #5 set in this mode, so that it makes easier to set the functions. Up to five functions can be set.
-
Página 143: Ajustes De Copia Por Omisión
Réglage initial de la copie Contenu du réglage initial de la copie Page On pouver indiquer si oui ou non la Marg R/V est affichée pour l'écran de réglage de $ Marge R/V copie avec marge, comme indiqué à la page 56. % Tiroir pour intercalaire Le tiroir des feuilles intercalaires à... -
Página 144: How To Make Settings In The Copy Default Setting Mode
Ajustes de copia por omisión Contenido de los ajustes de copia por omisión Pàgina Se puede seleccionar automáticamente la gaveta de uso más frecuente. Cuando se presiona la tecla de Reinicialización sin colocar un original, etc., puede seleccionar la 0 Gaveta por omisión gaveta especificada. -
Página 145: How To Set Each Mode
2. Touch the "Copy default" key. 2. Effleurer la touche "Défaut copie". 2. Toque la tecla "Default copia". 3. Enter the pin code "4200" with the numeric keys. * If the pin code matches the registered code, the screen changes to the copy default setting mode screen. -
Página 146: Exposure Steps
2 Exposure steps 1. Touch the "7 steps" key or "13 steps" key for the "Exposure steps". * When setting other modes continuously, see the setting of each mode. When finishing the setting, finish the copy default setting in accordance with the "... -
Página 147: Manual Exposure Adjustment
3. Touch the "End" key. * When setting other modes continuously, see the setting of each mode. When finishing the setting, finish the copy default setting in accordance with the " How to finish the copy default setting" on page 148. 3. -
Página 148: Output Form
7 Output form 1. Touch the "Sort:ON" key or the "Sort:OFF" key for the "Output form". * When setting other modes continuously, see the setting of each mode. When finishing the setting, finish the copy default setting in accordance with the " How to finish the copy default setting"... -
Página 149: Zoom Mode
* When setting other modes continuously, see the setting of each mode. When finishing the setting, finish the copy default setting in accordance with the " How to finish the copy default setting" on page 148. * Lorsqu'on règle les autres modes de manière continue, voir le réglage de chaque mode. -
Página 150: Custom Border Erase Size
# Custom border erase size 1. Touch the "Change" key for the "Custom border erase size." 2. Touch the upper "+" key or "-" key to set the paper size of width. It can be set from 3 " to 8 "... -
Página 151: Drawer For Cover Sheet/Stitch
* When setting other modes continuously, see the setting of each mode. When finishing the setting, finish the copy default setting in accordance with the " How to finish the copy default setting" on page 148. * Lorsqu'on règle les autres modes de manière continue, voir le réglage de chaque mode. -
Página 152: Create Shortcut (#1, #2)
* Create shortcut (#1, #2) 1. Touch the "Change" key for the "Create shortcut #1" or "Create shortcut #2". 2. Touch the key of the function to be shortcut. The display will return to the copy default setting screen. * The "Stitching" key appears only if an optional booklet stitcher is installed. * When setting other modes continuously, see the setting of each mode. -
Página 153: How To Finish The Copy Default Setting
How to finish the copy default setting 1. When finishing each setting, touch the "End" key for the copy default setting screen. The display will return to the management mode selection screen. Comment terminer le réglage initial de la copie 1. - Página 154 The pin code to enter each management mode such as week timer mode (page 129) and 9 Management code change: copy management mode (page 120) can be changed. with # keys * If pin code is changed, keep a note of the new one. If you forget it, enter the pin code "6482".
-
Página 155: How To Set The Machine Default Setting Mode
Ajuste por omisión de máquina Ajuste por omisión de máquina Contenido del ajuste por omisión de máquina Página Especifique si se va a utilizar papel de tamaño sin fijar o no en la bandeja de alimentación multi-hojas. Toque la tecla "Encendido" para ajustar el papel de tamaño a 1 Un tamaño fijado desde bypass medida. -
Página 156: How To Set Each Mode
3. Enter the pin code "4200" with the numeric keys. * The display will return to the machine default setting screen if the pin code matches the registered code. See the followings to make the settings of each mode. * The 4-digit pin code can be changed. (page 155, "9 Management code change: with # keys") 3. -
Página 157: Automatic Drawer Switching
1. Set the paper in the stack bypass tray (page 34) and touch the " " key. 2. Select the paper set in the stack bypass tray by touching the "Standard sizes" key or "Custom sizes" key. * If the "Standard sizes" key is touched, go to step 5. If the "Custom sizes"... -
Página 158: Drawer Paper Size
3 Drawer paper size * No operation need to be carried out since "APS" is selected for the initial mode. 3 Format de papier du tiroir * Aucune opération n'est nécessaire car "APS" est sélectionné comme mode initial. 3 Tamaño de papel de gaveta * No es necesario hacer una operación especial ya que se ha seleccionado "APS"... -
Página 159: Key Sound
6 Key sound 1. Touch the "ON" key or "OFF" key for the "Key sound". * When setting other modes continuously, see the setting of each mode. When finishing the setting, finish the machine default setting in accordance with the " How to finish the machine default setting"... -
Página 160: Management Code Change: With # Keys
9 Management code change: with # keys 1. Touch the "Change" key for the "Management code change: with # keys". 2. Enter the pin code to be changed (4-digit) using the numeric keys. 3. Touch the "Change" key. * When setting other modes continuously, see the setting of each mode. When finishing the setting, finish the machine default setting in accordance with the "... -
Página 161: Selection Of Touch Panel Language
2. Touch the "Basic" key. The touch panel will return to the basic screen. 2. Effleurer la touche "De base". Le panneau de touches à effleurement retourne à l'écran de base. 2. Toque la tecla "Básico". La pantalla de toque volverá al menú básico. (4) Selection of touch panel language Select the language to be used on the touch panel, in either English, French, Spanish or Japanese. -
Página 162: Optional Equipment
OPTIONAL EQUIPMENT OPTIONS EQUIPO OPCIONAL (1) a. Finisher The finisher stores the large quantity of copies, and sorts the multiple sets by shifting the output position after completing each set. Stapling the numbering copies or punching holes is possible. For details, see the finisher’s instruction handbook. (1) a. - Página 163 Selecting the staple sort mode Select the stapling position by touching the staple sort mode key. Three different positions can be stapled. Sélection du mode de tri agrafage Sélectionner la position d'agrafage en effleurant la touche de mode de tri agrafage.
- Página 164 * Le finisseur peut être placé à deux endroits: le tiroir principal ou le tiroir auxiliaire. Le tiroir à placer sera changé en fonction de la manière dont l'original et la finition sont réglés. Se reporter au tableau suivant. Mode Mode de non-tri Original Mode de tri...
-
Página 165: Key Counter
* El encuadernador de folleto está equipado con tres lugares para almacenamiento: bandejas 1, 2 y 3. La bandeja a la que sale y el método de salida dependen del método de colocación del original y del ajuste de terminación. Consulte el siguiente cuadro. Modo Modo de Modo sin compaginación... -
Página 166: I/F Kit
(3) I/F kit The copier can be used as a printer if an I/F kit is equipped. For details, see the printer’s instruction handbook. (3) I/F kit Il est possible d'utiliser le copieur comme imprimante si un I/F kit est installé. Pour plus de détails, se reporter au mode d'emploi de l'imprimante. - Página 167 Order of consumable and service request 1. Touch the “Default” key. The management mode selection screen will appear. Commande de fournitures et demande de service 1. Effleurer la touche "Par df". L'écran de sélection de mode de contrôle apparaît. Pedido de consumible y solicitud de servicio 1.
- Página 168 5. Touch one of the any number keys from “1” to “15”. The check mark will be displayed with the selected number. * Up to three menus can be displayed on the screen at a time. Touch the “ ” key or “ ” to display the undisplayed number keys. 5.
- Página 169 8. Touch the “Send” key. * The transmission will be started by touching the “Send” key. * Entered code will be cleaned and the display will return to the screen in step 5 by touching the “Cancel” key. 9. When the order transmission has been completed, the touch panel will return to the basic screen.
- Página 170 12. Touch the “End” key. The touch panel will be changed to the order transmission screen. 12. Effleurer la touche "Fin". Le panneau de touches à effleurement passe à l'écran de transmission de commande. 12. Toque la tecla "Fin". La pantalla de toque cambiará al menú de transmisión de pedido. 13.
-
Página 171: Messages
MESSAGES When the messages below are displayed: When any of the messages below appear on the touch panel, take the action indicated. Message Action Page “Close xxx cover.” The cover displayed is open. Close it/them securely. “Add paper in drawer.” There is no paper in the drawer displayed. - Página 172 Message Action Page Periodic maintenance is necessary to keep your copier in good condition. “Time for maintenance.” Contact your service representative as soon as possible. Memory is full. Select if print till the last page which has just read or clear “Memory full.”...
- Página 173 MESSAGES Lorsque les messages ci-dessous sont affichés: Lorsque l'un quelconque des messages ci-dessous apparaît sur le panneau de touches à effleurement, effectuer l'opération indiquée. Message Opération Page "Fermez le panneau xxx." Le panneau indiqué ouvert. Bien le(s) refermer. Il n'y a pas de papier dans le tiroir indiqué. Mettre du papier du format "Ajout.
- Página 174 Message Opération Page Il est nécessaire d'effectuer les travaux d'entretien périodique pour "Prévoir entretien." conserver le copieur en bon état de marche. S'adresser dès que possible à son agent de service. La mémoire est pleine. Sélectionner si l'on doit effectuer l'impression jusqu'à...
-
Página 175: Mensajes
MENSAJES Cuando aparecen los siguientes mensajes: Cuando aparece uno de los mensajes a continuación en la pantalla de toque, tome la acción indicada. Mensaje Acción Página "Cierre cubierta xxx ." La cubierta indicada está abierta. Cierre firmemente. "Añada papel en gaveta." No hay papel en la gaveta indicada. - Página 176 Mensaje Acción Página Abra y cierre la cubierta frontal. Si el mensaje no desaparece anote el "C" "Llame para servicio." y los números que aparece a continuación, desconecte ( O ) el interruptor principal y hable con su representante de servicio. "Tiempo de mantenimiento."...
-
Página 177: Replacing The Toner Cartridge
REPLACING THE TONER CARTRIDGE REMPLACEMENT DE LA CARTOUCHE DE TONER CAMBIO DEL CARTUCHO DE TONER Replace the toner cartridge only when “Add toner to resume copying.” is displayed. * Touch the “?” key to display the toner cartridge replacement procedure on the touch panel. - Página 178 2. Raise the old cartridge up slightly and pull it out towards you. 2. Soulever légèrement la cartouche usagée et la tirer vers soi. 2. Levante ligeramente el cartucho viejo y tire hacia sí. 3. Hold the new cartridge horizontally, and shake it up and down 3-5 times, turning it over each time.
-
Página 179: When Paper Misfeeds
WHEN PAPER MISFEEDS If a paper misfeed occurs, copying will stop. A misfeed message will appear on the touch panel as well as misfeed locations are indicated. Remove the misfed paper referring to page 177, “(3) Remove procedures” with the main switch ON ( ). Touch the “?”... - Página 180 LORSQUE LE PAPIER EST COINCE Lorsque le papier se coince, la copie s'arrête. Un message signalant le bourrage apparaît sur le panneau de touches à effleurement, avec l'emplacement du bourrage. Retirer le papier coincé en se reportant à la section "(3) Procédures de retrait" à la page 177, en laissant l'interrupteur principal sur marche ( ).
-
Página 181: Cuando Se Produce Un Atasco Del Papel
CUANDO SE PRODUCE UN ATASCO DEL PAPEL Si se produce un atasco del papel, dejará de copiar. Aparecerá un mensaje que le avisa del atasco en la pantalla de toque, junto con el lugar del atasco. Elimine el atasco de papel consultando la página 177, "(3) Procedimientos de eliminación"... -
Página 182: Removal Procedures
(3) Removal procedures 1 Misfeed in paper feed section Misfeed in drawer If “Misfeed in paper drawer. Remove paper.” and the misfeed location indicator shown in the illustration appear, misfeed has occurred in the drawer. (3) Procédures de retrait 1 Bourrage dans la section d'alimentation du papier Bourrage dans le tiroir Si le message "Bourrage dans le tiroir. - Página 183 1. Open the right cover. 1. Ouvrir le panneau droit. 1. Abra la cubierta derecha. 2. Remove the misfed paper without tearing it. * If the paper does tear, remove any scraps of torn paper from inside the copier. 3. Close the right cover. 2.
- Página 184 2. Check that the paper misfeed message has disappeared from the touch panel. Then, re-load the paper into the stack bypass tray. 2. S'assurer que le message de bourrage a disparu du panneau de touches à effleurement. Remettre ensuite le papier en place dans le plateau d'alimentation manuelle.
- Página 185 Misfeed in deck If “Misfeed in paper drawer. Remove paper.” and the misfeed location indicator shown in the illustration appear, misfeed has occurred in the deck. * It is displayed only when using the deck-type paper desk. Bourrage dans le grand tiroir Si le message "Bourrage dans le tiroir.
- Página 186 1. Open the right deck cover. 1. Ouvrir le panneau du grand tiroir droit. 1. Abra la cubierta derecha del cajón. 2. Remove the misfed paper without tearing it. * If the paper does tear, remove any scraps of torn paper from inside the copier.
- Página 187 2. Tip the paper transfer section release lever to the right. 3. Turn the paper feed section knob in the direction of the arrow, to make the misfed paper emerge. 2. Incliner le levier de libération de la section de transfert du papier vers la droite.
- Página 188 7. Return the transfer section slowly to the original position turning the transfer section safety release plate b in the direction of the arrow. 7. Remettre doucement la section de transfert à sa position initiale en tournant la plaque b de libération de sécurité de la section de transfert dans le sens de la flèche.
- Página 189 2. Turn the fixing knob in the direction of the arrow, to eject the misfed paper. The paper will be ejected to the ejection section. Remove the paper. 2. Tourner le bouton de l'unité de fixation dans le sens de la flèche afin d'éjecter le papier coincé.
- Página 190 6. Open the fixing cover c and remove misfed paper, if there is any, from inside. 7. Close the fixing cover c as before. 6. Ouvrir le panneau de l'unité de fixation c et si besoin est retirer le papier coincé...
- Página 191 1. Remove the copy tray, open the left cover, and remove the misfed paper. (page 184) * After the paper is removed, close the left cover and return the copy tray to their original position. If the misfed paper is not there, go to next step. 1.
- Página 192 6. Unscrew the two reversing cover screws d located on the left side of the duplex unit. The reversing cover e will open out downwards. 6. Dévisser les deux vis de couvercle d'inversion d situées sur le côté gauche de l'unité recto/verso. Le couvercle d'inversion e s'ouvrira vers le bas.
- Página 193 2. Remove the originals which have been ejected onto the original cover. 2. Retirer les originaux qui ont été éjectés sur le couvercle d'original. 2. Saque los originales expulsados a la cubierta de originales. 3. Open the DF original reversing cover. * To open the DF original reversing cover, hold the cover by the center knob.
- Página 194 6. Turn the original misfed release dial g and move the original to the position where it can be easily removed, and remove the misfed originals. 6. Tourner la molette g de libération d'original coincé et mettre l'original à une position où il puisse être facilement retiré, puis retirer les originaux coincés.
-
Página 195: Troubleshooting
TROUBLESHOOTING If trouble occurs, carry out the applicable checks and action given below. If the trouble persists, contact your service representative. Trouble Checks Action Page Nothing lights on operation panel when Is the power plug connected to an AC Connect the plug to an AC outlet. main switch is turned outlet? ON ( ). - Página 196 Trouble Checks Action Page Copies come out too Is the copier in the auto exposure Adjust exposure settings in the “Auto dark. mode? exposure adjustment”. Adjust the exposure to the correct Is the copier in the manual exposure degree using the manual exposure mode? adjustment keys.
- Página 197 DEPANNAGE Si une panne se produit, effectuer les vérifications et les opérations adéquates indiquées ci-dessous. Si l'anomalie persiste, contacter son agent de service. Problème Vérifications Opération Page Rien ne s'allume sur le panneau de commande La fiche du cordon d'alimentation est- lorsqu'on met Brancher la fiche à...
- Página 198 Problème Vérifications Opération Page Les copies produites sont Le copieur est-il en mode d'exposition Régler les réglages d'exposition dans la trop sombres. automatique? "Correction d'exposition automatique". Régler l'exposition au niveau correct à Le copieur est-il en mode d'exposition l'aide des touches de réglage manuelle? d'exposition manuelle.
-
Página 199: Localizacion De Averias
LOCALIZACION DE AVERIAS Si se produce un problema, realice las inspecciones y acciones que se indican a continuación. Si el problema no se soluciona, hable con su representante de servicio. Problema Inspecciones Acción Página No se enciende nada en el tablero de controles ¿Se ha conectado el enchufe en un Conecte el enchufe en un cuando se conecta ( ) el... - Página 200 Problema Inspecciones Acción Página Las copias salen ¿La copiadora está el modo de Haga los ajustes de exposición en el demasiado oscuras. exposición automática? "Ajuste de exposición automática". Ajuste la exposición al grado correcto ¿La copiadora está en el modo de con las teclas de ajuste de exposición exposición manual? manual.
-
Página 201: Cleaning The Copier
CLEANING THE COPIER NETTOYAGE DU COPIEUR LIMPIEZA DE LA COPIADORA Cleaning the original cover, DF original reading cover 1. Lift open the DF. Wipe the original cover a and DF original reading cover b, and the platen with a soft cloth dampened with alcohol or mild detergent. - Página 202 CAUTION DO NOT leave the document feeder open as there is a danger of personal injury. ATTENTION NE PAS laisser le chargeur de document ouvert car il y a un risque de blessures. PRECAUCION NO deje el alimentador de documentos abierto porque existe el peligro de sufrir heridas personales.
-
Página 203: Specifications
SPECIFICATIONS Type..........Desk-top Original table .........Fixed type Copying system ......Indirect electrostatic Originals.........The platen: Sheets of paper, and books, 3-dimensional (Maximum originals size: 11” x 17”) DF: Sheets of paper (11” x 17” - 8 ” x 5 ”, one-sided original: 35 g/m - 160 g/m , two-sided original: 50 g/m... - Página 204 SPECIFICATIONS Type..........De bureau Table d'original......Type fixe Système de reproduction .....Electrostatique indirect Originaux ........Vitre d'exposition: Feuilles de papier et livres, tri-dimensionnels (Format d'originaux maximum: 11 po. x 17 po.) DF: Feuilles de papier (11 po. x 17 po. – 8 po. x 5 po., original recto: 35g/m - 160g/m original recto/verso: 50 g/m...
-
Página 205: Especificaciones
ESPECIFICACIONES Tipo..........De escritorio Mesa de originales ......Tipo fijo Sistema de copiado ......Electrostático indirecto Originales........La pantalla: hojas de papel, y libros, objetos tridimensionales (Tamaño máximo de originales: 11" x 17") DF: Hojas de papel (11" x 17" - 8 " x 5 ", originales de un lado: 35 g/m - 160 g/m , original... -
Página 206: About 52 Ppm Copier
Names of parts for main body ABOUT 52 PPM COPIER The illustration and the instruction described on page 19 and page 20 are different for 52 ppm copier as follows. This chapter covers matters specifically for 52 ppm copier. Please refer this chapter, as well as other chapters in the instruction handbook, if you purchased a 52 ppm copier. - Página 207 ¤ Main switch Œ Duplex unit „ Re-feeding section (Turn ON ( ) before starting machine.) ‹ Left cover (Open when paper misfeed occurs in the duplex unit.) ´ Duplex cover (Open when paper misfeed occurs in the fixing unit or ejection section.) (Open when paper misfeed occurs in the duplex unit.) ›...
- Página 208 Nomenclature du corps principal A PROPOS DU COPIEUR 52 P/MN L'illustration et les instructions figurant aux pages 21 et 22 sont différentes pour le copieur 52 p/mn, sur les points Ce chapitre expose les sujets spécifiques au copieur 52 p/mn. Se suivants.
- Página 209 ¤ Interrupteur principal Œ Unité recto/verso „ Section de ré-alimentation (Mettre cet interrupteur sur ON ( ) avant de mettre la machine en marche.) (Ouvrir cette section lorsque le papier se coince dans l'unité ‹ Panneau gauche recto/verso.) ´ Couvercle recto/verso (Ouvrir ce panneau lorsque le papier se coince dans l'unité...
-
Página 210: Sobre La Copiadora De 52 Ppm
Nombres de las partes del cuerpo principal SOBRE LA COPIADORA DE 52 PPM La figura y las instrucciones que se describen en la página 23 y página 24 son diferentes en la copiadora de 52 ppm Este capítulo describe los puntos específicos para la copiadora de para los siguientes puntos 52 ppm. - Página 211 ¤ Interruptor principal Œ Unidad duplex „ Sección de realimentación (Conecte ( ) para poder utilizar la máquina.) ‹ Cubierta izquierda (Abra cuando se produce un atasco en la unidad duplex.) ´ Cubierta del duplex (Abra cuando se produce un atasco en la unidad de fijación o sección de salida.) (Abra cuando se produce un atasco en la unidad duplex.) ›...
- Página 212 Pin code The pin code registered in the management mode described in the third paragraph on page 122, the fourth paragraph on page 131, the third paragraph on page 140, the first paragraph on page 151 and the third paragraph in page 162 is 5200. This pin code can be changed.
- Página 213 Removal procedure of misfeed in duplex unit Instead of removal procedure described on page 185 to page 187 ("4 Misfeed in duplex unit"), remove paper as follows. Procédure de retrait du bourrage dans l'unité recto/verso Au lieu de retirer le papier coincé en suivant la procédure décrite aux pages 185 à...
- Página 214 4. If the misfed paper is in the re-feeding section, remove it. 4. Si le papier est coincé dans la section de ré-alimentation, le retirer. 4. Si el papel atascado está en la sección de realimentación, elimínelo. 5. Lift up the duplex cover. 6.
- Página 215 Specifications Specifications described on page 198 are different as follows. Type..........Console Original table .........Fixed type Copying system ......Indirect electrostatic Originals.........The platen: Sheets of paper, and books, 3-dimensional (Maximum originals size: 11” x 17”) DF: Sheets of paper (11” x 17” - 8 ”...
- Página 216 Spécifications Les spécifications décrites à la page 199 diffèrent comme indiqué ci-après. Type..........Console Table d'original......Type fixe Système de reproduction .....Electrostatique indirect Originaux ........Vitre d'exposition: Feuilles de papier et livres, tri-dimensionnels (Format d'originaux maximum: 11 po. x 17 po.) DF: Feuilles de papier (11 po. x 17 po. – 8 po.
- Página 217 Especificaciones Las especificaciones descritas en la página 200 tienen las siguientes diferencias. Tipo..........Consola Mesa de originales ......Tipo fijo Sistema de copiado ......Electrostático indirecto Originales........La pantalla: hojas de papel, y libros, objetos tridimensionales (Tamaño máximo de originales: 11" x 17") DF: Hojas de papel (11" x 17" - 8 "...
-
Página 218: Safety Of Laser Beam
SAFETY OF LASER BEAM 1. Safety of laser beam This copier has been certified by the manufacturer to Class 1 level under the radiation performance standards established by the U.S. DHHS (Department of Health and Human Services) in 1968. This indicates that the product is safe to use during normal operation and maintenance. The laser optical system, enclosed in a protective housing and sealed within the external covers, never permits the laser beam to escape. -
Página 219: Securite Du Rayon Laser
SECURITE DU RAYON LASER 1. Sécurité du rayon laser Ce copieur a été certifié par le fabricant au niveau Classe 1 d’après les standards de performance de radiation établis par le Département de la Santé et des Services Humanitaires (DHHS) des Etats-Unis. -
Página 220: Seguridad Del Haz Laser
SEGURIDAD DEL HAZ LASER 1. Seguridad del haz láser Esta copiadora ha sido certificada por el fabricante a nivel de Clase 1 bajo las normas de comportamiento de radiaciones establecidas por el DHHS (Departamento de Salud y Servicios Humanitarios) de EE.UU. en 1968. Esto indica que el producto es seguro para utilizarlo durante la operación y mantenimiento normales. - Página 221 CAUTION! The power plug is the main isolation device! Other switches on the equipment are only functional switches and are not suitable for isolating the equipment from the power source. ATTENTION ! Le débranchement de la fiche secteur est le seul moyen de mettre l'appareil hors tension.
- Página 222 WARNING This equipment has been tested and found to comply with the limits for a Class A digital device, pursuant to Part 15 of the FCC Rules. These limits are designed to provide reasonable protection against harmful interference when the equipment is operated in a commercial environment. This equipment generates, uses, and can radiate radio frequency energy and, if not installed and used in accordance with the instruction manual, may cause harmful interference to radio communications.
- Página 223 KYOCERA MITA Dealer from whom the copier was OF MERCHANTABILITY AND FITNESS FOR A PARTICULAR purchased of the defects. If the KYOCERA MITA dealer is not PURPOSE. THIS WARRANTY SHALL NOT EXTEND TO ANY able to provide warranty service, write to KYOCERA MITA at...
- Página 225 * For best copy results and machine performance, we recommend that you use only KYOCERA MITA original supplies for your KYOCERA MITA copier. * Pour une meilleure reproduction et une meilleure performance de votre photocopieur, nous vous recommandons d'utiliser exclusivement des fournitures d'origine KYOCERA MITA.
- Página 226 KYOCERA MITA CANADA, LTD. 6120 Kestrel Road, Mississauga, Ontario L5T 1S8 TEL : (905) 670-4425 FAX : (905) 670-8116 KYOCERA MITA MEXICO, S.A. DE C.V. Av. 16 de Septiembre #407 Col. Santa Inés, Delegación Azcapotzalco México, D.F. C.P. 02130 TEL : 3-83-27-41 FAX : 3-83-78-04 ©2000 KYOCERA MITA CORPORATION...