Tabla de contenido
Publicidad
Idiomas disponibles
Idiomas disponibles
Enlaces rápidos
Publicidad
Capítulos
Tabla de contenido

Manuales relacionados para KPS PowerCompact3020


Resumen de contenidos para KPS PowerCompact3020
- Página 1 PowerCompact3020 Manual de usuario User‘s manual...
-
Página 3: Tabla De Contenido
ÍNDICE INDICE Pág. Presentación ............................6 Presentación Seguridad ..............................6 Seguridad Seguridad de los operarios ....................6 Seguridad de los operarios Descripción del dispositivo y su conexión a la instalación eléctrica ............7 Descripción del dispositivo y su conexión a la instalación eléctrica Alimentación .......................... -
Página 4: Presentación
..............18 ÍNDICE ..........19 Pág. 5.2.7.1 Comprobación de la comunicación serie............ 19 Presentación .................19 ................. 20 Seguridad ..................20 Seguridad de los operarios 5.2.11 Información del dispositivo ...................20 Descripción del dispositivo y su conexión a la instalación eléctrica Uso y consulta del instrumento ......................21 Alimentación Navegación por los menús de medición ................21 Puerto USB... - Página 5 6.2.10 Menú de transitorios .....................38 ÍNDICE Pág............... 38 ............. 40 Presentación ..............40 6.2.11 Menú de campañas de medición ................41 Seguridad 6.2.11.1 Campañas de medición ................41 Seguridad de los operarios 6.2.11.2 Contenido de la tarjeta uSD ............... 42 6.2.12 Menú...
-
Página 6: Presentación
1. PRESENTACIÓN El PowerCompact3020 es un dispositivo avanzado dotado de nuevas funciones para medir y monitorizar los consumos eléctricos y para realizar un análisis avanzado de la energía y de la calidad de la misma; es un instrumento que puede medir, visualizar, procesar y transmitir todos los parámetros de una instalación. -
Página 7: Descripción Del Dispositivo Y Su Conexión A La Instalación Eléctrica
El símbolo reproducido aquí al lado, cuando está indicado en el producto o en cualquier otra parte, indica la consulta obligatoria del manual de instrucciones 3. DESCRIPCIÓN DEL DISPOSITIVO Y SU CONEXIÓN A LA INSTALACIÓN ELÉCTRICA El PowerCompact3020 ha sido concebido para realizar mediciones en tiempo real y campañas de medida de gran duración. -
Página 8: Alimentación
3.3. Tarjeta de memoria El PowerCompact3020 posee una ranura para colocar una tarjeta de memoria uSD de 16 GB, que permite memorizar los datos de las campañas de medición, de los transitorios rápidos y de las corrientes de arranque. - Página 9 3.4. Teclado El teclado de PowerCompact3020 dispone de 9 teclas de doble función. La función de cada tecla varía si se la presione una vez o si se la mantiene presionada por 3 segundos.
-
Página 10: Funcionamiento De Las Teclas
3.5. Funcionamiento de las teclas FUNCIÓN TECLA Presión individual Presión durante 3” ENCIENDE y APAGA el instrumento Acceso al menú TENSIONES Acceso al menú CONTADORES Acceso al menú ARMÓNICAS - THD - Acceso al menú CORRIENTES Acceso al menú POTENCIAS Acceso al menú... -
Página 11: Interfaz De Usuario
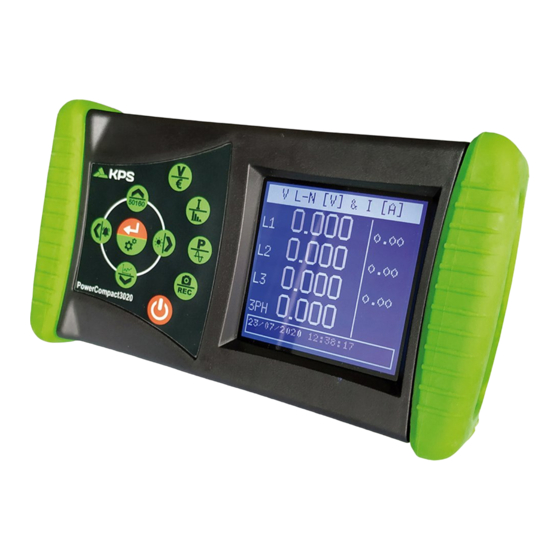
3.6. Interfaz de usuario Para facilitar su uso, el PowerCompact3020 dispone de una pantalla LCD gráfica y del teclado de membrana, descrito previamente. La arquitectura software del dispositivo está ordenada por MENÚS, y más precisamente: menús de CONFIGURACIÓN y de MEDICIÓN. Cada menú presenta diferentes pantallas descritas en los apartados siguientes. -
Página 12: Barra Inferior
3.8. Barra inferior En esta área de la pantalla se visualizan algunas informaciones relativas al estado del instrumento y puede ser personalizada por el usuario en el menú de configuración. 3.8.1. Barra principal La barra principal muestra la información general del instrumento: 1) Nivel de carga de la batería 2) Presencia o ausencia de la tarjeta de memoria A las informaciones anteriores se alternará... -
Página 13: Configuración
A los pocos segundos se mostrará la página con la detección automática de las pinzas de corriente. El PowerCompact3020 es, de hecho, capaz de detectar qué pinzas de corriente están conectadas a sus entradas y configurarse en consecuencia, almacenando estos datos en configuración interna. -
Página 14: Ajuste De Parámetros
Use las teclas para seleccionar la pantalla de configuración deseada y presione para acceder a ella. Para regresar al menú principal de configuración presione la tecla Para salir del menú de configuración, presione de nuevo la tecla durante 3 segundos. 5.2. -
Página 15: Ajuste A Cero
5.2.1.2. Configuración del tipo de tensión y de la relación de tensión (TV) para el canal principal. PowerCompact3020 puede medir tanto la tensión alterna como la tensión continua. Por este motivo, el usuario deberá seleccionar el tipo de tensión que se analizará, entre AC (alterna) y DC (continua). -
Página 16: Configuración De Los Contadores
Seleccione "Repetir" para realizar una nueva comprobación Seleccione Final para volver a la página Set-up conecciones. 5.2.2. Configuración de las pinzas de corriente. Gracias al econocimiento automático de la spinzas de corriente, los valores de configuración serán los detectados en el arranque del instrumento. Si es necesario utilizar pinzas diferentes de las detectadas, se tendrá... -
Página 17: Configuración De Las Alarmas Alarmas
Situe el cursor en una de las alarmas y presione para acceder a la pantalla de configuración de esa alarma. Seleccione ALL y presione para resetear todas las alarmas configuradas. 5.2.4.1. Configuración de las alarmas En el menú configuración de la alarma 1 o 2 se puede deshabilitarla, configurándola en OFF, o activarla, configurándola con el parámetro deseado, eligiendo entre los que se enumeran a continuación: Vrms 3F, Vrms L1, Vrms L2, Vrms L3, Irms 3F, Irms L1, Irms L2,... -
Página 18: Configuración De Las Tarifas
Más precisamente se pueden configurar: valor de Vrms por debajo del cual se ha definido la interrupción el valor de Vrms por debajo del cual estamos ante la presencia de una caída el valor de Vrms sobre el cual estamos en presencia de una sobretensión la tensión nominal la frecuencia nominal... -
Página 19: Configuración Y Comprobación De La Comunicación
5.2.7. Configuración y comprobación de la comunicación En esta página se pueden configurar los siguientes parámetros: la velocidad de transferencia de los datos entre los siguientes: 4800, 9600, 19200, 38400, 57600, 115200 bps. el tipo de paridad: No, Par, Impar. el tipo de protocolo: BCD o IEEE. -
Página 20: Información Del Dispositivo
Obviamente la eficiencia de la pantalla LCD depende del número de horas de encendido y de la luminosidad utilizada. Salvo que no exista una necesidad real, se aconseja mantener una luminosidad superior a 70 con retroiluminación SIEMPRE ON. NOTA: la pantalla se enciende automáticamente si se dispara una alarma en la pantalla. 5.2.9. -
Página 21: Uso Consulta Del Instrumento
6. 6. USO CONSULTA DEL INSTRUMENTO El teclado del PowerCompact3020 está diseñado para permitir el acceso directo a todos los menús de medición del instrumento a través de las teclas. Presionando la tecla apropiada se accede a un determinado menú, dentro del cual se puede navegar entre las diferentes pantallas que lo componen usando las flechas de dirección. -
Página 22: Menú De Mediciones
6.2. Menú de mediciones Al entrar o salir del menú de configuración, el PowerCompact3020 se posiciona en la primera pantalla del menú de tensiones. La estructura de los menús es de tipo circular (loop), es decir, una vez que se ha llegado a la última pantalla, al avanzar a la siguiente se volverá... -
Página 23: Configuración Monofásica
Medias de las tensiones (calculadas según el tiempo de integración escogido y que pueden ponerse a cero) Valores instantáneos mínimos de tensión registrados (pueden ponerse a cero) Valores instantáneos máximos de tensión registrados (pueden ponerse a cero) 6.2.1.2. Configuración monofásica En esta página se visualizan: tensión RMS, máxima, media, mínima y frecuencia, con las respectivas corrientes. -
Página 24: Menú De Corrientes
6.2.2. Menú de corrientes 6.2.2.1. Configuración trifásica o bifásica En la primera pantalla de este menú se representan las corrientes de cada fase y la corriente trifásica (o bifásica, según la conexión eléctrica) con las tensiones correspondientes. Desplazándose por las pantallas de este menú, se visualizarán las páginas siguientes. Corriente de neutro o, más genéricamente, 4°... -
Página 25: Menú De Potencias
Cargas pico, es decir, las medias de corriente más altas (calculadas según el tiempo de integración escogido y que pueden ponerse a cero). 6.2.2.2. Configuración monofásica En esta pantalla se visualizan: corriente RMS, máxima, media, mínima y potencia máxima (cargas pico calculadas según el tiempo de integración programado), con las tensiones correspondientes. - Página 26 Potencias reactivas (Var) de las fases individuales y trifásicas (o bifásicas) con los correspondientes valores de PF. NOTA: por convención general la potencia reactiva se indica como negativa cuando es capacitiva y positiva cuando es inductiva. Potencias aparentes (VA) de las fases individuales y trifásicas (o bifásicas) con los correspondientes valores de PF.
- Página 27 Las cargas pico y el PF correspondiente, es decir las potencias medias más altas (calculadas según el tiempo de integración escogido y que pueden ponerse a cero). Si la red UPS 3-3 o UPS 3-1 está seleccionada, se mostrarán lso siguientes datos de eficiencia en tiempo real: Pin: potencia de entrada instantánea en el UPS Pout: potencia de salida instantánea desde el UPS...
- Página 28 Valores instantáneos máximos de las potencias y del PF (que pueden restablecerse a cero) Las cargas pico de las potencias y el correspondiente PF, es decir los valores medios más altos (calculados según el tiempo de integración escogido y que pueden ponerse a cero).
-
Página 29: Menú De Contadores
Valores instantáneos máximos de las potencias y del PF (pueden ponerse a cero), relativos al canal auxiliar. Las cargas pico y el valor de PF correspondiente, es decir las potencias medias más altas (calculadas según el tiempo de integración escogido y que pueden ponerse a cero), relativas al canal auxiliar. - Página 30 Los contadores de la energía activa generada (-kWh) por cada fase y trifásica (o bifásica) Los contadores de la energía reactiva generada (-kVArh) por cada fase y trifásica (o bifásica) Las medias de los PF calculadas como relación entre kWh/kVAh (es considerada sólo la parte real de los contadores, no aquella decimal) En las siguientes pantallas se pueden visualizar las energías absorbidas y/o generadas y sus costes en función de las franjas horarias configuradas.
- Página 31 Los kVArh generados en las diferentes franjas horarias El coste expresado en la unidad de moneda configurada de los kWh absorbidos en las diferentes franjas tarifarias La renta expresada en la unidad de moneda configurada de los kWh generados en las diferentes franjas tarifarias.
- Página 32 Los kVArh absorbidos en las diferentes franjas horarias Los kWh generados en las diferentes franjas horarias Los kVArh generados en las diferentes franjas horarias El coste expresado en la unidad de moneda configurada de los kWh absorbidos en las diferentes franjas tarifarias La renta expresada en la unidad de moneda configurada (apdo.
-
Página 33: Menú De Armónicos
6.2.5. Menú de armónicos 6.2.5.1. Configuración trifásica o bifásica La primera pantalla de este menú muestra la THD% (Total Harmonics Distorsion - Tasa de distorsión armónica total) de tensión por cada fase y trifásica (o bifásica) y las THD% de las corrientes de fase correspondientes. a pantalla siguiente muestra los valores de la THD% de las corrientes de cada fase y trifásicas (o bifásicas) con las THD% de las tensiones de fase correspondientes. - Página 34 Histograma armónico de tensión y corriente de la fase L2. Histograma armónico de tensión y corriente de la fase L3. Histograma armónico de la corriente de neutro. 6.2.5.2. Configuración monofásica Valores de las THD% (Total Harmonics Distorsion - Tasa de distorsión armónica total) de tensión y corriente, valor del Cos y su ángulo expresado en grados (el signo negativo indica que la corriente anticipa la tensión y por tanto la carga es capacitiva).
-
Página 35: Menú De Formas De Onda
Presionando se puede acceder a la función de selección y desplazamiento de cada armónica. Mediante se puede, en efecto, seleccionar cada armónica del histograma (hasta la 50a) verificando sus relativos valores RMS. Presionando nuevamente se podrán volver a hojear las páginas del menú de armónicos. -
Página 36: Función De Captura De Pantalla
Formas de onda de tensión y corriente de L2 con valores RMS (sólo en configuraciones trifásicas o bifásicas). Formas de onda de tensión y corriente de L3 con valores RMS (sólo en configuraciones trifásicas o bifásicas). Formas de onda de la corriente de neutro y valor RMS (sólo en configuraciones trifásicas o bifásicas). - Página 37 6.2.8. Menú EN 50160 En este menú se pueden vigilar algunos de los parámetros determinantes para definir la calidad de la energía. En la primera página se muestra el resultado de la comprobación de conformidad con la norma EN50160 (normativa de referencia para la calidad de la energía) según lo configurado en el menú...
-
Página 38: Menú De Alarmas
6.2.9. Menú de alarmas En este menú se memorizan y visualizan las 5 últimas alarmas disparadas. Se visualiza automáticamente en la pantalla la última alarma disparada en orden cronológico. Cada alarma se identifica con: fecha y hora de inicio parámetro que ha provocado el disparo de la alarma valor del parámetro que ha determinado la condición de alarma duración del evento. - Página 39 En el modo de captura con almacenamiento en USD es necesario que la fecha y la hora se hayan establecido correctamente. Si no lo son el PowerCompact3020 impide la iniciación de las capturas, mostrando el mensaje "Ajustar fecha y hora".
-
Página 40: Configuración De Corriente De Arranque
Para visualizar transitorios anteriores al visualizado, utilice las teclas Para salir y volver a la página "menú transitores", presione (Final). 6.2.10.2. Configuración de corriente de arranque En el menú Transitorio, seleccionando “Corriente de Arranque” se accede a la pantalla de configuración para el análisis del antedicho fenómeno. -
Página 41: Menú De Campañas De Medición
Una vez finalizada la medición, se mostrará en pantalla el parámetro de la fase L1, indicando los valores máximo y mínimo, el tiempo de muestreo y el número de muestras tomadas. El usuario puede decidir entre: salir (Final = retorno a la pantalla de configuración) repetir la medición usando las mismas configuraciones (Repetir);... -
Página 42: Contenido De La Tarjeta Uds
Duración de la campaña Frecuencia de memorización recomendada Tamaño del archivo Hasta 12h 1 segundo 217 Mbyte De 12 a 48h 5 segundos 174 Mbyte De 48h a 2 semanas 30 segundos 204 Mbyte De 2 semanas a 1 mes 60 segundos 217 Mbyte De 1 a 6 meses... -
Página 43: Contadores En Tiempo Real
6.2.12.3. Contadores en tiempo real Esta pantalla ofrece la posibilidad de comprobar cuentas parciales sin resetear las calculadas en una campaña en progreso. Para cada tipo de energía se muestra dos valores: parcial (grande) y absoluta (pequeño). Presione para iniciar la cuenta parcial y vuelva a presionar de nuevo para pararla. -
Página 44: Esquemas De Conexión
7. ESQUEMAS DE CONEXIÓN A continuación se citan algunos ejemplos de posibles conexiones eléctricas. - 44 -... - Página 45 - 45 -...
- Página 46 - 46 -...
-
Página 47: Mantenimiento
8. MANTENIMIENTO El PowerCompact3020 no necesita de tareas especiales de mantenimiento. Es suficiente atenerse a las reglas comunes, válidas para todos los aparatos electrónicos: limpiar el instrumento con paños suaves, limpios y no deshilachados; no usar detergentes o sustancias corrosivas o abrasivas;... - Página 48 Tratar de realizar operaciones en el instrumento sin disponer de los conocimientos apropiados podría comportar riesgos para la seguridad de las personas. Se prohíbe al usuario o a laboratorios no autorizados realizar operaciones de reparación, mantenimiento y calibración en el instrumento. Toda manipulación realizada por terceros comportará inevitablemente la perdida de la garantía.
- Página 49 9. SOFTWARE POWERCOMPACT/STUDIO El software PowerCompact/Studio es un simple y práctico software de análisis de las campañas de memorización realizadas con el instrumento PowerCompact3020. El software es compatible con los sistemas operativos WINDOWS XP, WINDOWS VISTA, WINDOWS7 y para instalarlo es necesario ejecutar el archivo SETUP.EXE y seguir las indicaciones visualizadas en la pantalla del ordenador.
-
Página 50: Caracerísticas Técnicas
10. CARACERÍSTICAS TÉCNICAS PANTALLA: Dimensiones 68x68mm Tipo LCD dot matrix (gráfico) 128x128 FSTN negativo Retroiluminación Led blanco Idiomas Inglés - Español - Italiano - Alemán - Francés ALIMENTACIÓN: Cargador externo enchufable, entrada 100-240VCA ±10% 47-63Hz, con Alimentador externo toma intercambiable; salida 7,5VCC - 12W Paquete baterías 4 x AA NiMh 2100mAh Autonomía de carga de la batería... -
Página 51: Potencias
Canales 5 canales independientes Impedancia de la entrada 10KOhm Escalas Relación: 1-60000 Medida con pinzas amperométricas Valor máximo visualizable: 500KA Sensibilidad 0,2% del F.S. POTENCIAS Potencias por cada fase Valores < 999 GW,Gvar,GVA Potencias Totales Valores < 999 GW,Gvar,GVA CONTADORES DE ENERGÍA Valor máximo antes de restablecerse 99999999 kWh, kvarh, kVAh PRECISIÓN... -
Página 52: Composición Del Kit, Accesorios Y Repuestos
1 manual de usuario, n. 1 maletín El PowerCompact3020 puede disponer de una serie de accesorios, enumerados en la tabla siguiente, que amplían el uso para fines particulares o condiciones de medida menos frecuentes respecto a la estándar. Descripción accesorios opcionales... - Página 54 TABLE OF CONTENTS Pág. Introduction............................57 Introduction Safety ..............................57 Safety ........................57 Operator’s safety Instrument overview and connection to the electrical installation ............58 Instrument overview and connection to the electrical installation Power supply ........................59 Power supply USB port ..........................59 USB port Memory card ........................
- Página 55 5.2.7.1 Seral communication test ................71 5.2.7 Communication setup and test 5.2.8 Display setup ......................71 5.2.7.1 Seral communication test 5.2.9 Bottom bar setup ....................71 5.2.8 Display setup 5.2.10 Clock setup ......................72 5.2.9 Bottom bar setup 5.2.11 Device info ......................72 5.2.10 Clock setup 5.2.11 Device info Instrument use and consultation ......................
- Página 56 6.2.10.2 Inrush current setup..................93 6.2.10.1 Transients setup ................94 6.2.10.2 Inrush current setup 6.2.11 Measurements campaigns menu................94 6.2.10.3 Oscillo measures setup 6.2.11.1 Measurements campaigns ................. 95 6.2.11 Measurements campaigns menu 6.2.11.2 uSD content ....................95 6.2.11.1 Measurements campaigns 6.2.12 Extra functions menu ....................96 6.2.11.2 uSD content 6.2.12.1 Compact view .....................
-
Página 57: Introduction
PowerCompact3020 is a measuring tool designed for those in need of an accurate and easy-to-use product. It is aimed at both users who want to understand their systems better, and Energy Managers, system installers, electricians, and maintenance workers, for diagnosis and intervention, or for the provision of integral consulting services on electrical power. -
Página 58: Instrument Overview And Connection To The Electrical Installation
The symbol shown here on the right - when found on the product or elsewhere - means that the user manual must be consulted. 3. INSTRUMENT OVERVIEW AND CONNECTION TO THE ELECTRICAL INSTALLATION PowerCompact3020 has been designed to perform both real- time measures, both of prolonged measurement campaigns. It has therefore been equipped with special shock-resistant... -
Página 59: Instrument Overview And Connection To The Electrical Installation 3.1 Power Supply
(approximately) to prevent the batteries from going almost completely flat, in which case you will no longer be able to recharge them. If the battery runs out you will loose date and time. In this case, PowerCompact3020 alerts the user to set the correct date and time, with a display message "Set date and time". -
Página 60: Memory Card Keyboard
Do not remove the uSD card whilst a measurement campaign is being performed, as all data will be lost. 3.4. Keyboard The PowerCompact3020 keypad is equipped with 9 double-function keys, i.e. the function of each key varies depending on whether it is pressed once or pressed and held for approximately 3 seconds. -
Página 61: Keyboard Keyboard Commands
3.5. Keyboard commands FUNCTION Single pressure Pressure over 3” SWITCH ON/OFF Enter into VOLTAGES Enter into COUNTERS Enter into CURRENTS Enter into HARMONICS Enter into POWERS Enter into WAVES FORM Function “snapshot”: it freezes values at a certain time for a better analisys; it does not Enter into CAMPAIGNS stop measurements. -
Página 62: Keyboard Commands User Interface
3.6. User Interface For ease of use, PowerCompact3020 is equipped with a graphic LCD and a membrane keypad detailed above. The software architecture of the instrument is divided into MENUS, more specifically SETUP and MEASUREMENT Menus. Each menu consists of a number of pages, which are described further on. -
Página 63: Setup And Measurement Menus Bottom Bar
3.8. Bottom bar This área displays information regarding the status of the instrument and it can be customized by user via Setup. 3.8.1. Main bar Main bar shows global device informations: 1) Battery level 2) Micro SD inserted if highlighted or not In addition to the above information, the bottom bar will alternate between 3 parameters of the user's choice and indicate the yype of electrical connection selected by user through setup - 63 -... -
Página 64: Start-Up
A few seconds later it will show the page with the automatic detection of current probes. PowerCompact3020 is able to detect which current clamps are connected to its inputs and to configure itself accordingly, storing such data in the appropriate setup. -
Página 65: Setup
The user can always skip this check by pressing the button and directly accessing the landing page of voltage menu and subsequently accessing the setup menu of the amperometric clamps, to perform manual configuration required. Once completed the start-up and the clamp settings, system will move to the page of voltages. 5. -
Página 66: Connection Setup
= single-phase system 5.2.1.2. Type of voltage and voltage ratio setup for the main channel. PowerCompact3020 can measure both alternate and direct currents. The user must set the type of voltage to be analysed, selecting among AC (alternate) y DC (direct). -
Página 67: Zero Adjustment
5.2.1.5. Zero adjustment. After disconnecting the voltage and current input channels from the measuring grid, place the cursor on START and press to correct the offset, in case the latter has deviated. A page with numerical values will be displayed for the duration of the zero adjustment procedure (10-20”). When the procedure is complete, the system will automatically return to the CONNECTIONS SETUP page. -
Página 68: Counters Setup
5.2.3. Counters setup This page allows the user to: 1) Set the integration time, i.e. the time at which the average values and maximum demand are calculated. 2) Reset the counters and/or averages and/or Min/Max values by selecting the desired ones; when page will be left, the required parameters will be reset. -
Página 69: Alarm Setup
5.2.4.1. Alarm setup In the Alarm 1 or 2 configuration submenu, select OFF to disable the alarm or set the desired parameter to enable the alarm. The following parameters are available: Vrms 3F, Vrms L1, Vrms L2, Vrms L3, Irms 3F, Irms L1, Irms L2, Irms L3, Prms 3F, Prms L1, Prms L2, Prms L3, Qrms 3F, Qrms L1, Qrms L2, Qrms L3, Srms 3F, Srms L1, Srms L2, Srms L3, pf 3F, pf L1, pf L2, pf L3, thdv 3F, thdv L1, thdv L2, thdv L3, thdi 3F, thdi L1, thdi L2,... -
Página 70: Tariffs Setup
5.2.6. Tariffs setup. Chose the tariff band to be set by selecting it with the cursor. One selecting the tariff band, press to access the relevant configuration and reset submenú. This function resets the measurements previously performed (for all 4 tariffs). The following options are available: NEVER - 1 MONTH - 2 MONTHS - 3 MONTHS 5.2.6.1. -
Página 71: Communication Setup And Test 5.2.7.1 Seral Communication Test
5.2.7.1. Serial communication test Test communication page is helpful when connecting the instrument to a device to check if communication is correct, as well as to check if the instrument is working correctly. This field shows the current status (No communication, Comm. OK) or the type of error (Cecksum error, framing error, etc.) occurring during communication. -
Página 72: Bottom Bar Setup Clock Setup
5.2.10. Clock setup. This page allows user to set the date and time. The format is: DD/MM/YYYY 5.2.11. Device info Last Setup menu section is aimed to report main information concerning the device. Model, serial number and firmware versión are showed in this page. - 72 -... -
Página 73: Harmonics Menu Three-Phase Or Two-Phase Connection
6. INSTRUMENT USE AND CONSULTATION The PowerCompact3020 keypad allows user to access all the menus of the instrument directly, thanks to its practical function keys. Press the desired key to access the relevant menu. Use the arrow keys to scroll through the different pages of a menu. -
Página 74: Navegation Through Measurements Menus Measurement Menu
6.2. Measurement menu When switching on the instrument or exiting the Setup Menu, PowerCompact3020 displays the first page of the Voltages Menu. The menus have a loop-type structure, i.e. when the end of the last page is reached, the menu automatically returns to the first page. -
Página 75: Three-Phase Or Two-Phase Connection Single-Phase Connection
Average voltage levels (calculated on the basis of the integration time which has been set. Values can be reset). Minimum instant voltage values (Values can be reset). Maximum instant voltage values (Values can be reset). 6.2.1.2. Single-phase connection This page displays the RMS voltage, maximum, average and minimum value, and frequency, and the relevant currents. -
Página 76: Auxiliary Channel Current Menu
6.2.2. Current menu 6.2.2.1. Three-phase or two-phase connection The first page of this menu displays the currents in each phase, as well as in the three- phase current (or two-phase current, depending on the electrical connection) and corresponding voltages. When scrolling through the pages, the following pages will be displayed. Neutral current or, in general, 4th current channel. -
Página 77: Three-Phase Or Two-Phase Connection Single-Phase Connection
Load peaks, i.e. the highest average current (calculated on the basis of the integration time set. Values can be reset). 6.2.2.2. Single-phase connection This page displays the RMS current, maximum, average and minimum value, and maximum demand (load peaks are calculated on the basis of the integration time set), and the relevant voltages. - Página 78 Reactive power (Var) in each phase and in the three-phase (or two-phase) connection and the corresponding PF values. NOTE: as a norm, reactive power is shown as a negative when capacitive and a positive when inductive. Apparent power (VA) in each phase and in the three-phase (or two-phase) connection and the corresponding PF values.
-
Página 79: Three-Phase Or Two Phase Connection Single-Phase Connection
Load peaks and relevant PF, i.e. the highest average power (calculated on the basis of the integration time set. Values can be reset). If Grid Type is set to UPS 3-3 or UPS 3-1 the efficiency page will be shown reporting following realtime values: Pin: instantaneous power entering the UPS Pout: instantaneous power exiting from UPS... -
Página 80: Single-Phase Connection Auxiliary Channel
Maximum instant values of power and PF (values can be reset). Load peaks of power and PF, i.e. the highest average values (calculated on the basis of the integration time set. Values can be reset). 6.2.3.3. Auxiliary channel On any of the Power Menu pages, press to access a series of pages containing all the information regarding auxiliary channel power. -
Página 81: Auxiliary Channel Counters Menu
Maximum instant values of power and PF (values can be reset) related to the auxiliary channel. Load peaks and relevant PF, i.e. the highest average power (calculated on the basis of the integration time set. Values can be reset) related to the auxiliary channel. - Página 82 The counters of the active power generated (-kWh) in each phase and in three- or two- phase connections. The counters of the reactive power generated (-kVarh) in each phase and in the three- or two-phase connections. The average PFs calculated as kWh/kVAh ratio (only the real part of the counters is taken into account;...
-
Página 83: Three-Phase Or Two-Phase Connection Single-Phase Connection
The kVArh generated during the various time bands. The cost of the kWh absorbed during the various tariff bands, expressed in the currency selected in the Setup Menu. The income expressed in the set currency unit of the kWh generated during the different tariff bands. - Página 84 The kVArh absorbed during the various time bands. The kWh generated during the various time bands. The kVArh generated during the various time bands. The cost of the kWh absorbed during the various tariff bands, expressed in the currency selected in the Setup Menu. The income expressed in the set currency unit of the kWh generated during the different tariff bands.
-
Página 85: Singles-Phase Connection Auxiliary Channel
6.2.4.3. Auxiliary channel On any of the Counters Menu pages, press to access the page containing all the information regarding auxiliary channel counters. In the AUX Menu, the user can also access the other Auxiliary Channel Menus (Voltages, Currents, Power, Harmonics, Waveforms) by selecting them with the relevant function keys. - Página 86 This page display the K factors of the phases. This page displays the harmonic histogram of the voltage and current of phase L1. Press to access the function for selecting and scrolling through the single harmonics. Press to select each single harmonic of the histogram (up to the 50th) and check the relevant RMS values.
-
Página 87: Single-Phase Connection
6.2.5.2. Single-phase connection THD% (Total Harmonic Distortion) for voltage and current, Cos value and relevant angle expressed in degrees (the negative sign indicates that current comes before voltage and that the load is capacitive). K factor Harmonic histogram of current and voltage. to access the function for selecting and scrolling through the single Press harmonics. -
Página 88: Auxiliary Channel Waveforms Menu
Harmonic histogram of auxiliary voltage and current. Press to access the function for selecting and scrolling through the single harmonics. Press to select each single harmonic of the histogram (up to the 50th) and check the relevant RMS values. Press again to return to the function that allows you to scroll through the pages of the Harmonics Menu. -
Página 89: Auxiliary Channel Snapshot Function
Neutral current waveform and relevant RMS value (only in three-pase and two-phase connections). 6.2.6.2. Auxiliary channel On any of the Waveforms Menu pages, press to access the auxiliary channel tracing page. In the AUX Menu, the user can also access the other Auxiliary Channel Menus (Voltages, Currents, Power, Counters, Harmonics) by selecting them with the relevant function keys. - Página 90 These pages display the last 5 interruptions recorded (if any occurred). NOTE: according to Standard EN50160, an "interruption" is defined as the simultaneous drop of all phase voltages below 5% of nominal V. However, a different threshold may be set by the user. The Start Date and Time and Duration of each interruption are displayed.
-
Página 91: Alarms Menu
6.2.9. Alarms menu This menu stores and displays the last 5 alarms to go off. The menu automatically displays the page of the most recent alarm. Each alarm is identified by: start date and time type of parameter that exceeded the thresholds set value of the parameter which caused the alarm to go off duration of the event. -
Página 92: Transients Setup
In detection modes with storage on USD, it is necessary that the date and time are set correctly. If they are not, the PowerCompact3020 prevents the initiation of the detection, displaying the message “Set date and time”. -
Página 93: Inrush Current Setup
If transient is detected, event graph is displayed with following information: Channel(s) in which the transient has occurred. Transient waveform. Relevant peak value. To scroll through the transients that occurred at the same time as the one being displayed, use the keys. -
Página 94: Inrush Current Setup
6.2.10.3. Oscillo measures setup By selecting the Oscillo function the device shows the Oscillo setup measure menu: inputs to be measured: Currents or Voltages and frequency. duration of the measure: 1 sec, 2 sec, 5 sec or 10 sec. start measure. -
Página 95: Measurements Campaigns Menu 6.2.11.1 Measurements Campaigns
6.2.11.1. Measurements campaigns Select "Start Campaign" to view the Measurement Campaign configuration page. The following parameters can be set: campaign name. Press to access a page with an alphanumeric keypad in order to enter the desired name. storing rate. The following options are available: 1” - 5” - 30” - 1’ - 5’... -
Página 96: Extra Functions Menu
6.2.12. Exta functions menu This page will display the following funtions: compact view of the system data phasor diagram of the system realtime counters efficiency between main and auxiliary channel 6.2.12.1. Compact view This page displays the values of the main parameters of the main channel. Press to access the page with the values of the main parameters of the auxiliary channel. -
Página 97: Realtime Counters
NOTE: in case of UPS 3-1 or UPS 3-3, refer to Power measurement pages to get the proper efficiency ratio related to the selected connection. 7. CONNECTION SCHEMES This chapter resume main usual connection schemes that can be applied to PowerCompact3020 analyzer. - 97 -... - Página 98 - 98 -...
- Página 99 - 99 -...
-
Página 100: Maintenance
8. MAINTENANCE PowerCompact3020 requires basic maintenance according to common rules that apply to any electronic device: Clean the instrument with a soft and clean cloth (the edges must not be frayed); Do not use detergents or corrosive or abrasive substances;... -
Página 101: Accuracy Check Repair
8.2. Repair. PowerCompact3020 is a sophisticated electronic product.. Any attempt to repair the instrument without the necessary know-how may pose a safety risk. Therefore, no unauthorised personnel or laboratories should carry out repair, maintenance or calibration operations. The warranty shall no longer be valid if the instrument is tampered with by third parties. -
Página 102: Powercompact/Studio Software
9. POWERCOMPACT/STUDIO SOFTWARE PowerCompact/Studio Software is a powerfull and versatile analysis tool of the measurement campaigns performed with PowerCompact3020. The software is compatible with WINDOWS XP, WINDOWS VISTA, WINDOWS7 operating systems and it is necessary to execute the file SETUP.EXE and follow the instructions displayed in the screen in order to install it. -
Página 103: Technical Specifications
10. TECHNICAL SPECIFICATIONS DISPLAY: Dimensions 68x68mm Type 128x128 FSTN Negative dot matrix graphic LCD Backlight White LED Languages English - Spanish - Italian - German - French POWER SUPPLY: wall-plug switching; input 100-240VAC ±10% 47-63Hz with External power supply interchangeable plug; output 7.5VDC - 12W Battery pack 4 x AA NiMh 2100mAh Duration of the battery charge... - Página 104 Channels 5 independent channels Input impedance 10KOhm Scales Ratio: 1-60000 Measurement with current clamps Maximum value which can be displayed: 500KA Sensitivity 0,2% of F.S. POWERS Single phase power Values < 999 GW,Gvar,GVA Total power Values < 999 GW,Gvar,GVA POWER COUNTERS Maximum value before reset 99999999 kWh, kvarh, kVAh ACCURACY...
-
Página 105: Package Content
1 calibration certificate, n. 1 instruction manual, n. 1 carrying case The PowerCompact3020 may be equipped with different accessories, listed in the following table, that extend the use for particular purposes or measurement conditions less frequent than the standard. Description optional accessories... - Página 106 ASIA-PACIFIC TAIWAN CHINA Flat 4-1, 4/F, No. 35, 72 Puxing East Road, Qingxi, Section 3 Minquan East Road Dongguan Guangdong, Taipei, Taiwan China Tel: +886 2-2508-0877 Tel: +86 769-8190-1614 Fax: +886 2-2506-6970 Fax: +86 769-8190-1600 info.apac@mgl-intl.com info.apac@mgl-intl.com AMERICA MEXICO 760 Challenger Street Brea, 2810 Coliseum Centre Drive, Calle Poniente 122, No.